Attack Detection Fundamentals: Discovery and Lateral Movement - Lab #3
By Alfie Champion on 8 July, 2020
In the third part of WithSecure Consulting's Attack Detection Workshop series, covering Discovery and Lateral Movement, we explored a number of offensive techniques for discovering assets of value, be that users or file shares, and methods for moving between compromised hosts.
We also explored the detection strategies that can be employed to spot these using our own detection stacks. As with previous workshops, the following blog provides a third step-by-step guide to recreating the demos from that Discovery and Lateral Movement workshop, as well as exercises to further the reader's understanding of the concepts shown.
A recording of the workshop can be found here.
In the previous two labs, we’ve looked at suspicious LDAP queries using telemetry from ETW and looked at ways we can put object access logs to work to detect enumeration of file shares. We’ve focused on Discovery so far, but now we’re going to look at a means for lateral movement by pivoting through the aptly named “c3” file share we found last time. Admittedly this isn’t a common technique when compared to techniques such as PsExec or WMI, but it’s a good segway into our lateral movement exercises, highlights another application of our 5145 events and hey, it should make for a fun lab!
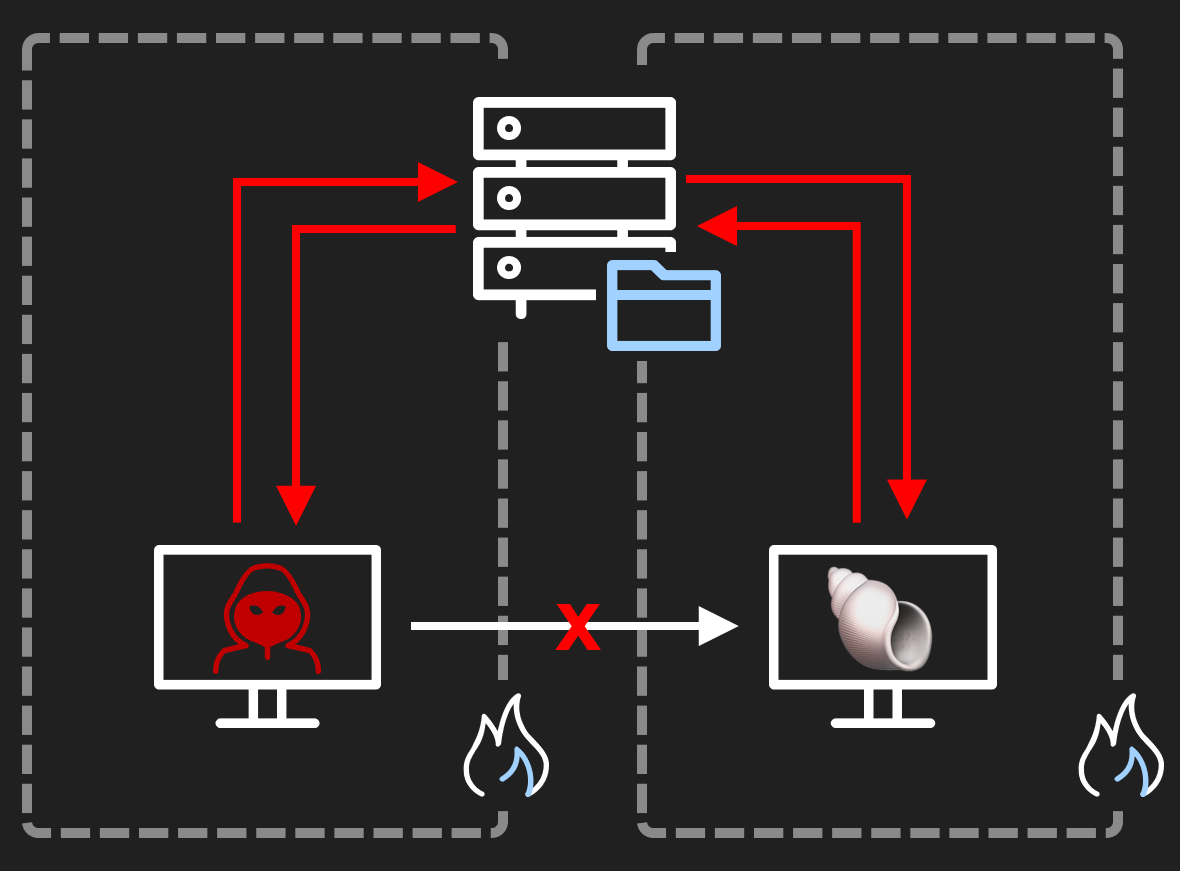
In our lab environment, things are pretty ‘flat’ from a networking perspective, with all our hosts able to talk to each other. In more segregated environments though, file shares can often be exposed to hosts that otherwise would have no means of communicating, and this is where tools like C3 can be useful.
We’re going to use C3 for this lab, and explore a few strategies for detection. Firstly, we’ll look at the file share access logs as before, to see what traces we observe. After that we’ll make use of a new ETW provider, Windows Kernel Trace, and see if we can spot our Grunt being launched in-memory. We’ve talked about ETW and Ruben’s SilkService tool before, so we won’t cover that again. Here’s the SilkService config XML we’ll use this time:
 <SilkServiceConfig>
    <ETWCollector>
              <Guid>870b50e1-04c2-43e4-82ac-817444a56364</Guid>
              <CollectorType>kernel</CollectorType>
              <KernelKeywords>ImageLoad</KernelKeywords>
              <FilterValue>Image/Load</FilterValue>
              <OutputType>eventlog</OutputType>
    </ETWCollector>
</SilkServiceConfig>
Our “FilterValue” in this case ensuring that we only log “Image Load” (and unload) events.
References
- SilkETW and SilkService
- Covenant
- Threat Hunting with ETW and HELK
- Microsoft ETW Introduction and Overview
- C3 - Walkthrough
- Countercept's Hunting for C3
DISCLAIMER: Set up of the tools and the testing environment might not be covered comprehensively within this lab. We will assume basic familiarity with Linux/Windows command line and the ability of the reader to deploy the necessary frameworks. For that, it is recommended to follow the suggested references for the official tutorials and walkthrough published by the framework's author.
Required Tools
- Active Directory domain with at least one DC and workstation
- HELK (optional)
- SilkService
- C3
- Covenant
- Process Hacker
Walkthrough
1 – Environment Setup
In the previous lab, we used SharpShares to identify the “c3” file share that we configured on our DC2 host.
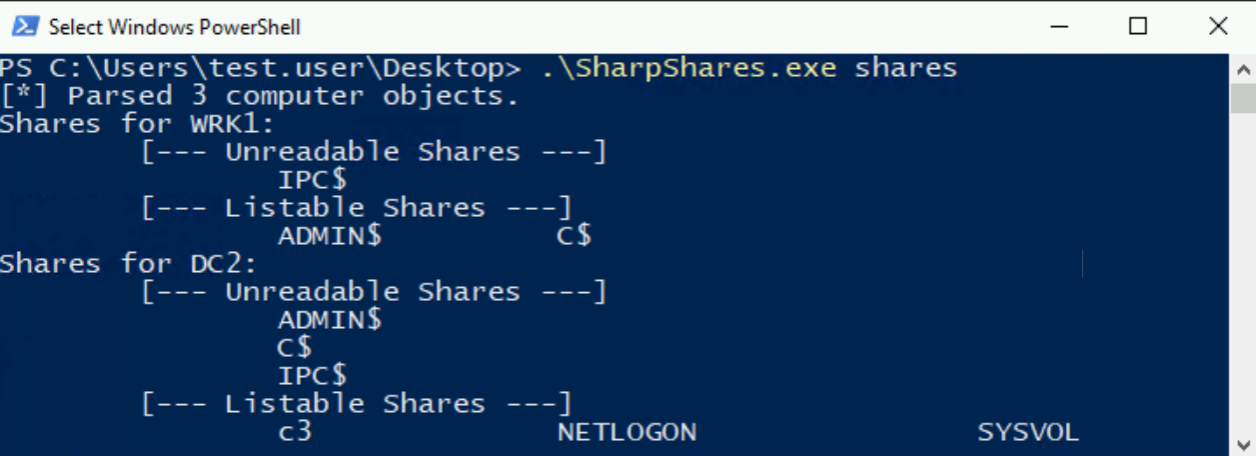
Now, as this share was configured to give “Everyone” “Read/Write” permissions, it’s (conveniently) a prime candidate for pivoting, as multiple compromised users can read and write messages to it.
2 – C3 and Covenant
We won’t cover the initial setup of C3 as there are already comprehensive blogs on the topic. But, we’ll briefly cover the integration of C3 with Covenant so we can launch and communicate with Grunts through our file share (more operational details can be found here).
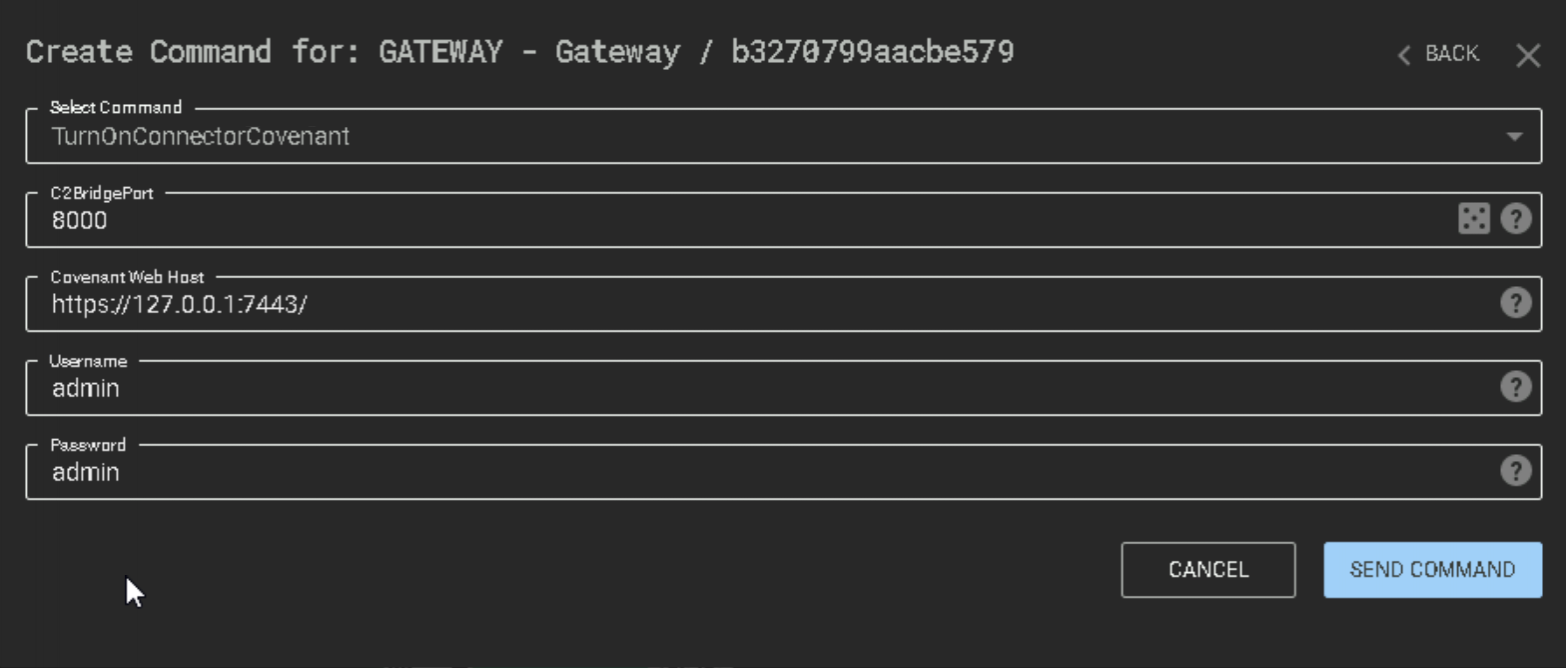
For the purposes of this lab, we’re running both the Covenant C2 server and C3 on the same host. With Covenant already running, launch a C3 gateway and run the “TurnOnConnectorCovenant” command. You can see from the below, we’re using a local 127.0.0.1 address in the “Covenant Web Host” field, and we’re entering the super secure “admin:admin” credentials we initial set for our Covenant server.
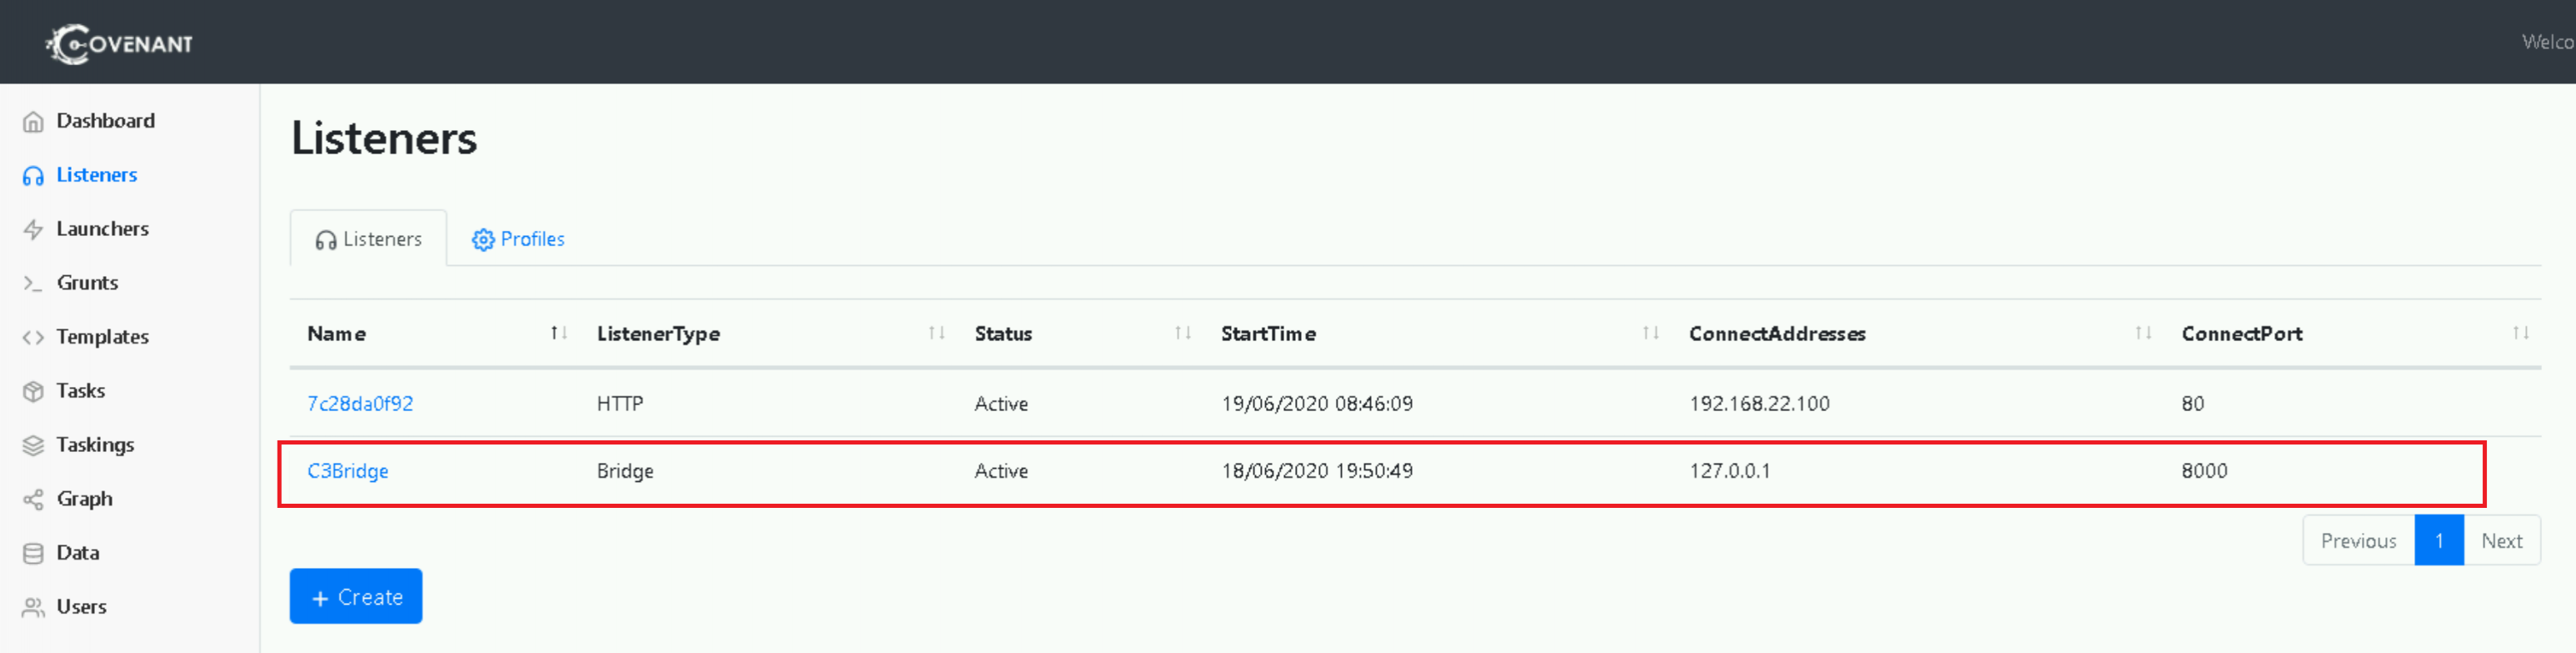
If the command succeeds we should see a notification in Covenant and “C3Bridge” added to our available listeners.
The C3 UI should also display the connection as below.
NOTE: In a real-life scenario, we would have already obtained an initial foothold on a host and would be using our file share pivot to move further into the network. For this lab though, we’re going to simplify things slightly and have our attacker host (i.e. the one running Covenant and C3) talk directly to the exposed file share. To achieve this, we’re going to need to first establish access to the file share on our Windows attacker host. In an Explorer window, browse to the UNC path of our share, e.g. \\DC2\c3. Enter some domain user credentials and ensure that you have access from the attacker host.
With access confirmed, we can create a Negotiation channel in C3 (descriptions of channel types available can be found on the C3 blog). Select the “AddNegotiationChannelUNCShareFile” command, leave the “Negotiation Identifier” as the default value, and enter the UNC path to our “c3” share.
There’s two things to note here. Firstly, our path is using an IP address not a hostname. This is specific to our lab environment in which our attacker host cannot communicate with the target environment DNS servers to resolve any names. In a real scenario, a hostname would be fine here. Secondly, we’re specifying a “testing” folder in our path. This is just an arbitrary-named folder within the “c3” share that we’re going to have our messages written to.
If all goes well here, we can observe the “testing” folder created in the “c3” share.
Now, we’re ready to create a Relay. Like the Beacons, Grunts, Zombies etc. that we’ve seen before, Relay is C3’s implant.
Select the channel in C3 (the eye icon), click “New Relay” from the “Interface Options” drop-down in the top right.
You’ll notice that the bottom half of the window is prepopulated with our UNC channel details. All we need to do here is specify the name for the Relay and the output format and architecture we want. For our purposes, we can stick with the default 64-bit executable option. Click “Create and Download Relay” and move the downloaded executable to our workstation host.
At this point, we have our C3 gateway setup, it’s connected to our Covenant server, and it’s established a means of communicating through our UNC file share. If we now launch the Relay executable on our workstation, we should see the C3 graph update to include the foothold we’ve just obtained!
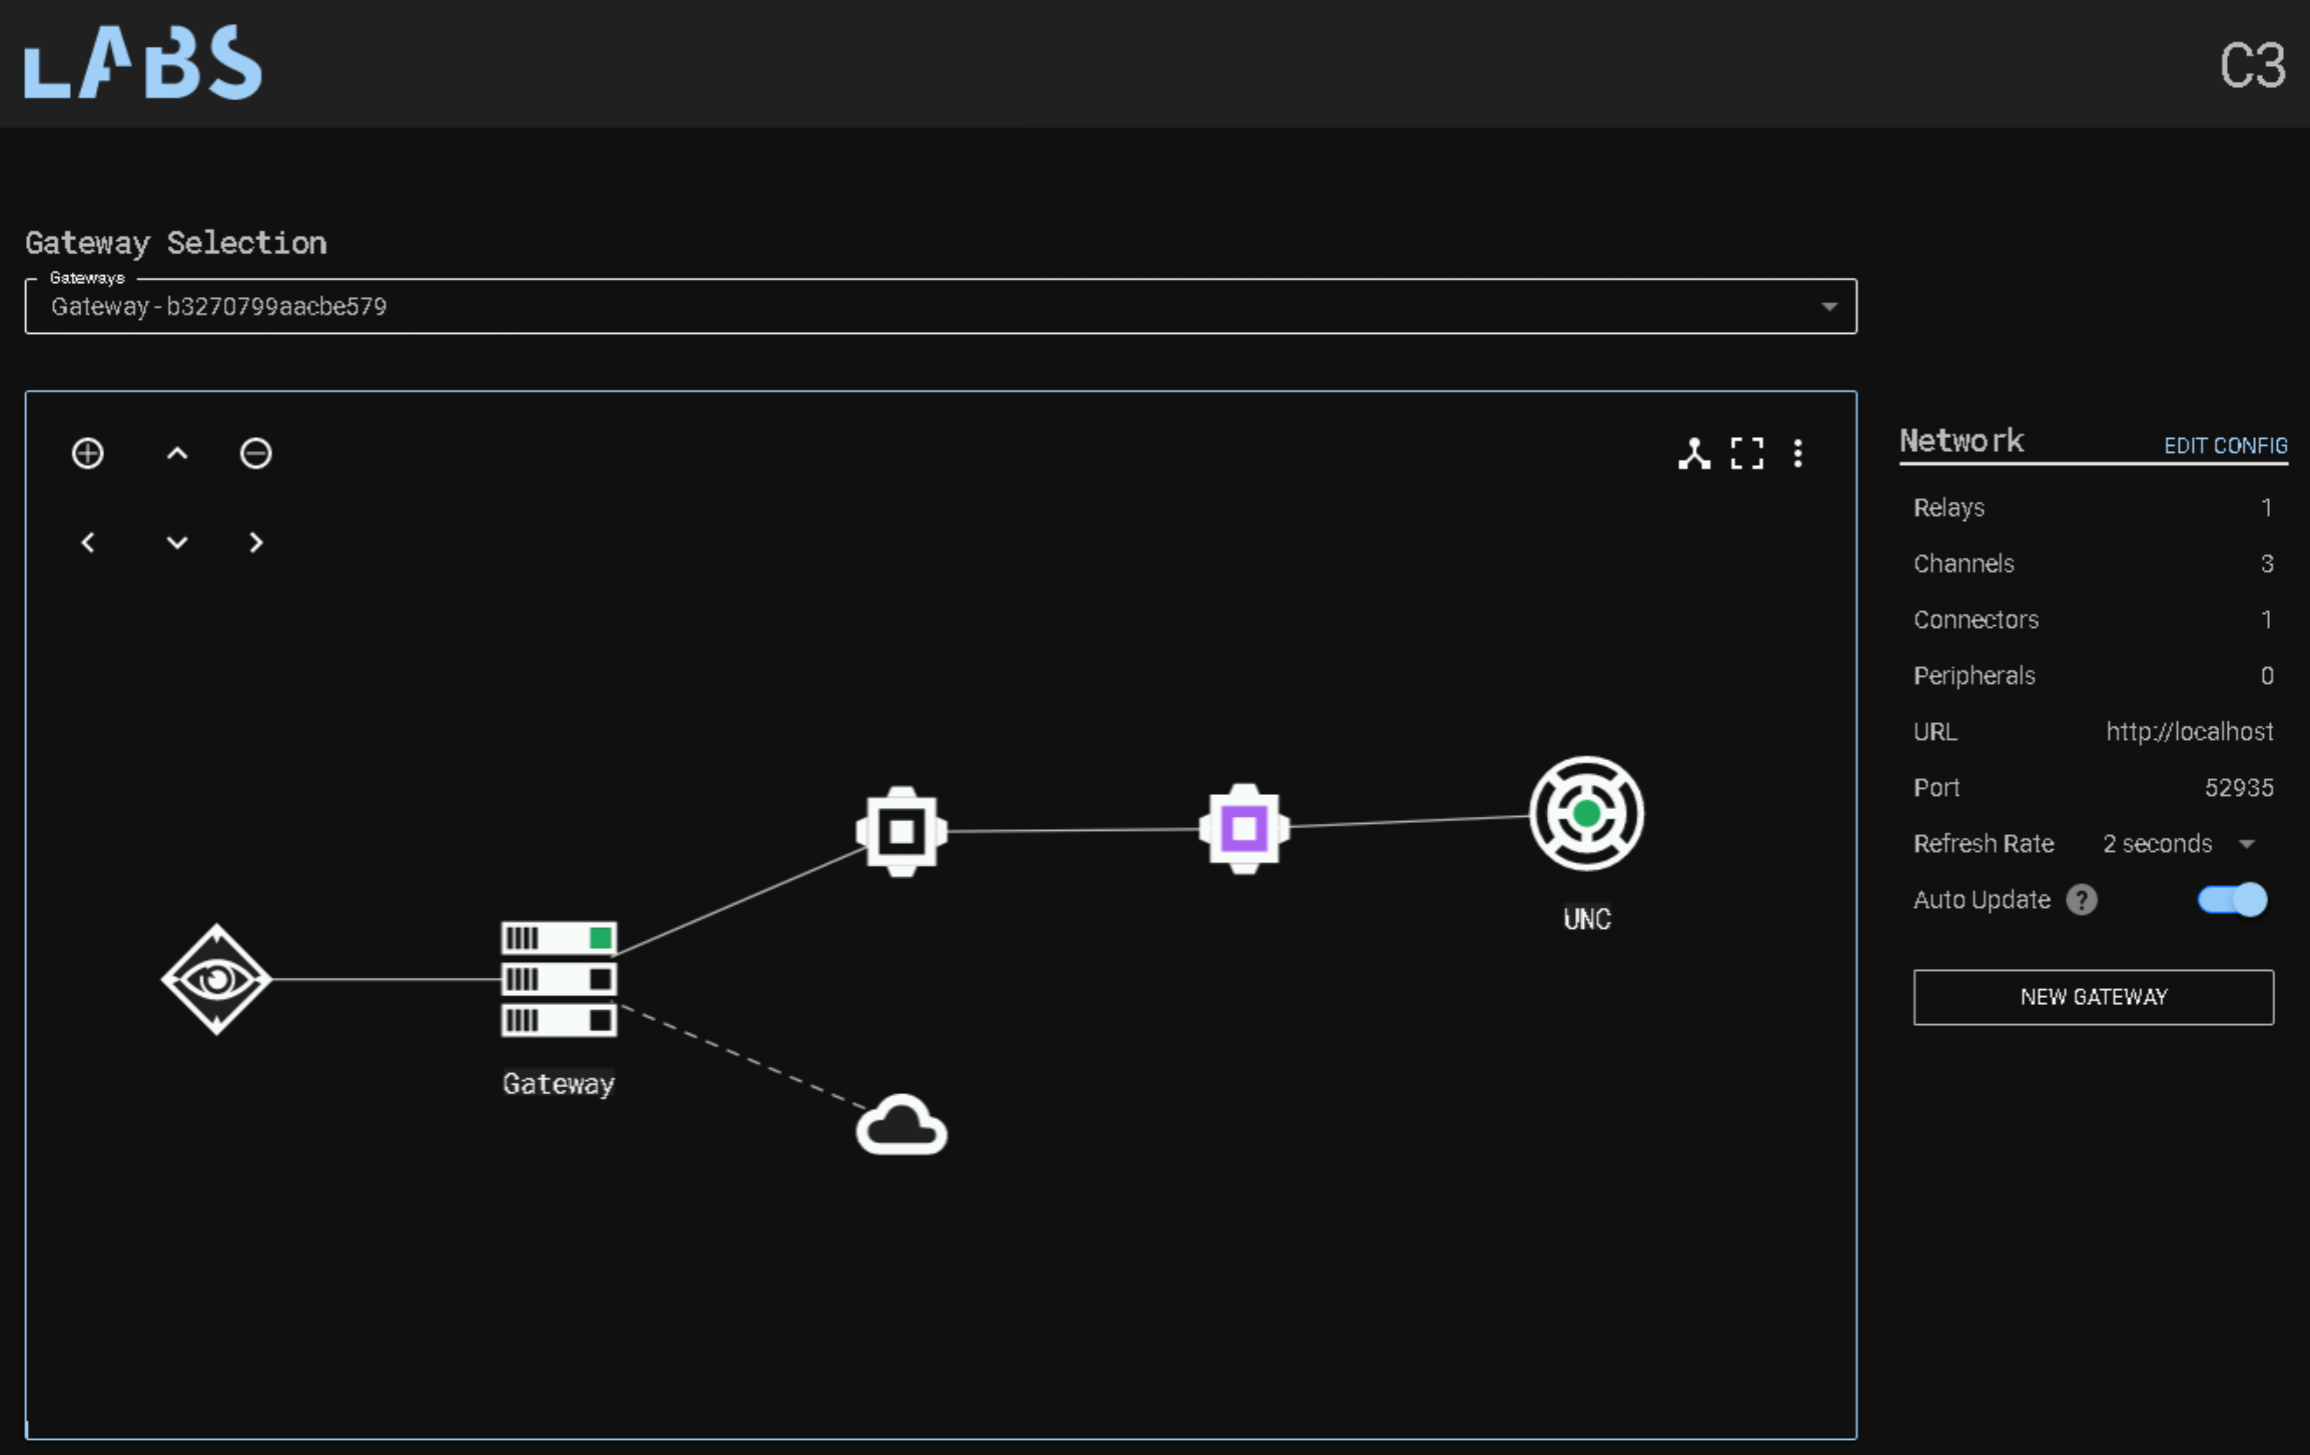
So now, all the communication between our target workstation and the attacker host is being sent through our exposed file share.
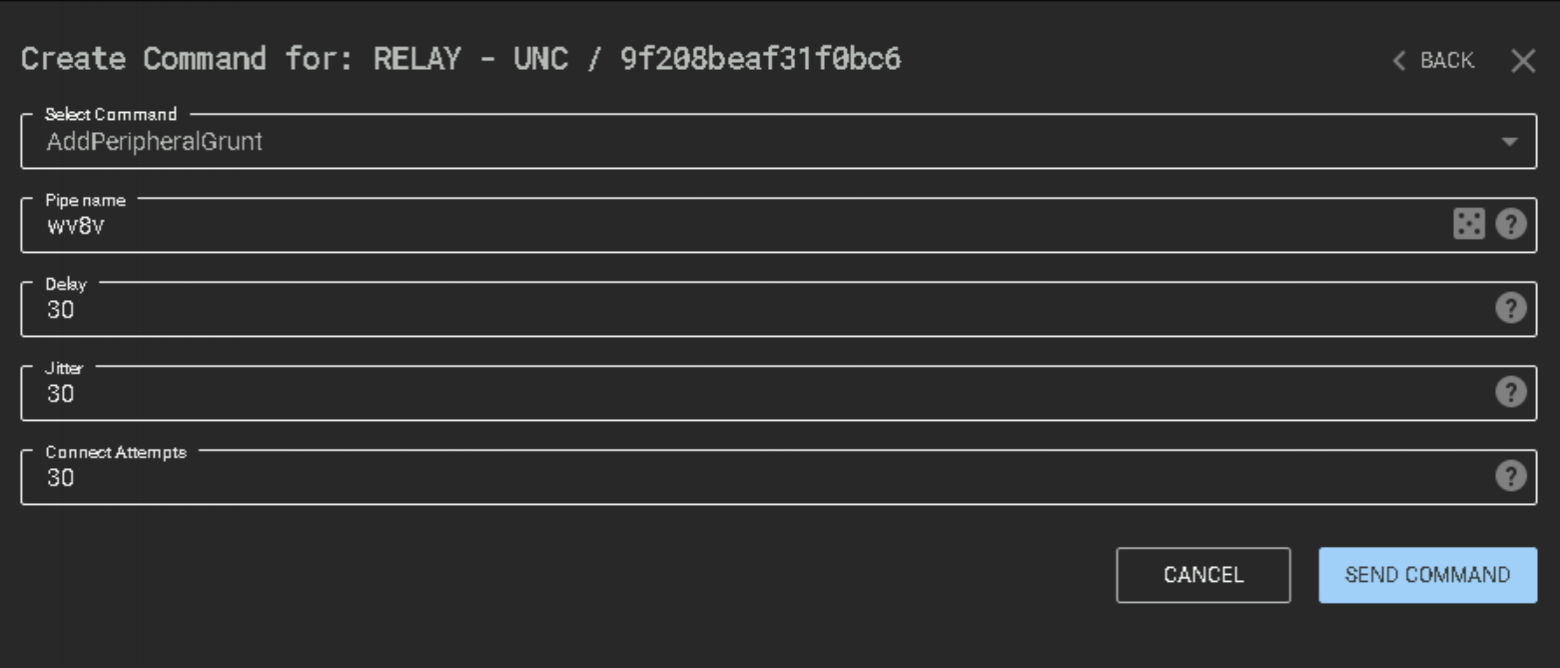
That’s cool in itself I think - but C3’s focus is, as it’s name suggests, on command and control. We’re going to need to utilise additional tooling to capitalise on the foothold we’ve obtained. This is where Covenant steps in. With the setup we completed previously, we can now add what C3 terms a “Peripheral” to the Relay. Click the UNC relay and select the “AddPeripheralGrunt” option from the command list. For this lab, all the displayed options can remain default.
If we return to the Covenant dashboard, we should see a Grunt check in!
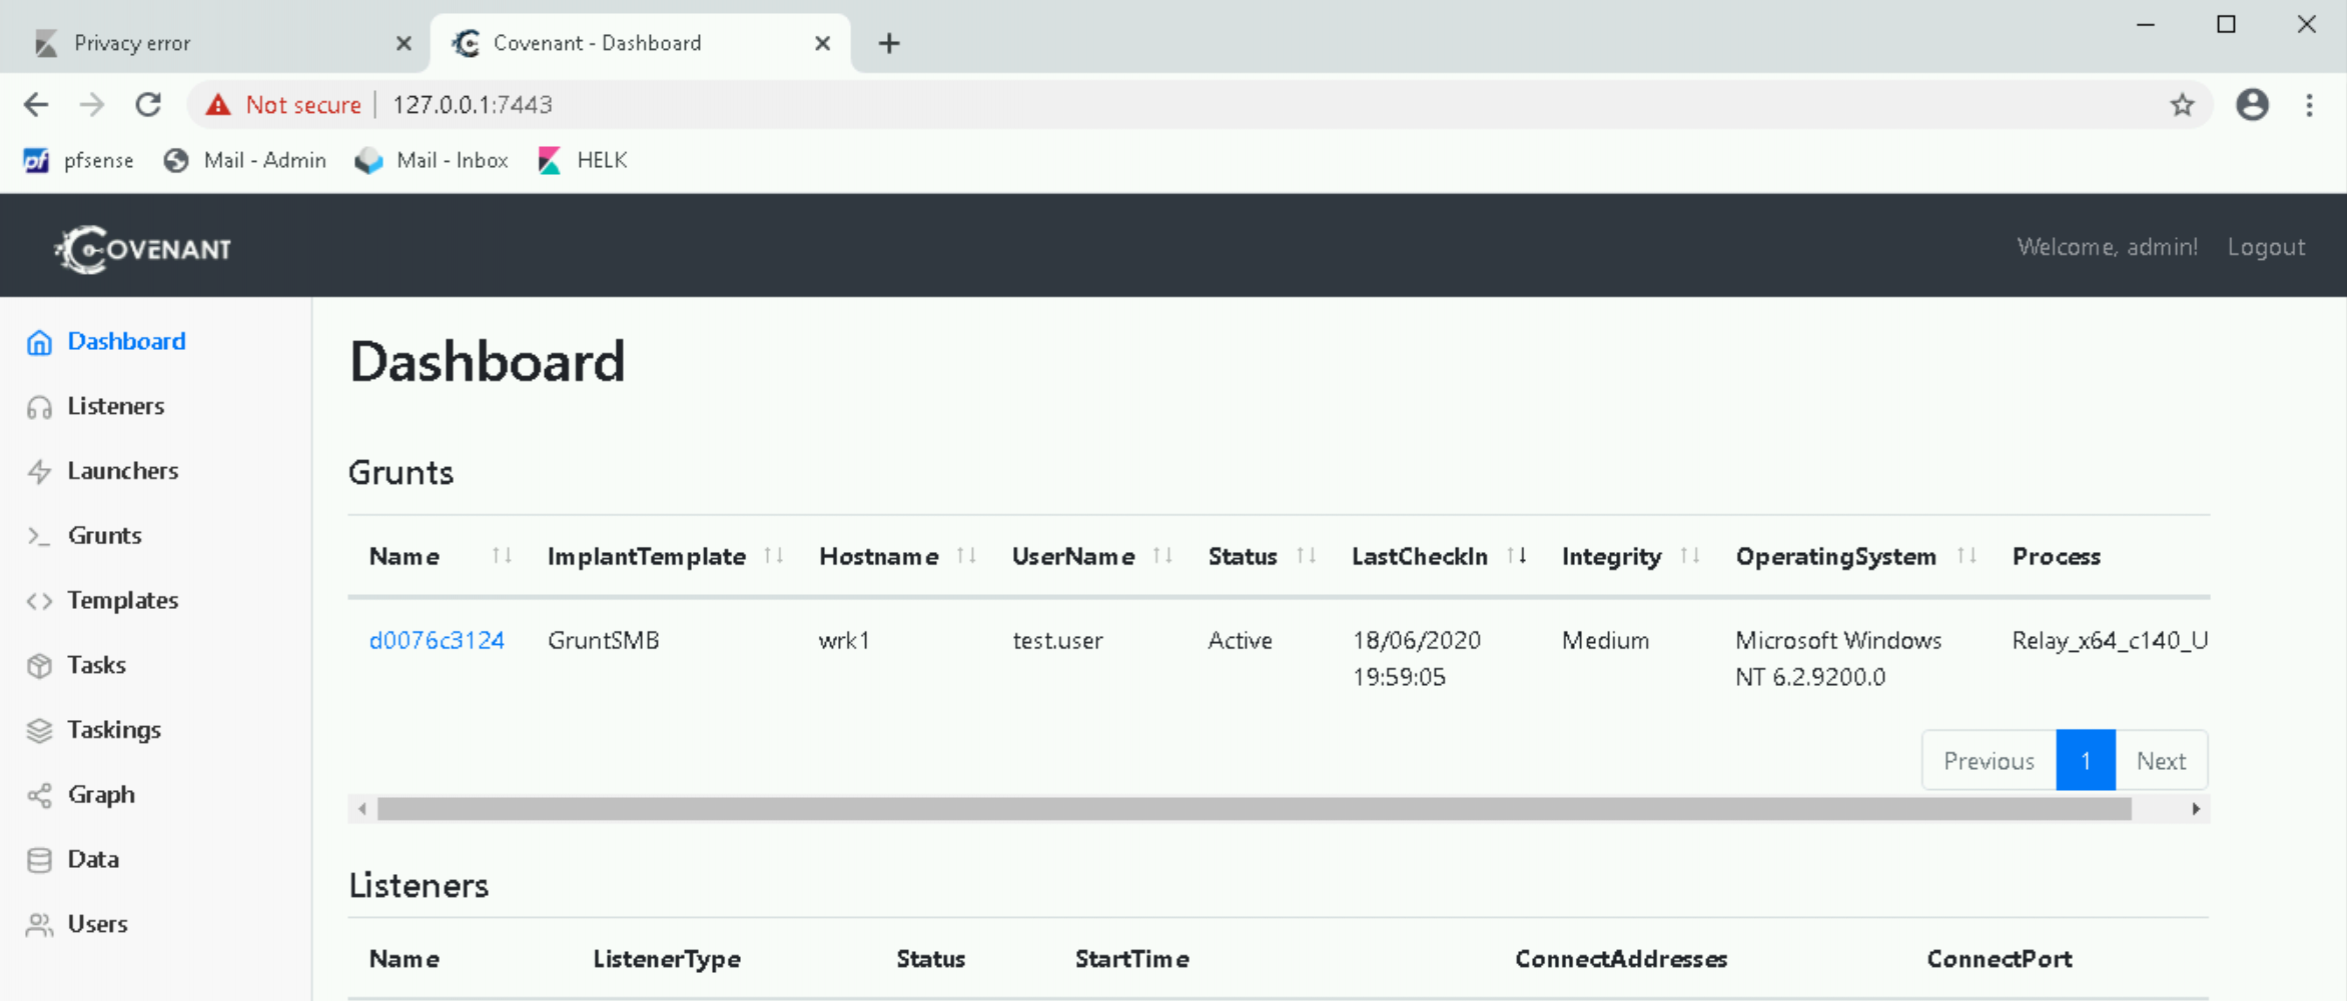
You’ll notice here that the “ImplantTemplate” is displayed as GruntSMB. This gives us a clue as to what has happened under the hood. The C3 blog covers much of this, but at a high-level, when we selected the “AddPeripheralGrunt” command, we made an API request to Covenant to return us a Grunt that communicates over a pipe with a specified name (“wv8v” in the above screenshot). The Grunt shellcode is then injected into the Relay process (at the time of writing, this is a CreateThread API request, much like we saw in our SharpShooter example in the very first workshop!). The Relay can then communicate over this named pipe to the Grunt to allow us to interact with it (you can see the code for this here and here).
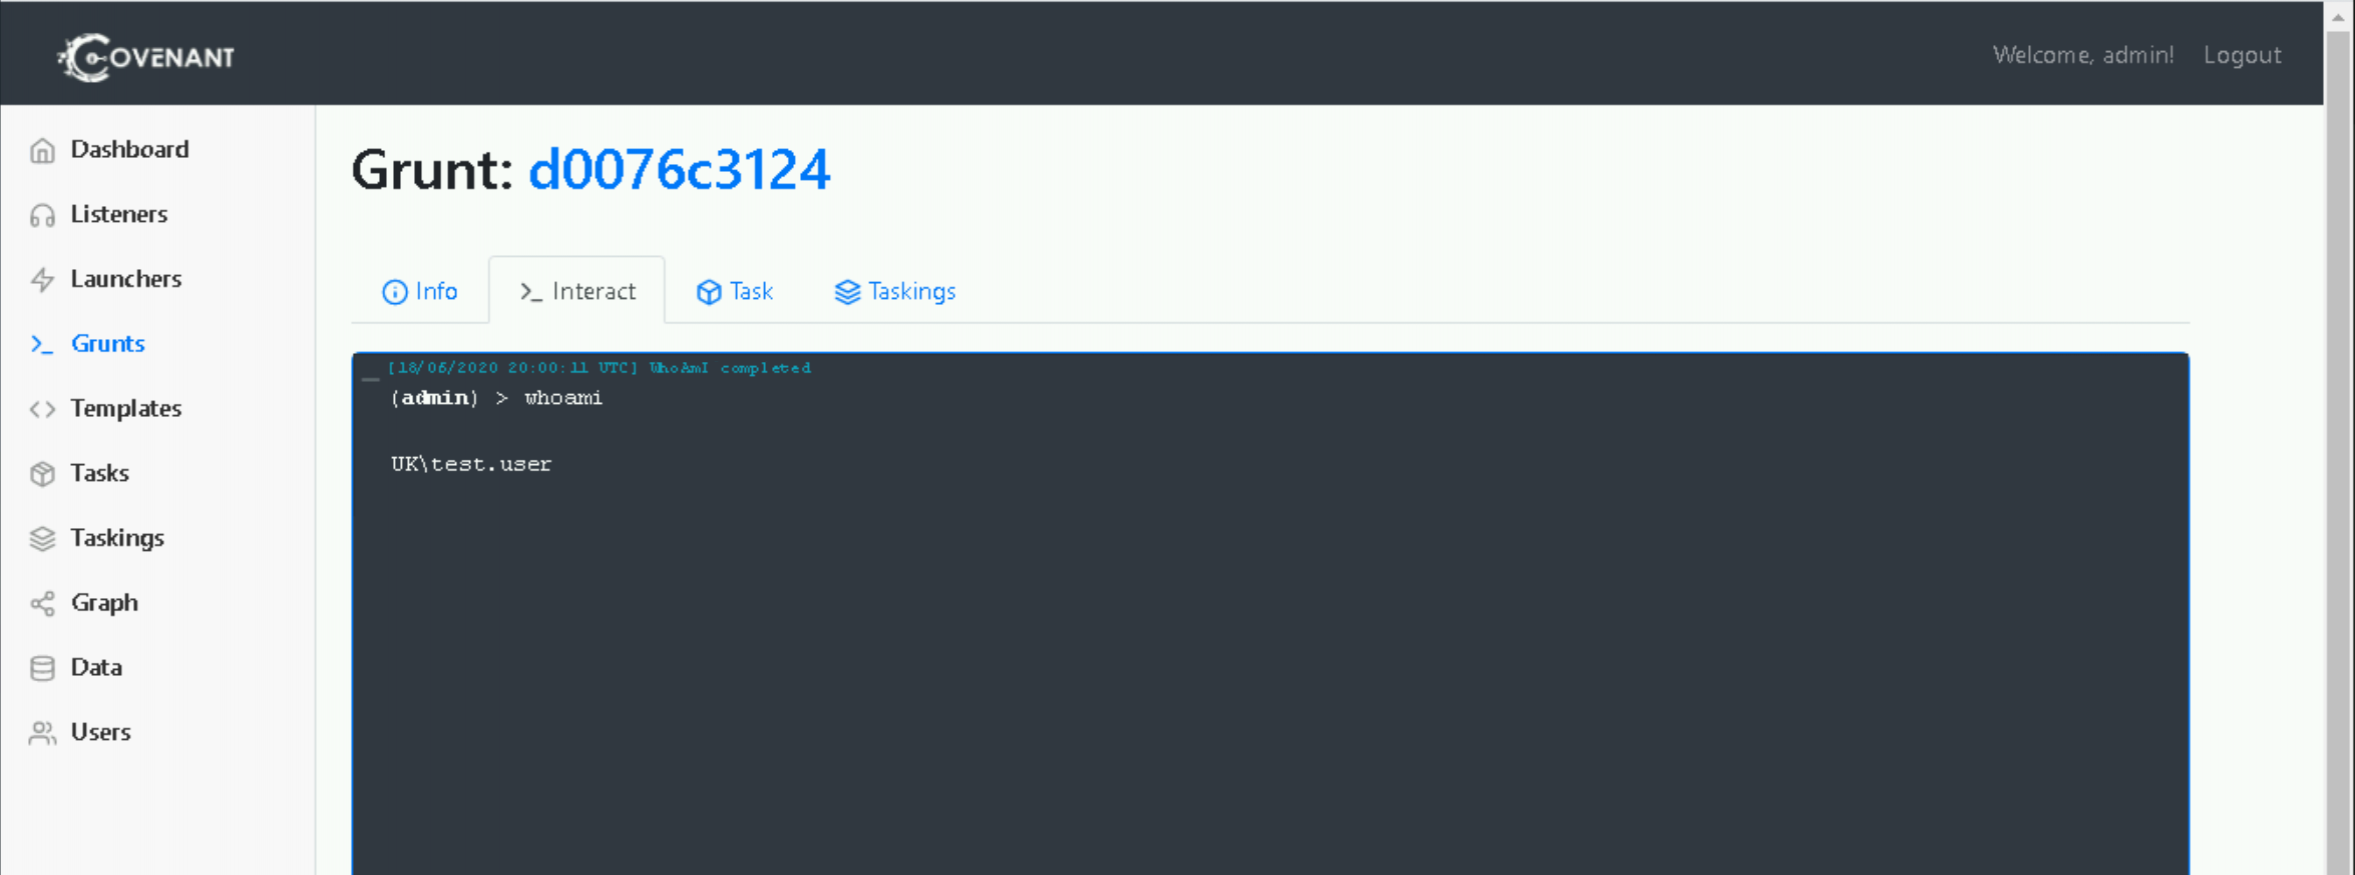
From here, we can execute tasks with the Grunt, just as we’ve done previously!
3 – File Share Auditing
So, we’ve established a means of pivoting between hosts using our file share, and we’ve used this access to deploy a Grunt to our target host. In terms of detection opportunities, let’s first see what we can observe with the object access logs we’ve used previously. Filtering for 5145s on our file share, we can see the following:

The first thing to note is the file naming convention we observe in the “ShareRelativeTargetName” field of our 5145s. We can see the use of randomised file names and “.lock” files, potentially signifying that the equivalent file without the “.lock” suffix is still being written to. If we check out the UNC channel code, we can see that our hypothesis is correct:
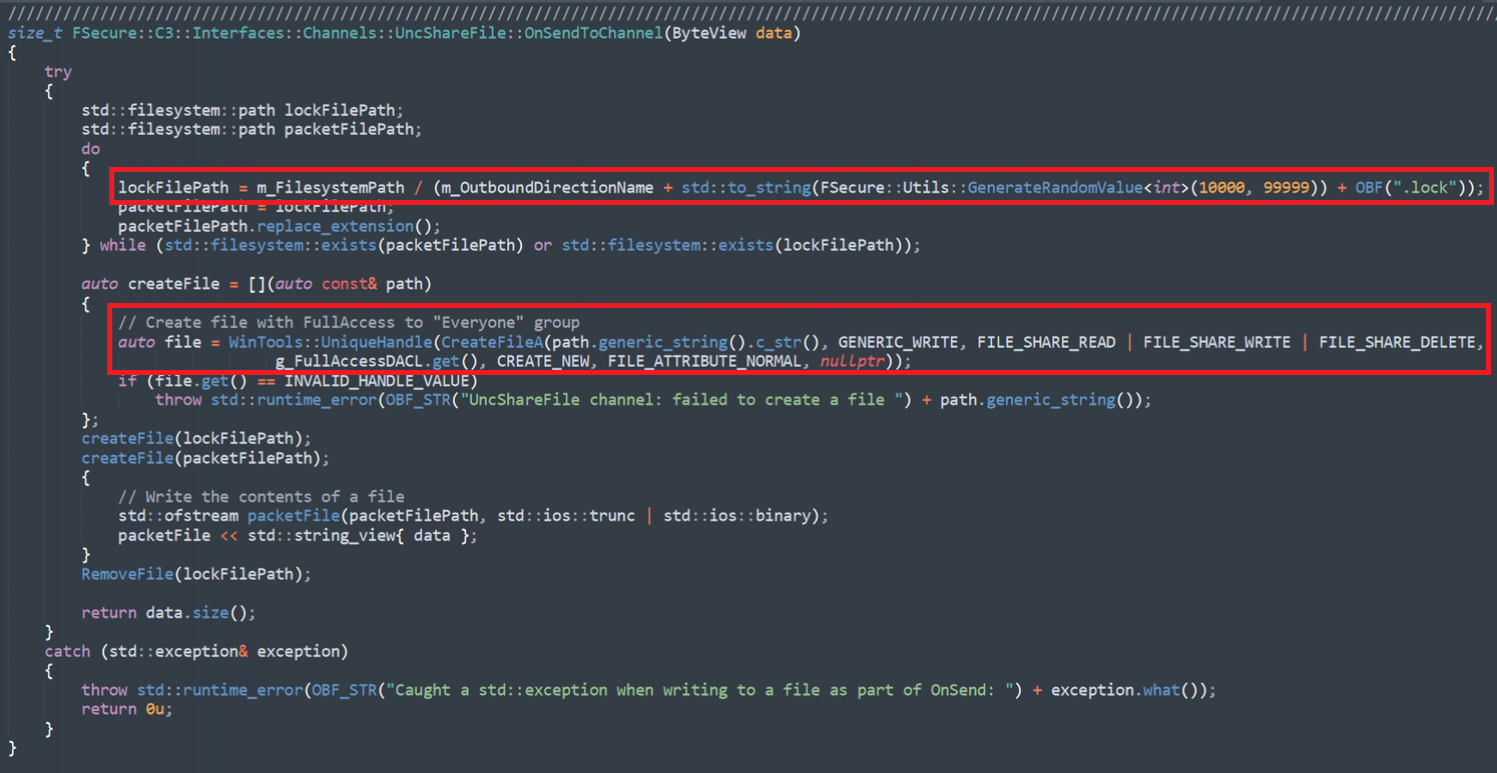
We can also get some idea of the flow of communication flow if we turn our attention to the “ObjectAccessMaskRequested” field. Two notable masks are below (we can see details of these from Microsoft here):
- 0x2
- 0x100081
The first of these is a WriteData or AddFile mask, relatively self-explanatory. The latter is an aggregation of a few masks, namely:
- 0x100000 - SYNCHRONIZE – This gives us the ability to use the object for synchronization. This enables a thread to wait until the object is in the signaled state.
- 0x80 – ReadAttributes.
- 0x1 – ReadData or ListDirectory.
There’s also a 0x110080 mask which includes a DELETE mask – so our C3 channel can tidy up after itself!
Reading through this, it should become clear that we’re looking at something resembling the send and receive components of the channel.
Knowing this is a effectively a command and control channel, we can make the assumption that we’ll see a fairly regular polling of our file share with the 0x100081 access mask (on both sides), as both the C3 Gateway and the Relay await something to do.
To better articulate this, in the screenshot below, you can see that we’ve filtered our traffic to just one side of the conversation. The source IP is set to our attacker host.
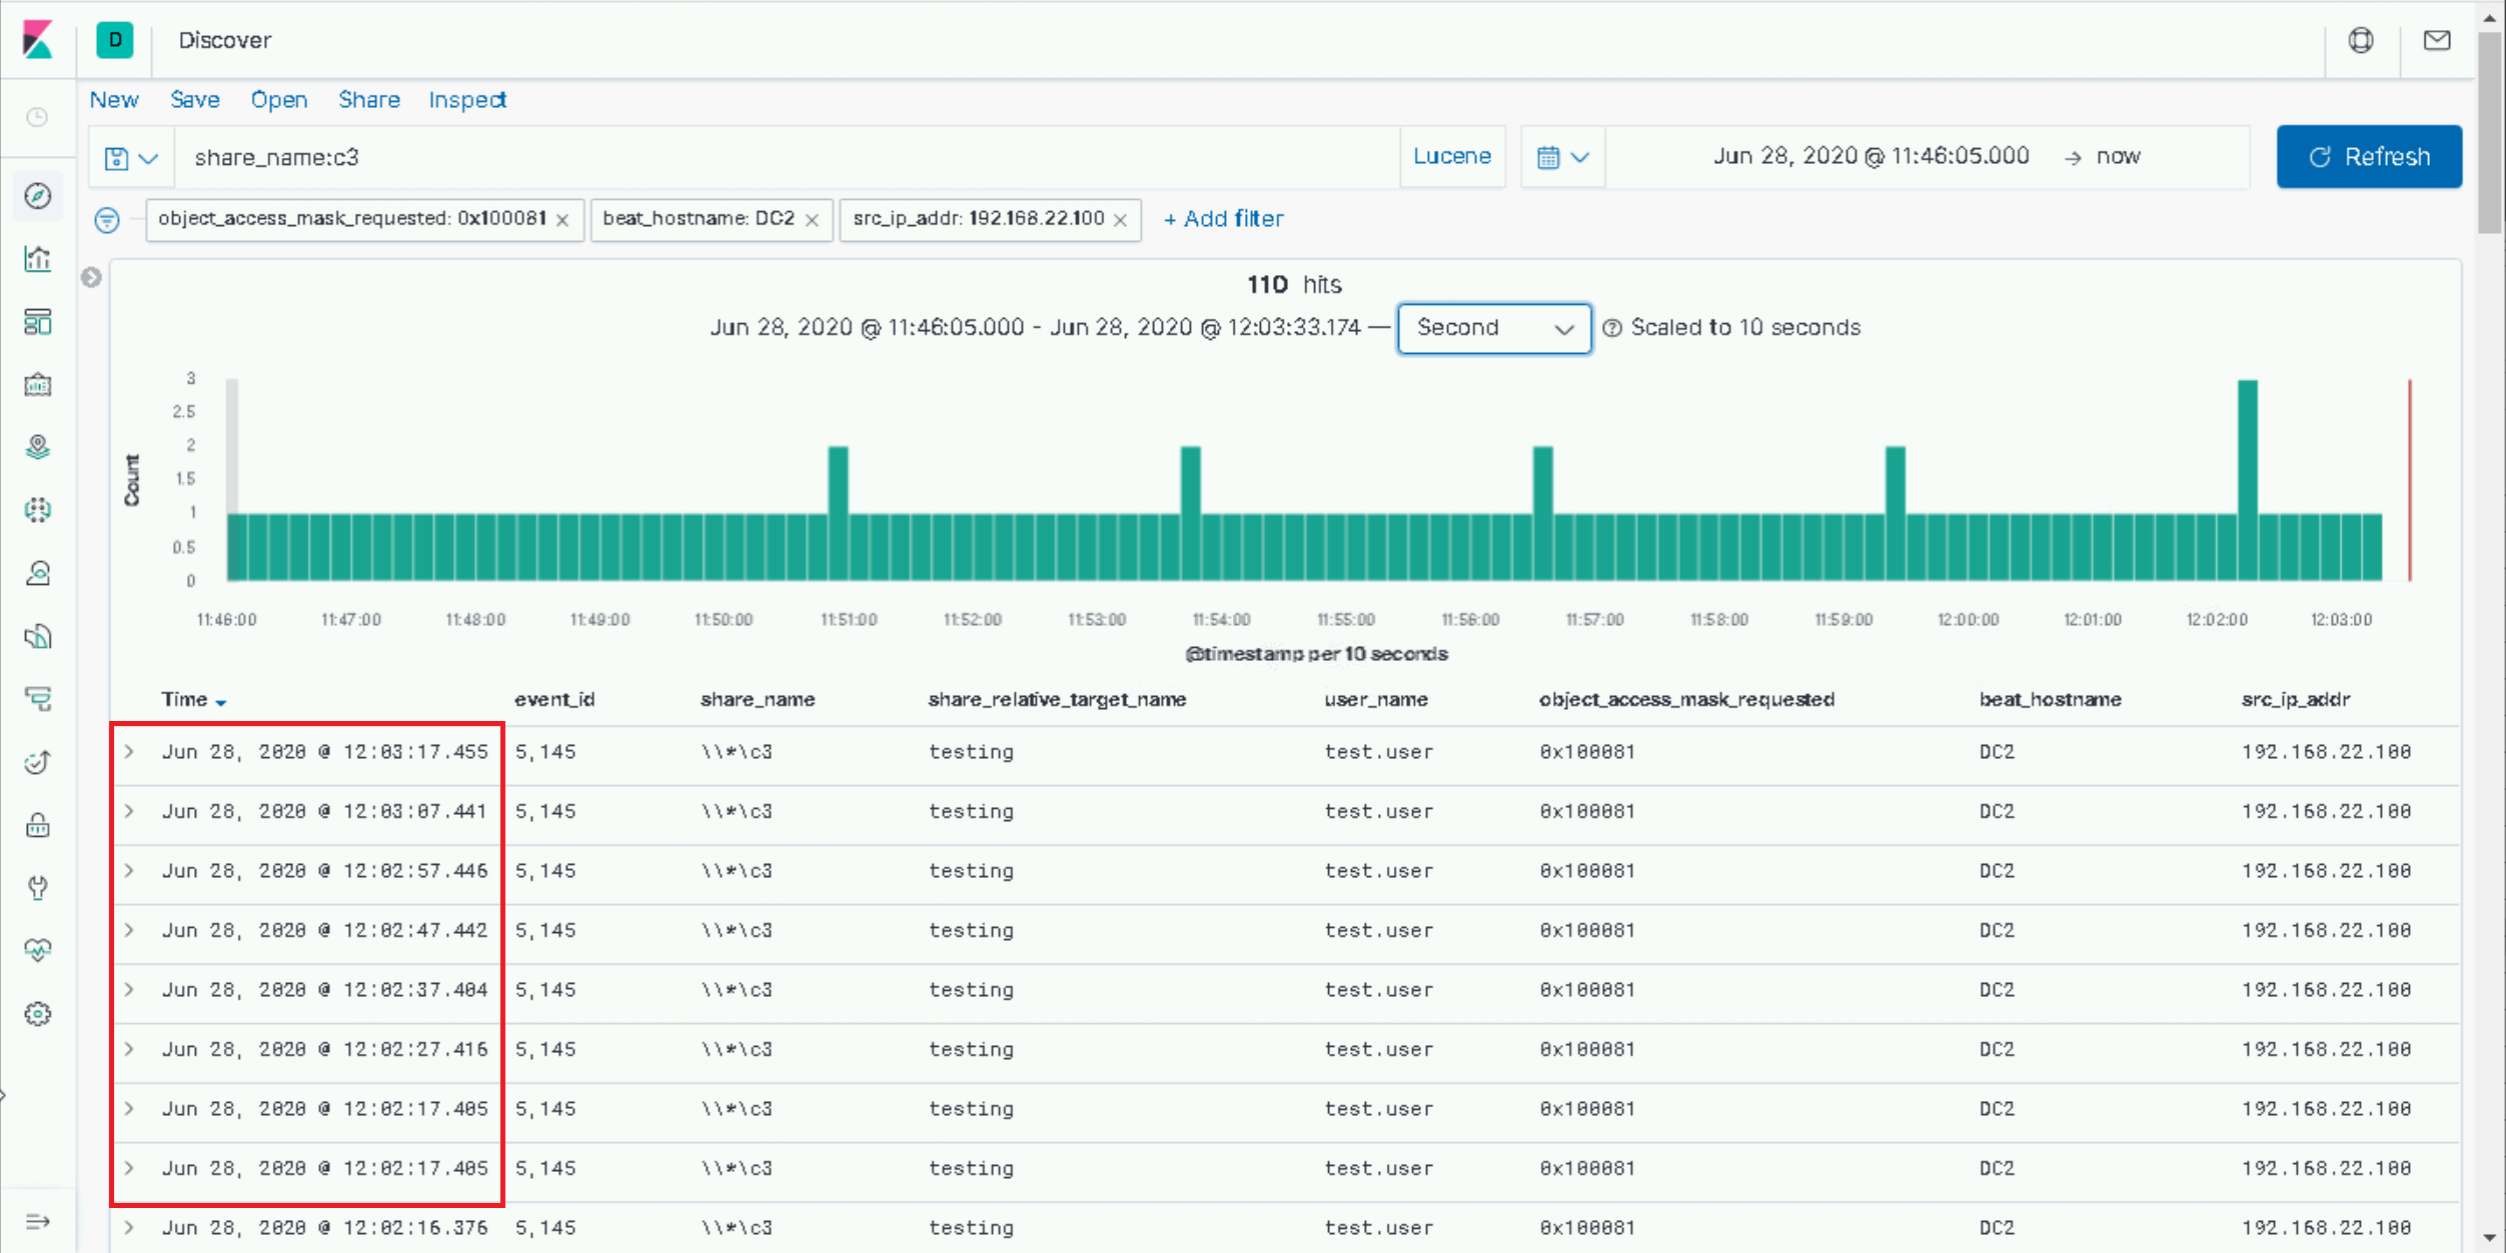
Now it’s probably pertinent to mention that everything we’re observing here is entirely configurable. From our “.lock” file extension to the polling frequency, we could customise these as an attacker. Nevertheless, using the default settings, we can see our Gateway polling reliable almost exactly every 10 seconds.
Let’s see if we can now identify our Grunt implant being sent to the Relay.
The first thing to mention is that C3 both encrypts and chunks the data it sends between components. So while we’re essentially writing the Grunt to disk for our Relay to read from, as a defender we’re not going to get an AV hit or IDS signature firing based on the Grunt implant on disk nor or on the wire.
What we can do however, is observe the 5145s generated by our Gateway, with the 0x2 access mask we’ve already spoken about.
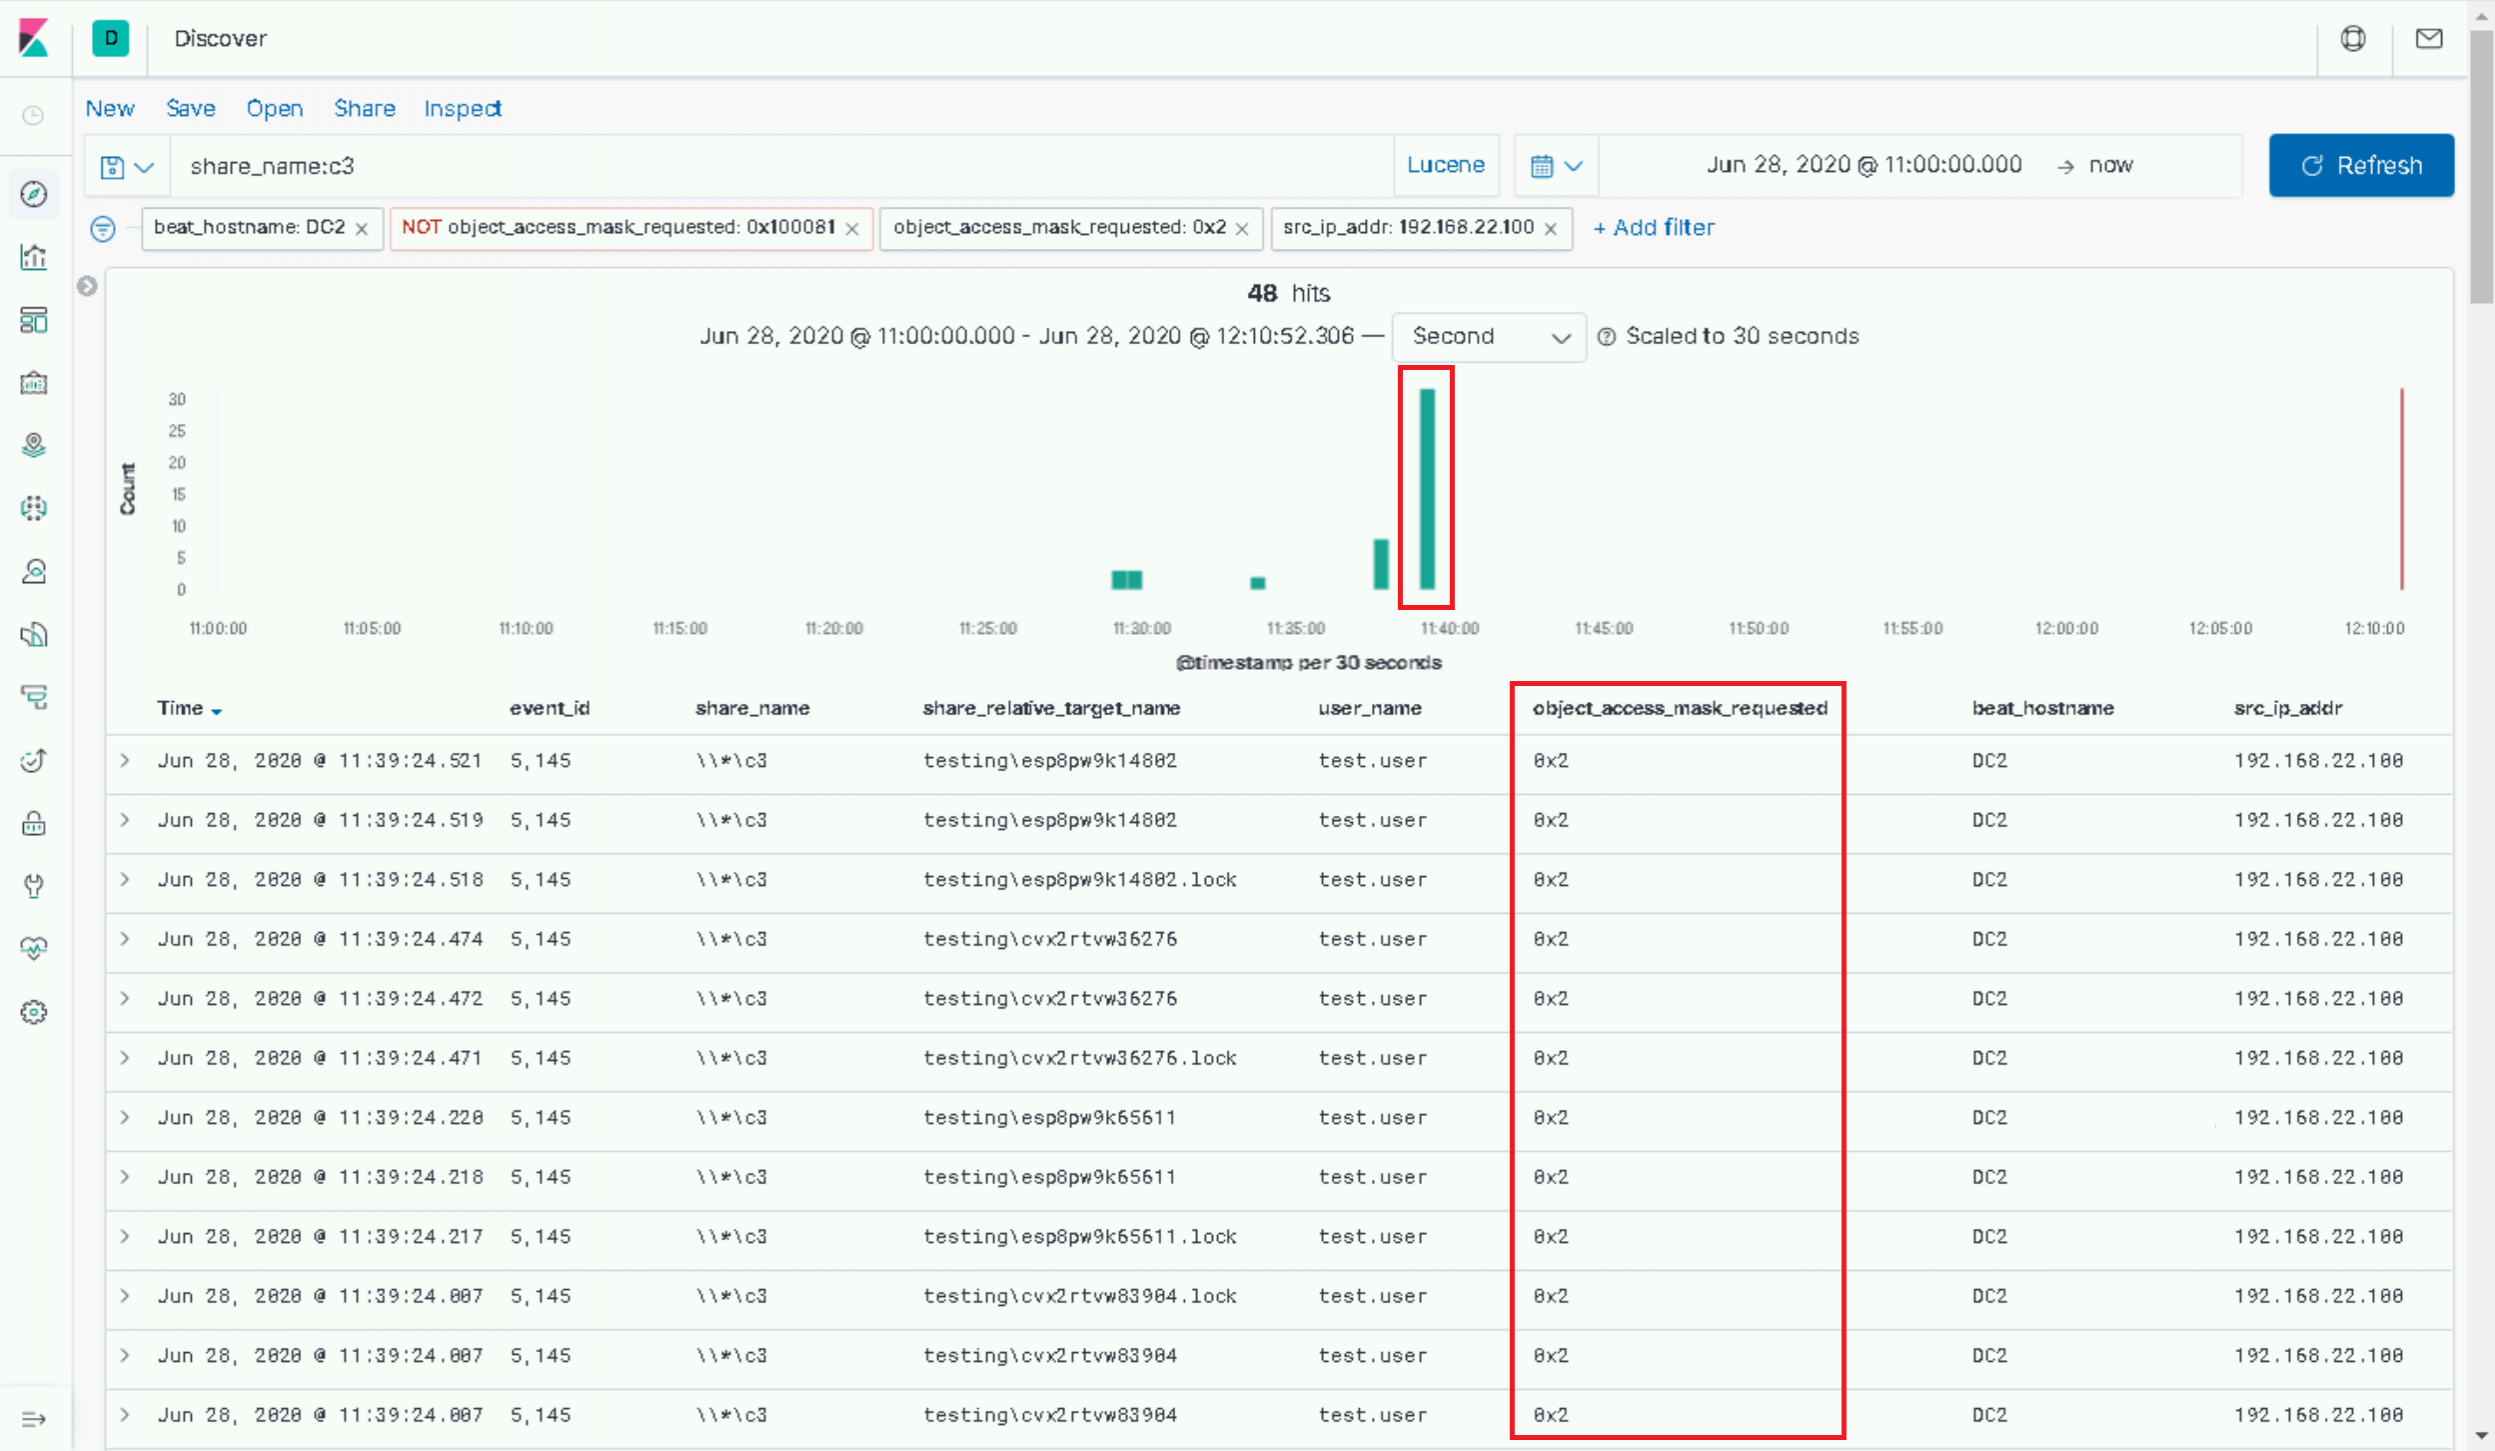
If you check back at your Covenant logs, that spike should correlate with the time we requested our Grunt to be added in C3. In this instance, there’s not too much we can do to assert that this is definitely malicious, but it’s worth noting.
4 – Anomalous CLR Loading
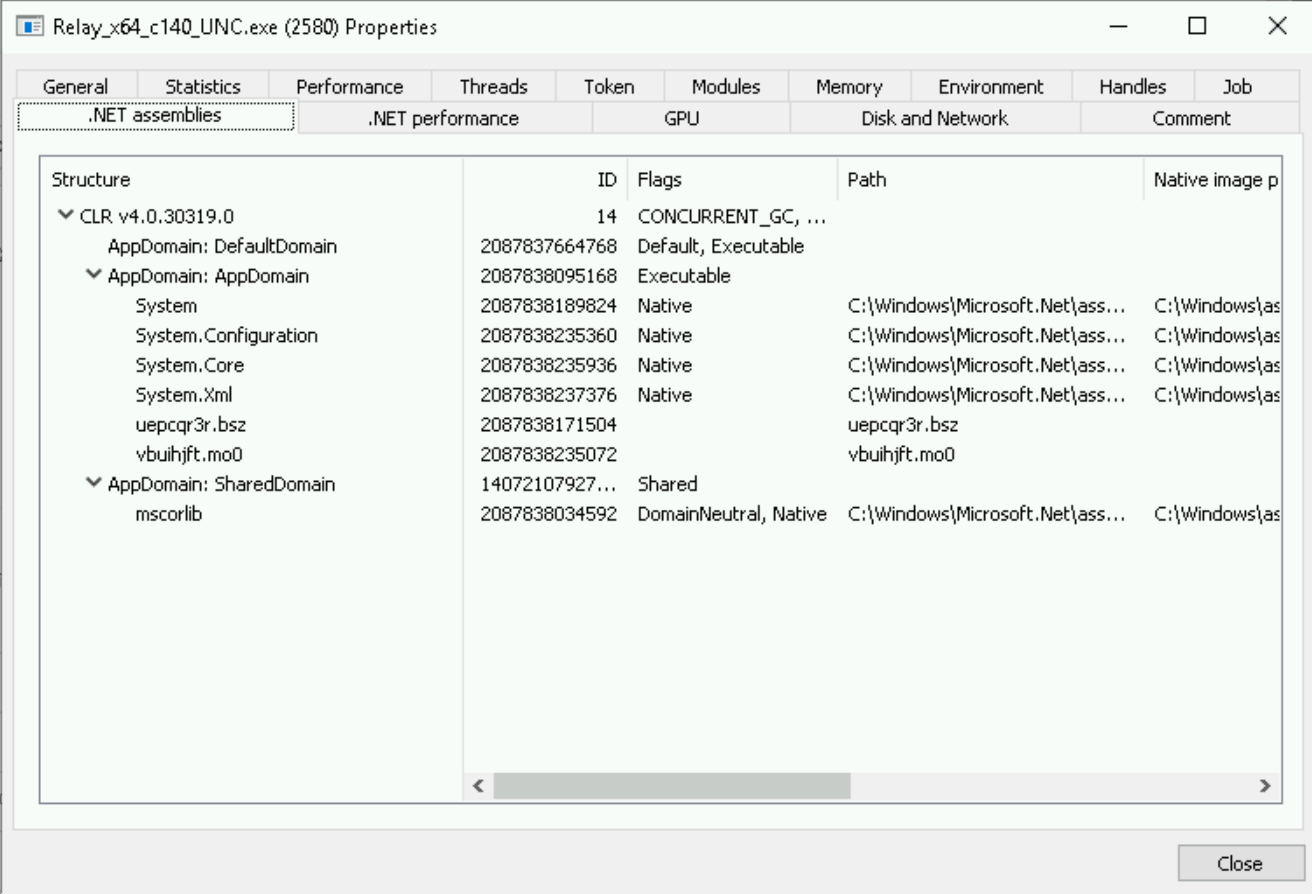
We know that Covenant’s implants, Grunts, make use of .NET. So, what might give us an opportunity to join the dots here is to look at the .NET assemblies that have been loaded into our Relay process. Now, of course, our “Relay“ named exe isn’t exactly elite opsec. But if we put that aside for now…
As a simple exercise to get us started, launch a second instance of our C3 relay on the same target workstation host. Just as before, you should see the C3 graph update with a second relay.
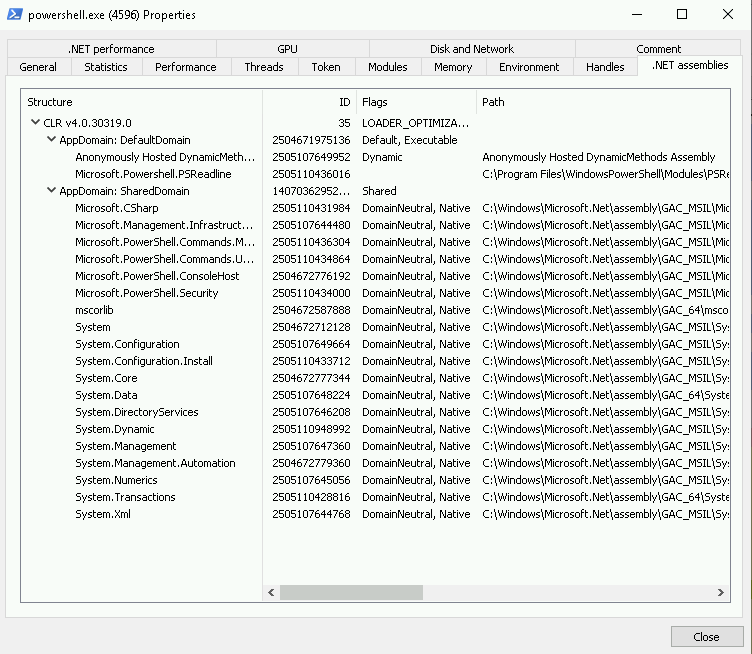
Now with Process Hacker, identify the two instances of the Relay in the process tree and view their properties side-by-side. You should immediately notice that our Grunt-loaded Relay has tabs for .NET that are absent from the new Relay we just launched.
So, any process that has .NET assemblies loaded is malicious? Try the same exercise with a newly-launched PowerShell process. Yeah, not quite!
What we’re observing here, in the case of PowerShell anyway, is entirely legitimate behaviour. Without going into the depths of .NET, CIL and the CLR – there are many great posts on this already including here, here and here – the upshot is that we will only see the CLR loaded into our process memory when .NET assemblies are being executed.
If we turn to our ETW logs from the Windows Kernel Trace provider, and search for “Image/Load” events performed by our “Relay” process (filtering for those that have file paths contain “.NET” or “mscor”), we get the following:
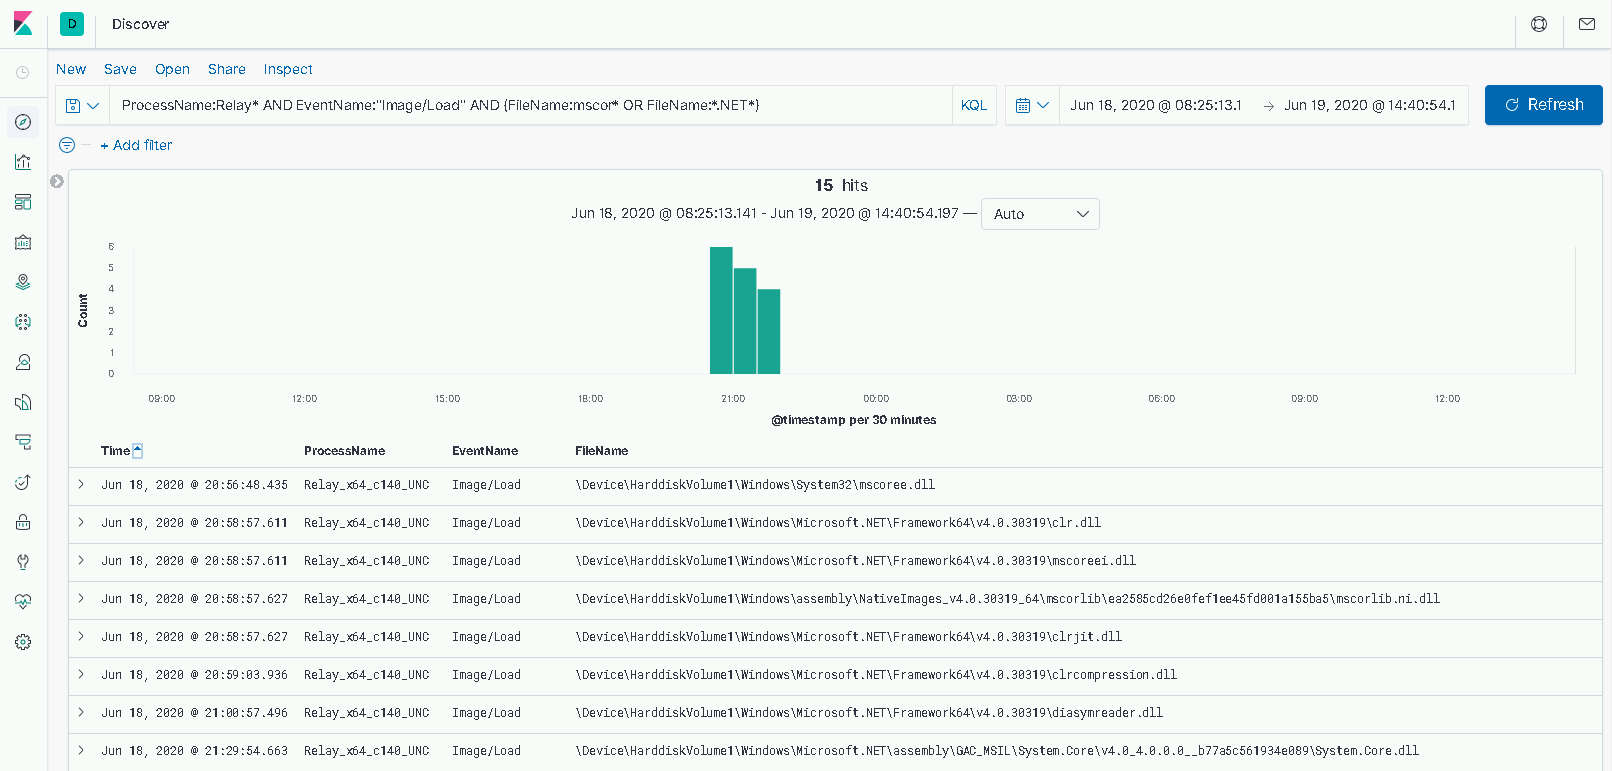
Here we can see the required CLR DLLs being loaded into our process, including the “clr.dll” which is the main DLL in .NET 4.0 onwards.
Now, we could go much deeper here with regards to inspecting the actual assemblies that are running - we’ve only looked at the CLR itself being loaded here, not what .NET we’re actually running. We could look at the randomized assembly naming convention we see from our Grunt, we could look at identifying those assemblies that are not backed by files on disk. Of course, from an offensive perspective we could then look at subverting all of the above with some defence evasion techniques.
For now though, let’s keep it simple - we could employ a detection strategy whereby we identify instances where the CLR is loaded into processes that don’t typically load it.
Consider if we attempted to replay this lab, except we used a payload launcher that injected our Relay - and subsequently our Grunt - into an Explorer process (in an attempt to mask our UNC file share access as legitimate), or a browser process (if we were trying to do the same but with external C2 web traffic). Launching these applications in Process Hacker, we can see that they don’t launch the CLR in normal operation and if they suddenly decided to do so, we’d have cause to investigate.
Conclusion
In this third lab of the Discovery and Lateral Movement workshop we covered how an attacker could make use of an exposed file share to pivot their traffic between hosts. We used our object access telemetry to identify suspicious access and made use of a new ETW provider, Windows Kernel Trace, to develop a detection strategy for suspicious use of .NET.
The main takeaways from this third lab are:
- An overview of a more esoteric lateral movement technique.
- A simple example for identifying beaconing behaviour against our file share.
- Use of a second ETW provider for identifying module loading.
- An introduction to detecting suspicious .NET usage.
Let's continue with Lateral Movement and take a look at PsExec next!