Attack Detection Fundamentals: Discovery and Lateral Movement - Lab #2
By Alfie Champion on 8 July, 2020
In the third part of WithSecure Consulting's Attack Detection Workshop series, covering Discovery and Lateral Movement, we explored a number of offensive techniques for discovering assets of value, be that users or file shares, and methods for moving between compromised hosts.
We also explored the detection strategies that can be employed to spot these using our own detection stacks. As with previous workshops, the following blog provides a second step-by-step guide to recreating the demos from that Discovery and Lateral Movement workshop, as well as exercises to further the reader's understanding of the concepts shown.
A recording of the workshop can be found here.
Last time, we explored the detection opportunities presented by attackers attempting to identify users of interest. We made use of Event Tracing for Windows (ETW) to log and scrutinize the LDAP queries that were generated when performing the initial query for kerberoastable and AS-REP roastable users, as well as when retrieving information about users and groups. We also did a basic review of some of the codebase for Rubeus to identify queries to hunt for.
This time, we’re going to take a look at another enumeration activity. This time, exposed file shares. In a large enterprise environment there are often file shares that are either intentionally or unintentionally exposed. Performing offensive engagements, we often find sensitive material in these file shares, including passwords, that can provide a simple path of privilege escalation. For this lab, we’ll be making use of a simple C# tool, Dwight Hohnstein’s SharpShares, to perform our initial enumeration. After that, we’ll look at a particular file share of interest, SYSVOL, and identify a detection strategy for attacks searching for Group Policy Preference files which could contain credential material.
As we did in the first lab, we’ll be making use of the logs provided by the Microsoft-Windows-LDAP-Client ETW provider, but we’ll also look at Windows Event Logs for evidence of suspicious activity. We’ll be using Ruben Boonen’s SilkService tool to capture our ETW events (again using the configuration shown below), and we’ll use Roberto Rodriguez’s HELK for doing some analysis, but as our SilkService configuration logs to the system Event Log, you can view the logs there if you choose.
<SilkServiceConfig>
<!--
Microsoft-Windows-LDAP-Client ETW Provider
-->
<ETWCollector>
<Guid>859efb51-6985-480f-8094-77192b2a7407</Guid>
<CollectorType>user</CollectorType>
<ProviderName>099614a5-5dd7-4788-8bc9-e29f43db28fc</ProviderName>
<UserKeywords>0x1</UserKeywords><!--Search-->
<OutputType>eventlog</OutputType>
</ETWCollector>
</SilkServiceConfig>
For this lab, we’re also going to enable auditing of object access. We can do this in Group Policy at:
Computer Configuration > Policies > Windows Settings > Security Settings > Local Policies > Audit Policies > Audit object access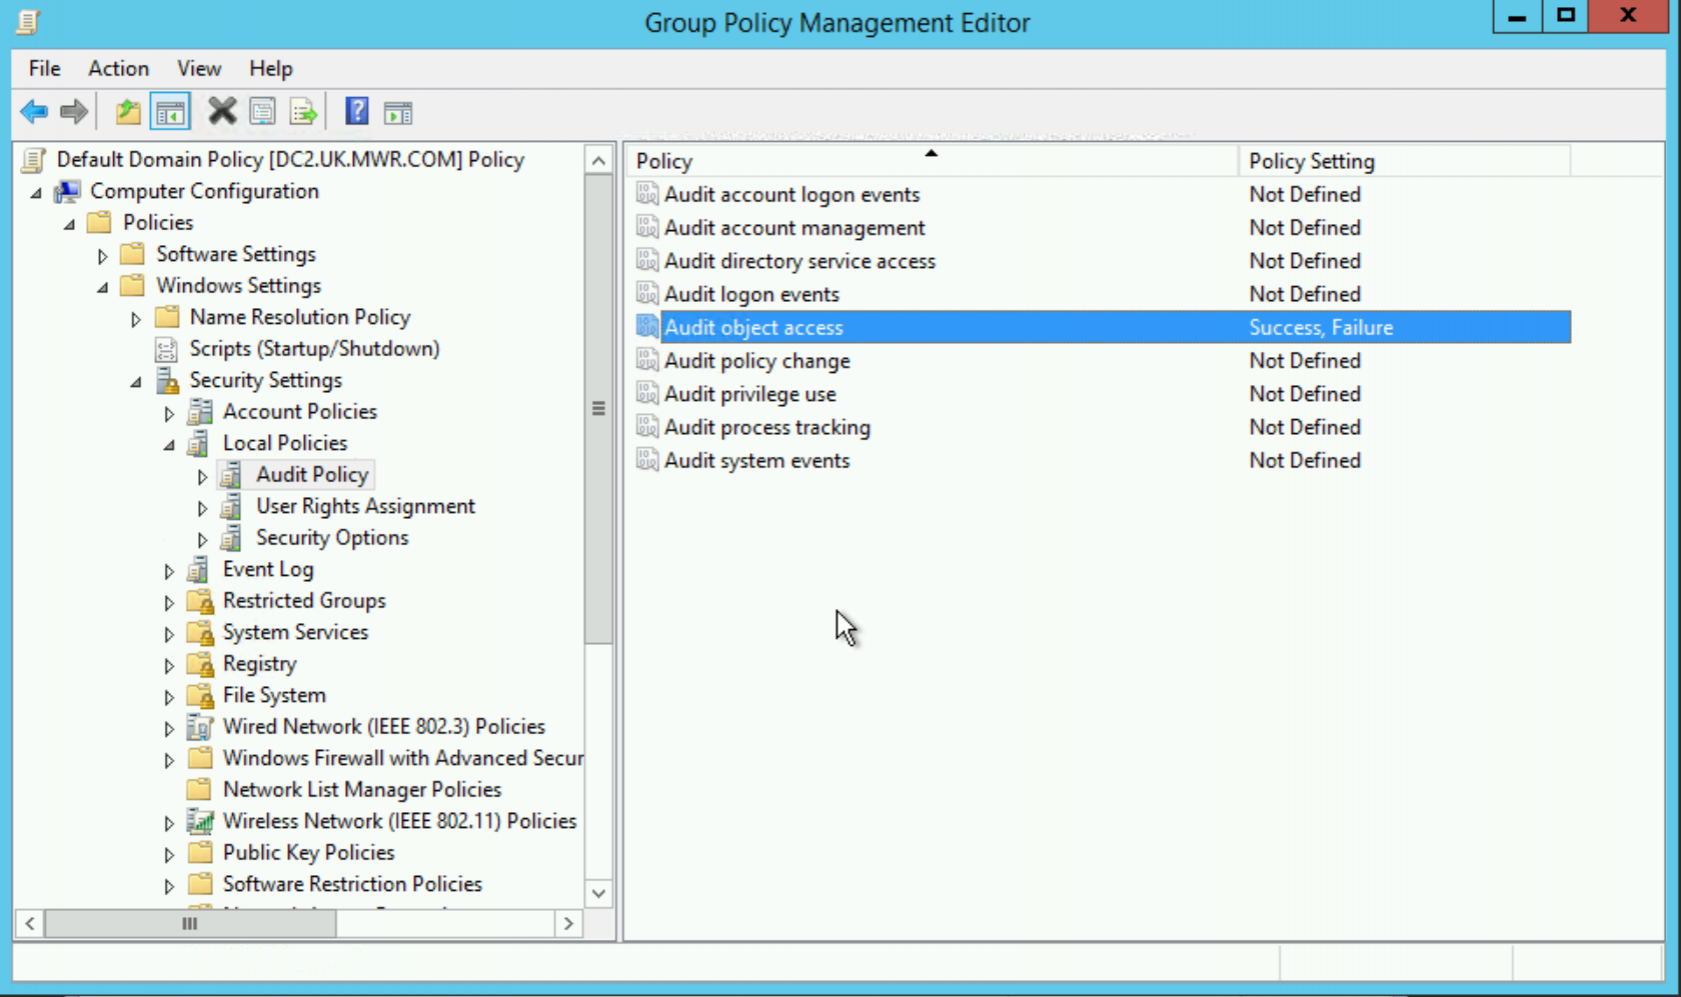
There are options here to enable logging for successful file access attempts, as well as failures. For our lab, we’ll capture both.

References
- SilkETW and SilkService
- SharpShares
- Threat Hunting with ETW Events and HELK
- Microsoft ETW Introduction and Overview
DISCLAIMER: Set up of the tools and the testing environment might not be covered comprehensively within this lab. We will assume basic familiarity with Linux/Windows command line and the ability of the reader to deploy the necessary frameworks. For that, it is recommended to follow the suggested references for the official tutorials and walkthrough published by the framework's author.
Required Tools
- Active Directory domain with at least one DC and workstation
- HELK (optional)
- SilkService
- Sysmon
- SharpShares
Walkthrough
1 – Environment Setup
In a typical corporate environment, there are often many file shares that would be suitable candidates for pivoting through. For our testing lab though, we’re going to need to create one.
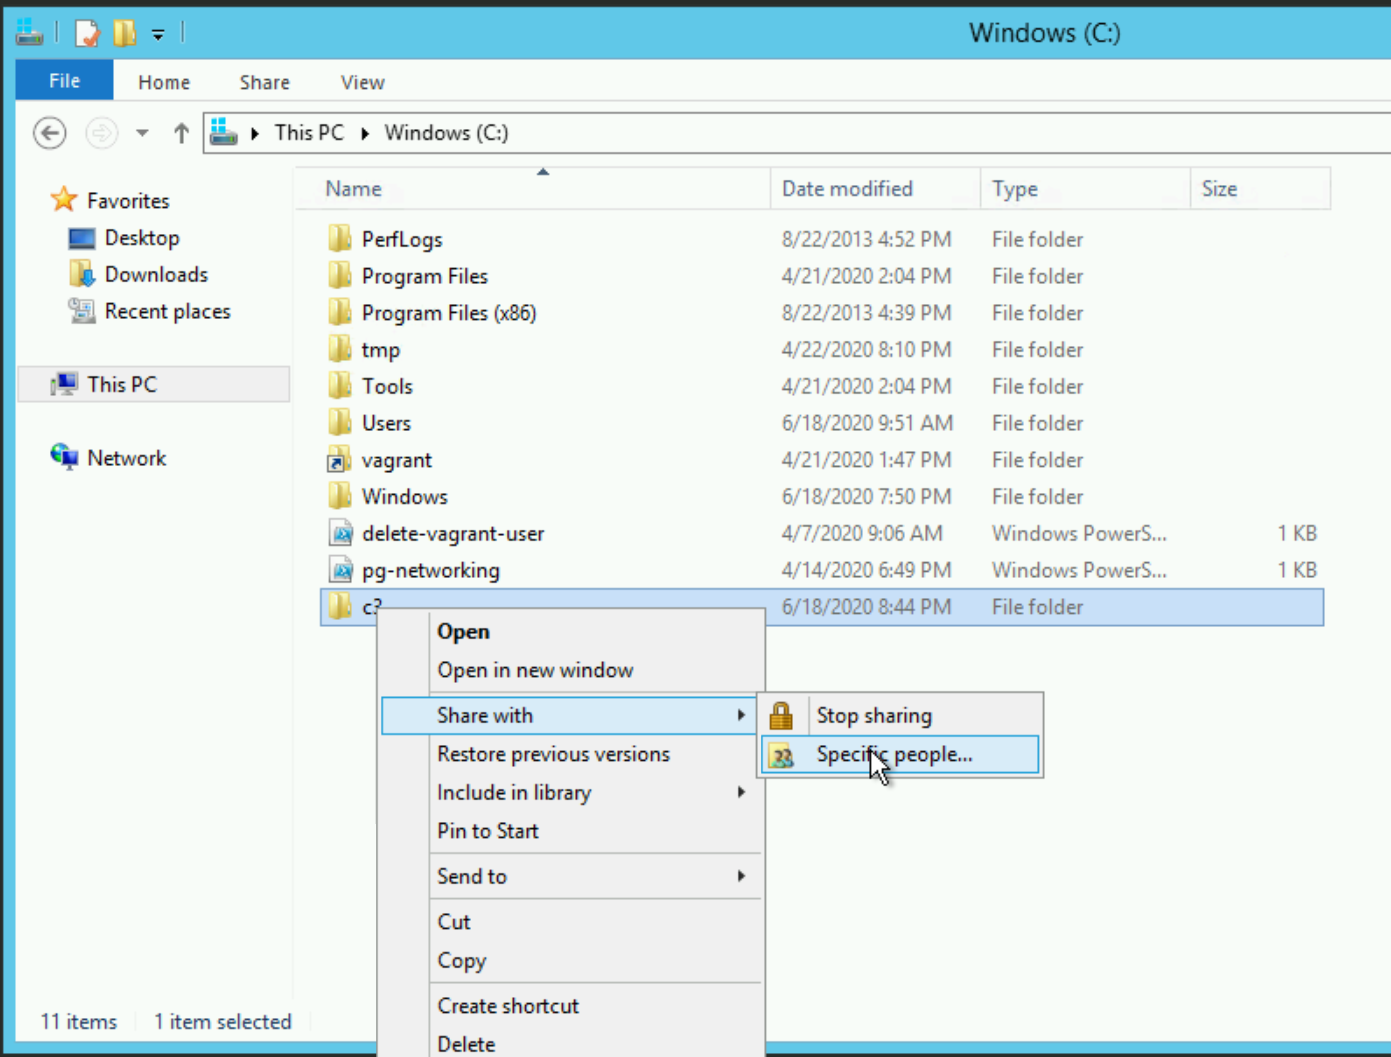
In our case, as we’re only using a single domain controller and workstation, we’re going to create our share on our DC. Create a folder (named “c3” in our case), right-click and select “Share with -> Specific People…”
From here, we can see a list of existing users that have access - select “Everyone”. The name is relatively self-explanatory but for clarity, Microsoft refers to this built-in group as follows:
On computers running Windows Server 2003 operating systems, Everyone includes Authenticated Users and Guest. On computers running earlier versions of the operating system, Everyone includes Authenticated Users and Guest plus Anonymous Logon.

We’re then going to set the access of “Everyone” to Read/Write.
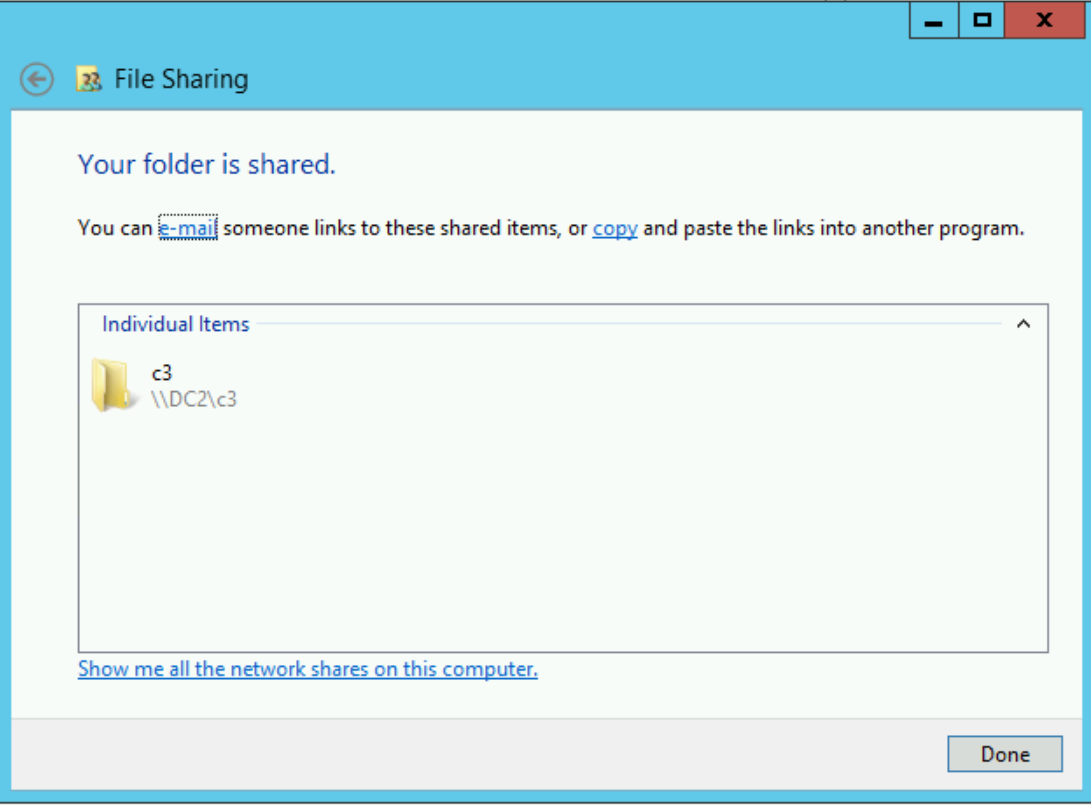
When that’s done, we should be able to access the share by browsing to \\DC2\c3 (or whatever the equivalent is in your lab setup) from the workstation host.
2 – Building and Executing SharpShares
Firstly, we’re going to need to download and compile the SharpShares executable (we can do this on our ‘attacker’ host and copy the binary over to our ‘target’ host, or for the purposes of this lab, just compile it on the ‘target’). Download the project files and unzip them.
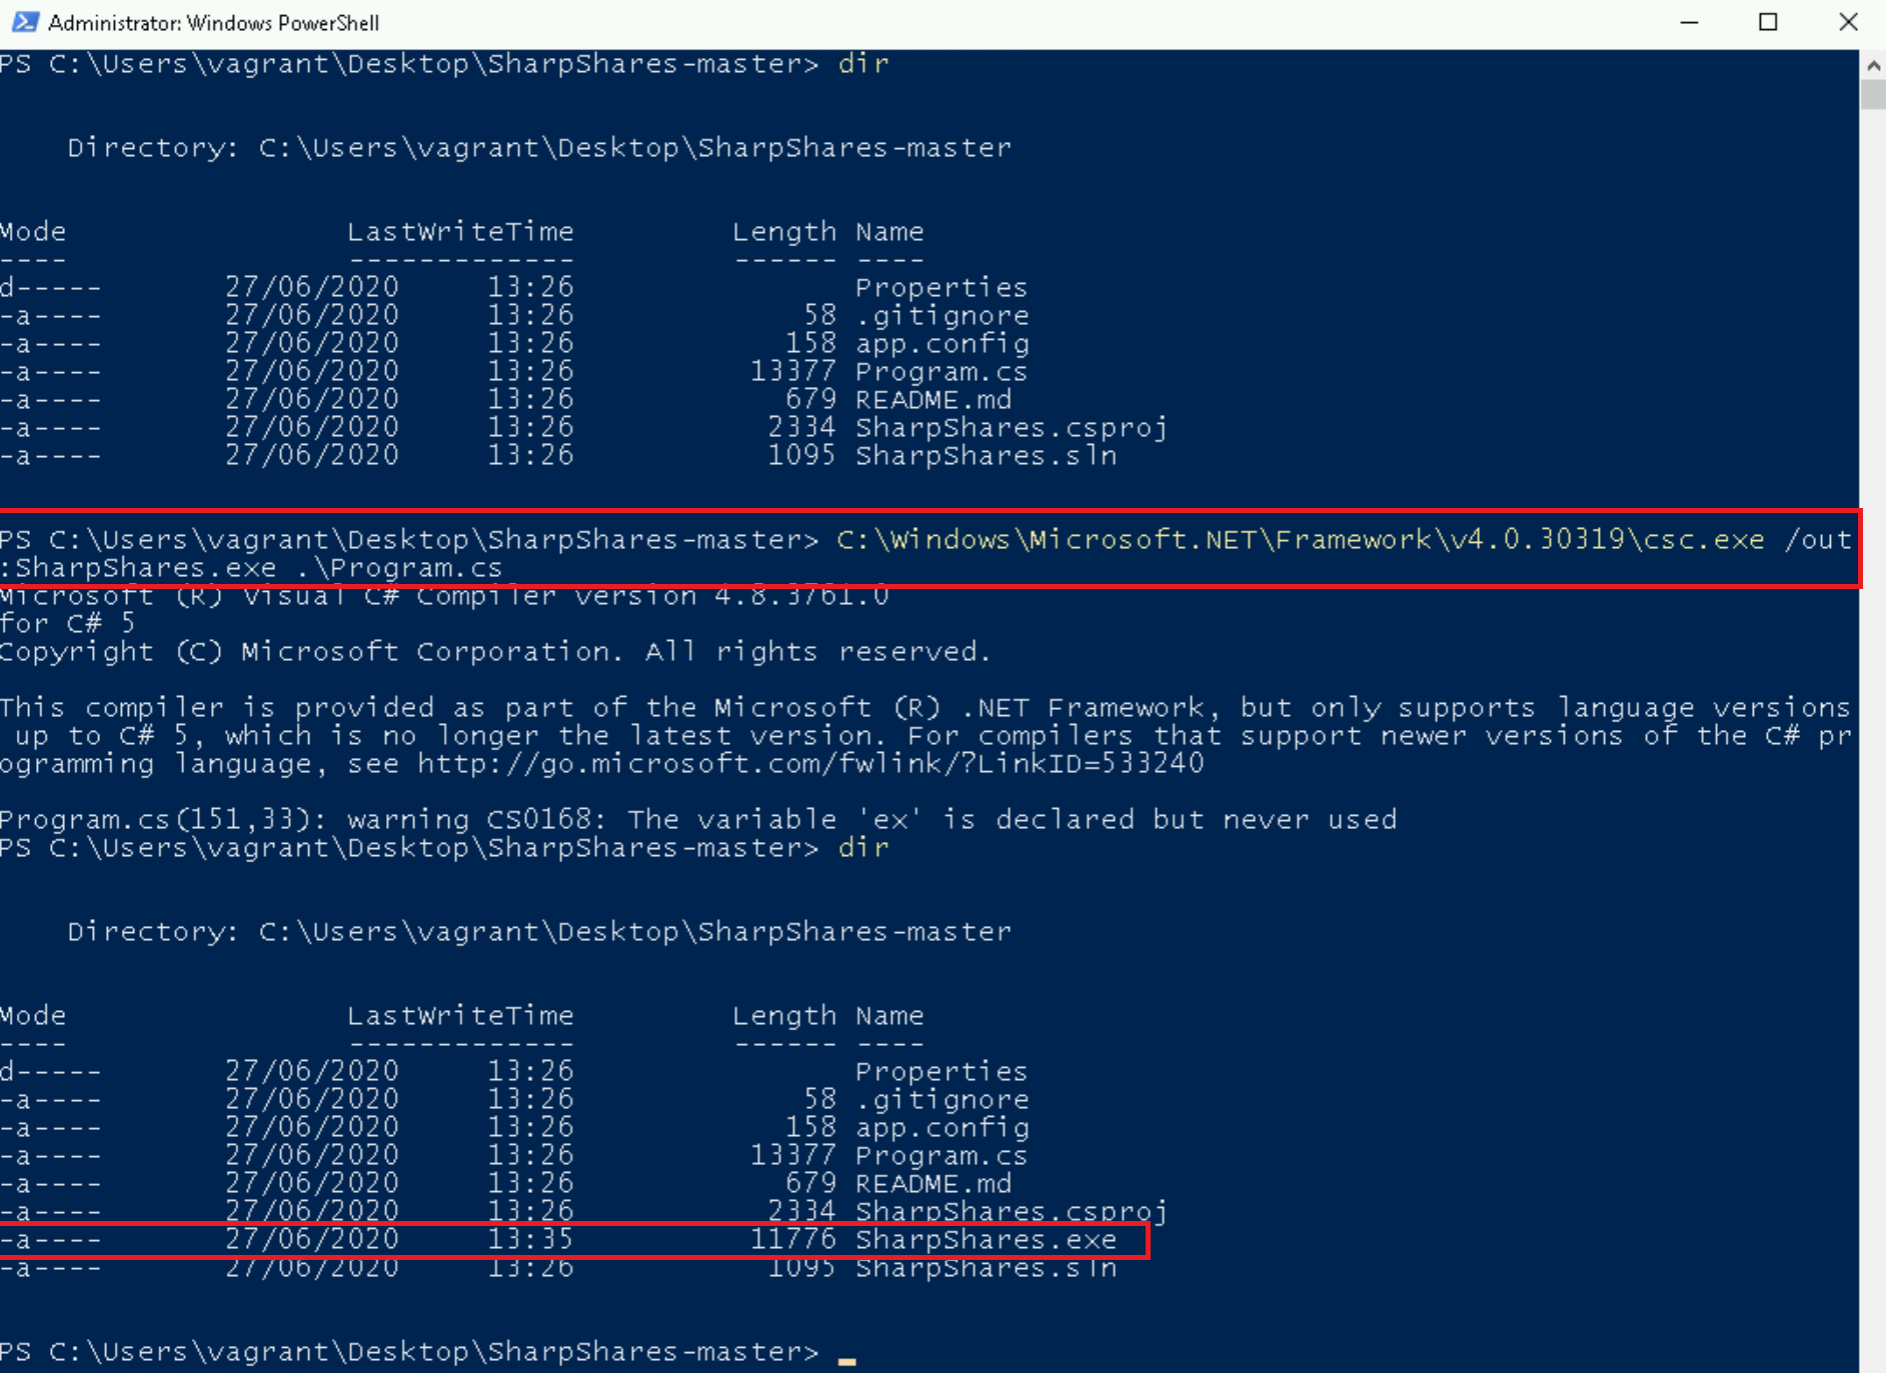
Opening a PowerShell window in the SharpShares directory, we can use the in-built C# compiler, csc.exe, to build our executable:
C:\Windows\Microsoft.NET\Framework\v4.0.30319\csc.exe /out:SharpShares.exe .\Program.csIf it’s succeeded, we should see the ShareShares.exe now present in the directory.
On our domain-joined target host, execute SharpShares with the following argument:
.\Sharpshares.exe sharesDepending on the setup of your lab, you should see something similar to the following:
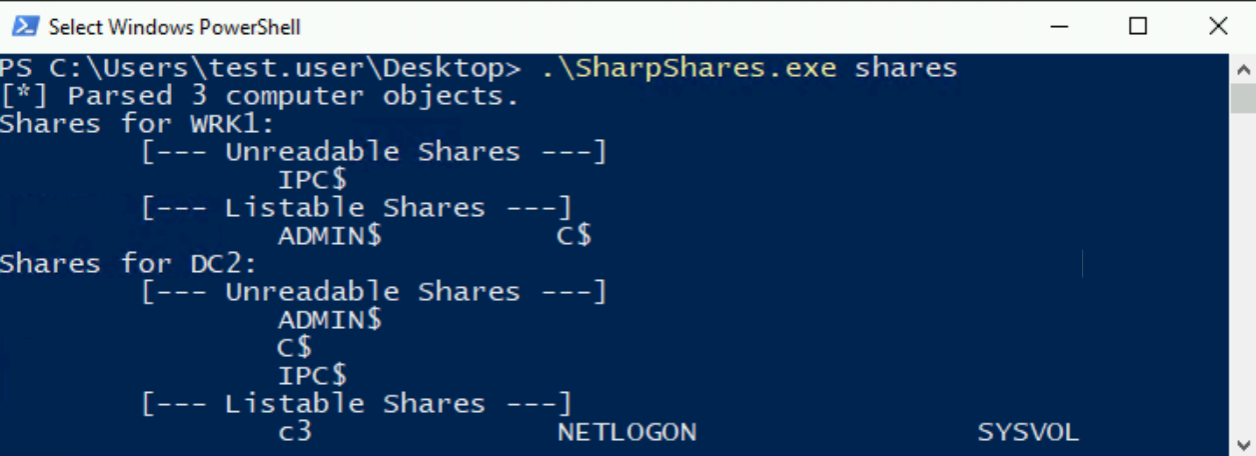
We can see that we have access to several default Windows shares including C$ and ADMIN$, as well as some specific Active Directory shares, NETLOGON$ and SYSVOL$. Notably in this case, we can see that our DC2 domain controller host is also exposing an extra share, C3. We’ll find a use for that in the next lab!
3 – SharpShares LDAP Queries
Now we’ve discovered our exposed file shares, let’s explore one way we could find evidence of us doing so. Let’s see if we can use the same methodology we employed last time, reviewing some of the tool’s codebase and seeing if there are any LDAP queries we could hunt for.
You don’t need to understand all the ins and outs of the code, but at a high level the flow is as follows:
- Get a list of the domain controllers in the domain - here.
- Fetch the first of these and fetch all computer objects - here.
- For each of these computers, query the available shares and attempt to read the contents of each of these shares - here.
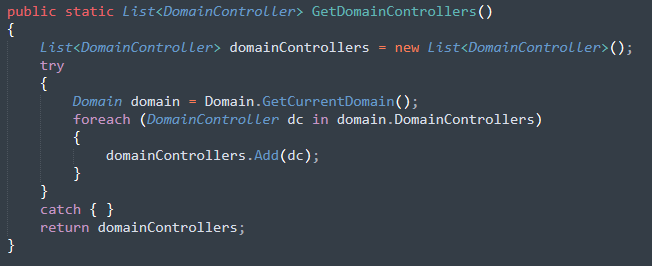
Let’s look at that first step then. To retrieve our domain controllers we’re using the functions provided by the "System.DirectoryServices.ActiveDirectory" namespace. We can see this from the directives at the top of the Program.cs file.
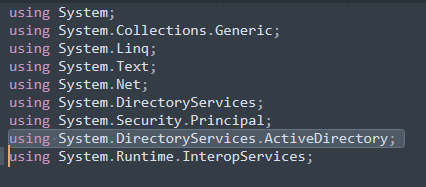
Now, unlike the Rubeus code we looked at last time, we’re not constructing LDAP filters at this point. All the heavy lifting is being done by that GetCurrentDomain() method, followed by an enumeration of the DomainControllers property.
At this point, we can cheat ever so slightly and work backwards from the LDAP queries we’ve observed from our SharpShares process. One interesting candidate is shown below:

The two fields on the far right of this Kibana entry correspond to the “SearchFilter” and “AttributeList” respectively. Effectively these mean “what are we searching for?” and “what details do we want to know?”. We’ll see more of this shortly, but a simple example could be querying for all users, and only returning their user names, rather than all the other data about them held in AD.
So, could this query be the result of that code block above?
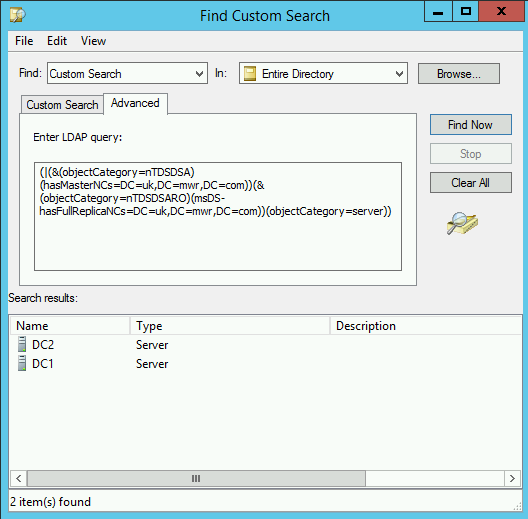
(|(&(objectCategory=nTDSDSA)(hasMasterNCs=DC=uk,DC=mwr,DC=com))(&(objectCategory=nTDSDSARO)(msDS-hasFullReplicaNCs=DC=uk,DC=mwr,DC=com))(objectCategory=serWithout breaking this whole filter down to each element, for now let’s just pull out that first one – “objectCategory=nTDSDSA”. A quick look at Microsoft documentation tells us:
On a DC, the nTDSDSA object represents the replication agent, which is responsible for processing the DRS Protocol. The GUID of this nTDSDSA object is invariant for the lifetime of the DC. The implementation MAY use this GUID value as an alternative identifier for the DC.
Sounds like we might have found our Domain Controller LDAP query! As we’ve done before, we can open Active Directory Users and Computers (ADUC) and perform a custom search with this query to confirm our suspicions.
Ok, we now know the cause of that query, but it’s reasonable to assume SharpShares isn’t going to be the only thing making use of a default function for looking up DCs. Let’s move onto the next step in the code – fetching the names of all computer objects.
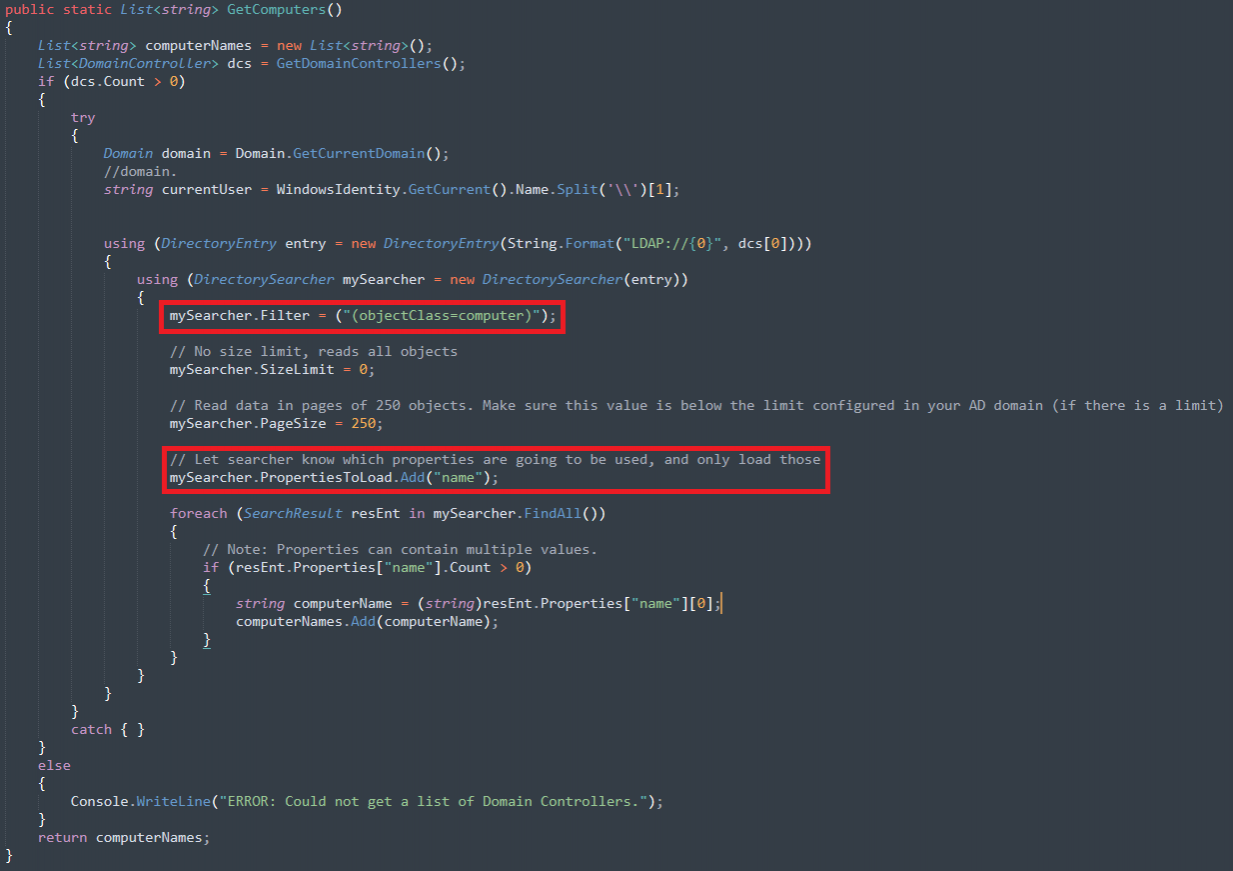
Now we’re into familiar LDAP query building territory. It’s a simple query this time:
(objectClass=computer)We mentioned the “AttributeList” field previously. Looking at this code block, we can see this is being used to retrieve only the “name” field of any computer objects. Turning to our ETW LDAP log, we can see this in action.

4 - SharpShares File Share Access
Moving on to the last stage in the SharpShares program flow, we’re looking for evidence of us attempting to access shares on each of the computers in the domain. Now, even in the simple lab environment we have setup here - with just a few shares present - looking through 5140 and 5145 event IDs… it’s pretty clear something dodgy has taken place!
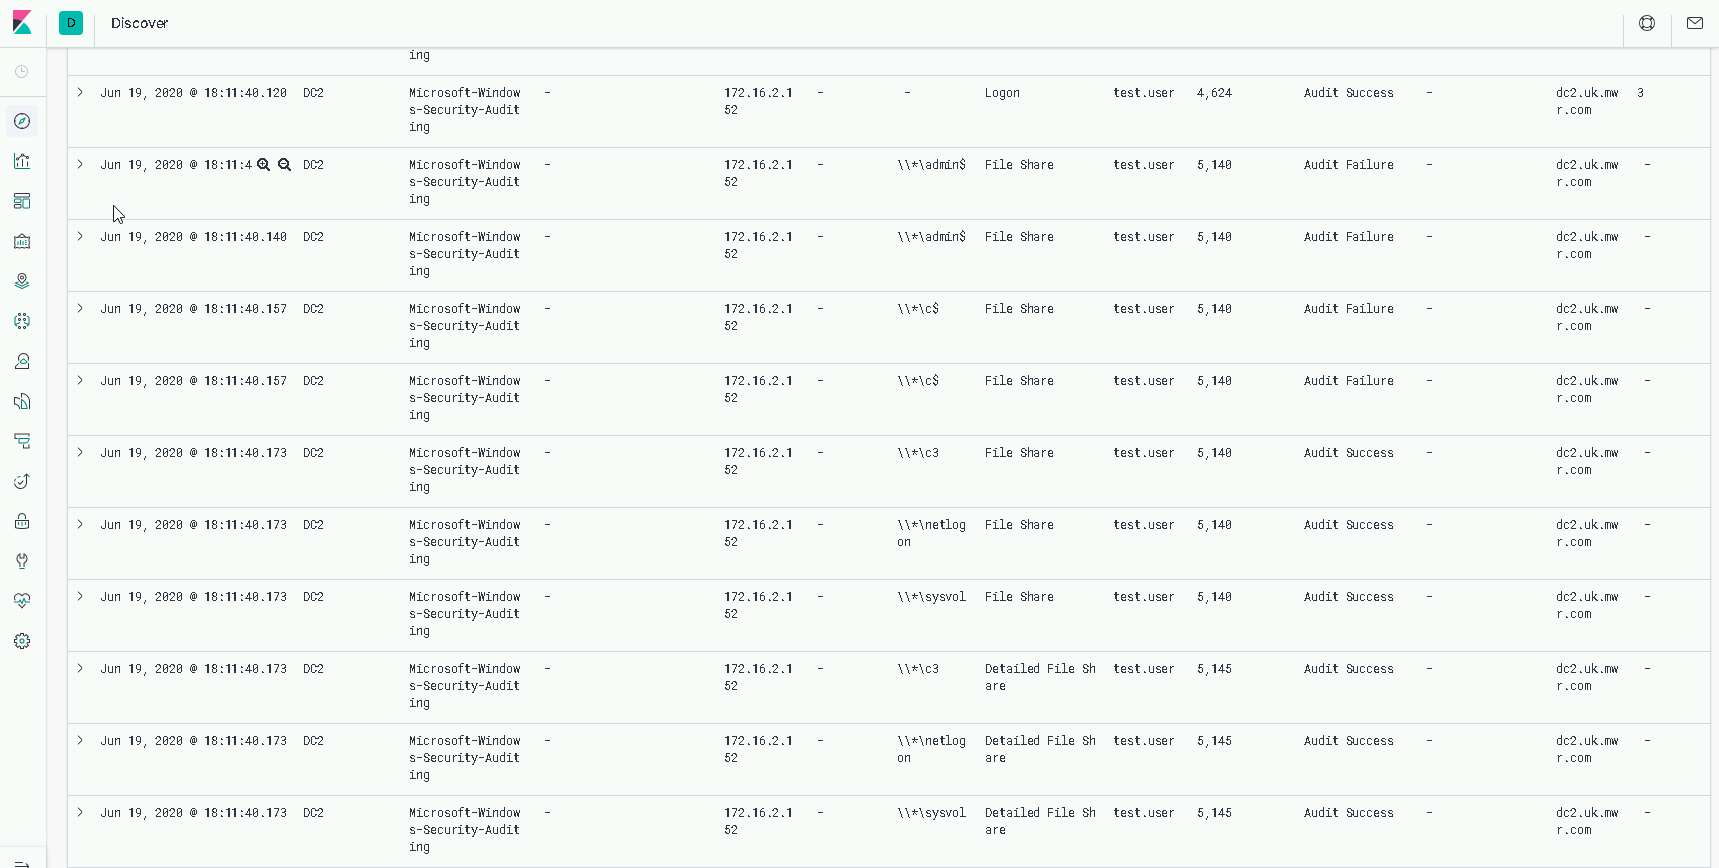
The 5140 events are generated each time our user attempts to access a given share, while the 5145s are generated for every access attempt to a given share object.
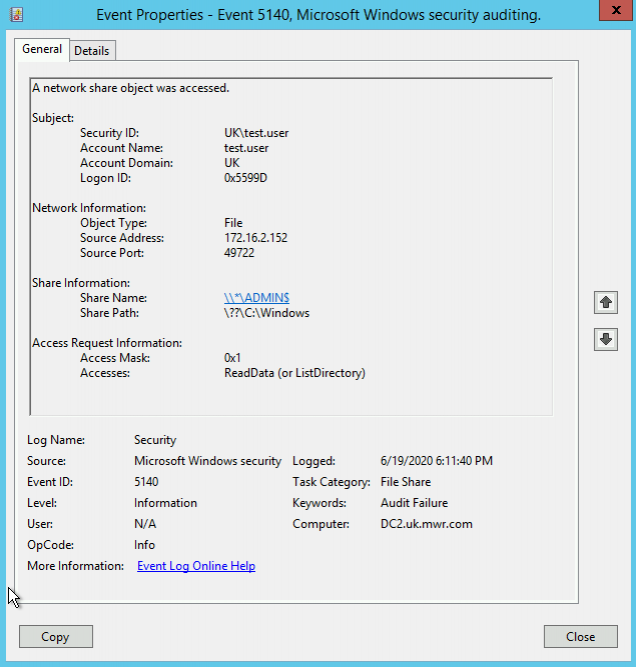
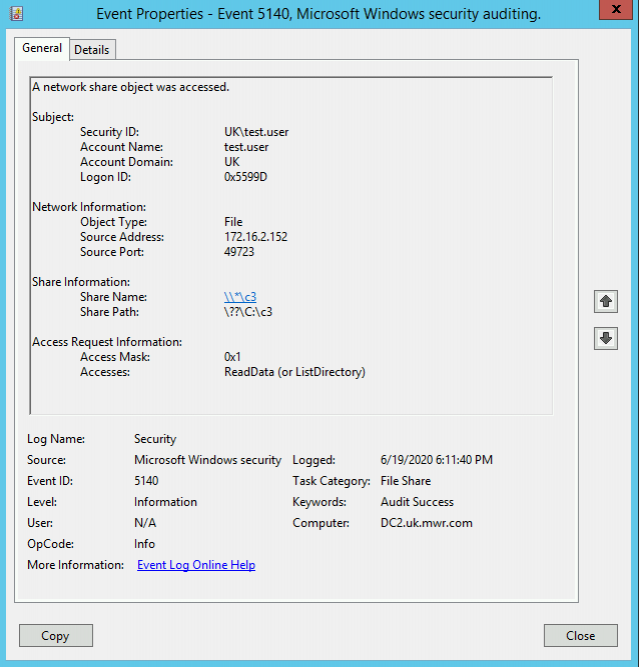
Notably in the above Kibana search, we can see all the “Audit Failures” in the “Keywords” field (second column from the right). Examples of successful and failed share access attempts can be seen below:
We can see from the LDAP queries and object access events that we have a few opportunities to detect this share enumeration.
As an aside, when reviewing the percentage of LDAP queries recorded in the lab over a ten day period, 96% were generated by the svchost and lsass processes, the remaining 4% were from SharpShares and our Grunt implant. Of course, every environment is different, and this might not scale to a full enterprise environment but worth noting!
Arguably the most incriminating telemetry is the comparatively large volume of file share access events and the number of distinct shares being accessed.
While we can’t really demonstrate it in our small lab setup, at an enterprise scale, we also have the high volume of new network connections (Sysmon Event ID 3) as we enumerate and connect to every computer object in the environment.
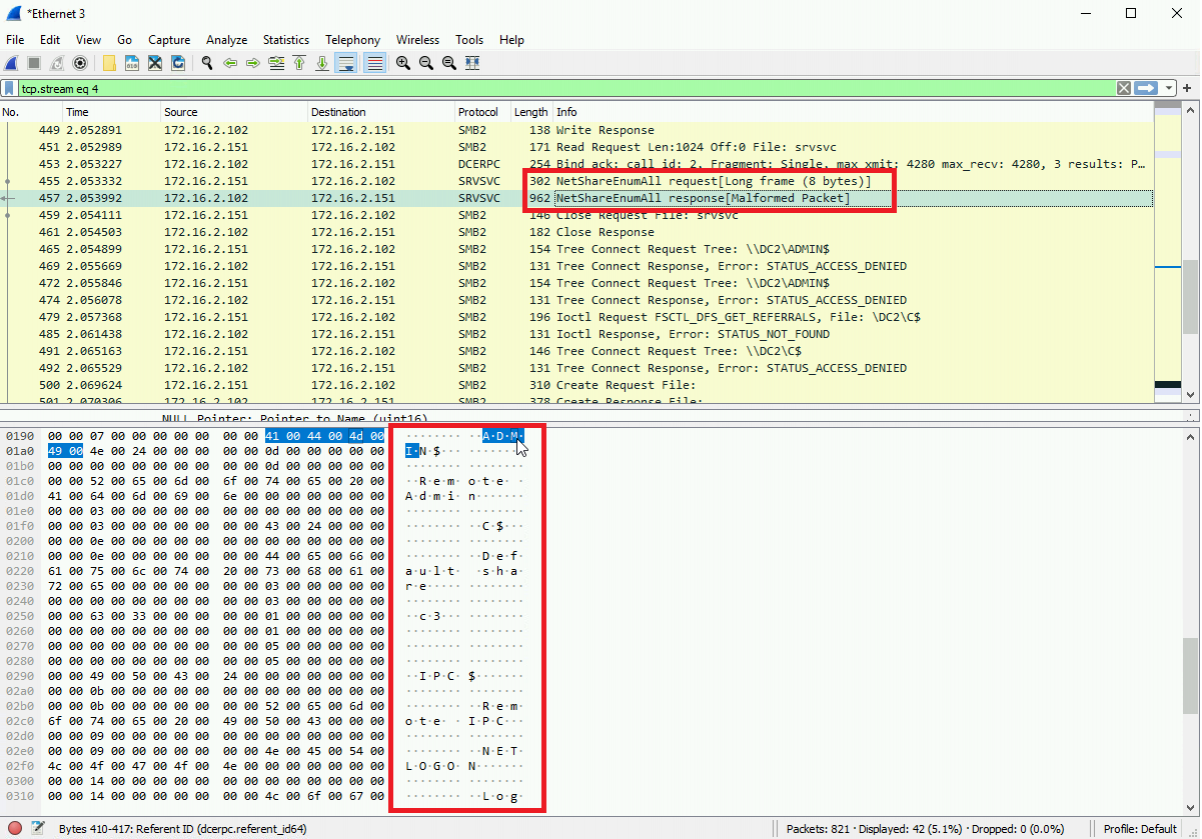
Furthermore, while we won’t touch on it too much here, from a network traffic perspective, capturing and inspecting the SharpShares network traffic using Wireshark, we can first see the traffic for initially requesting a list of shares.
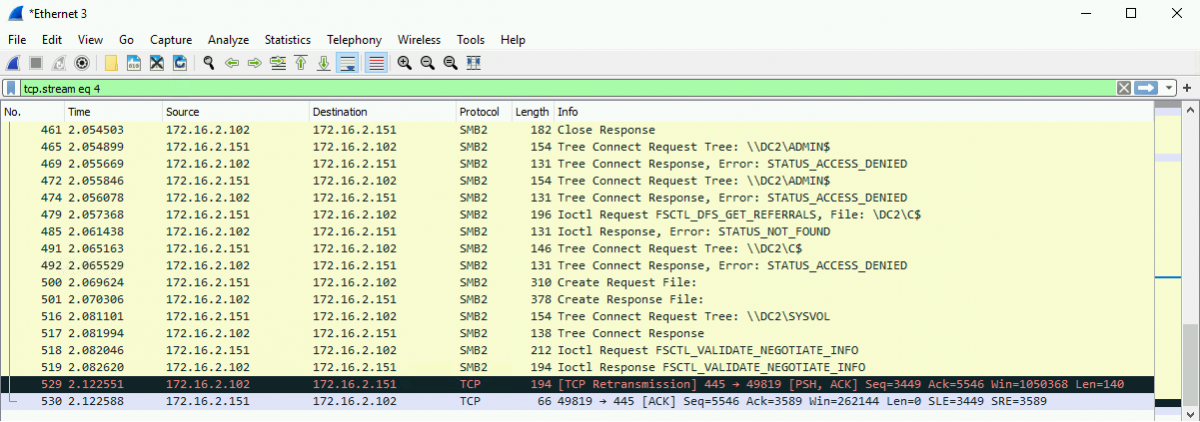
Followed by our attempts to access each one, including details of the success and failure.
5 – Group Policy Preference Files
At this point, we’ve got a few methods for detecting the enumeration and access of file shares. As a final exercise for this lab, we can apply this to identify instances of suspicious access to Group Policy Preference files.
Historically, Group Policy Preference (GPP) files provided administrators with an automated means of customising settings on domain-joined hosts. This included creating local users, setting scheduled tasks and changing local administrator passwords. Domain computers could then fetch these preference files and apply them.
Where credentials were required to achieve the customisation, e.g. in the case of setting the new local administrator password, they could be embedded in the GPP files’ “cpassword” field using reversible encryption. Microsoft released a patch (KB2962486) to prevent the further storage of passwords in GPP files, and the key used for this encryption has since been made public.
Notably, installation of that patch didn’t remove pre-existing instances of the encrypted passwords and these had to be actively removed by administrators.
So, cool story… what does it mean for us? The upshot of all of this is that there is the potential for passwords - potentially local administrator passwords (if a solution like LAPS isn’t in place) – to be stored in a reversible format in SYSVOL files that, by design, any domain user or computer can access. Of course, this was patched years ago and we’d never find instances of this now would we! ¯\_(ツ)_/¯
There are a number of tools that automate the discovery and decryption of GPP passwords, but for this exercise we’re going super simple and using the findstr utility built-in to Windows, running the following command:
findstr /S /I cpassword \\[FQDN]\sysvol\[FQDN]\policies\*.xmlThe arguments are as follows:
- /S – searches the current directory and all subdirectories.
- /I - Ignores the case of the characters when searching for the string.
- cpassword – the string we’re looking for
- \\[FQDN]\sysvol\[FQDN]\policies\*.xml – the SYSVOL folder for our target domain.

If we filter for our 5145 events as before, we can see multiple entries, as our findstr command enumerates through the policies folder looking for instances of “cpassword”.

Of course, as we mentioned above, these policy files are accessed by other hosts on the network by design. Evidence of this access alone is hardly a smoking gun; but we can refine this search!
GPP files, specifically those containing machine customisations (like our local administrator password changes), are intended to be accessed and utilised by Active Directory computer accounts. Computer accounts in AD are denoted by their “$” suffix, so we can filter our search based on this. As Samir Bousseaden notes, a query similar to the following can give us what we need:
event.code: 5145 AND share_name:\\*\sysvol AND share_relative_target_name:*\policies\*\Machine\* AND NOT user_name:*$Conclusion
In this second lab of the Discovery workshop we covered how an attacker could enumerate exposed file shares, as well as exploring opportunities to detect this. As in previous labs, we reviewed some of the tool’s codebase to inform our detection. Using our LDAP ETW log again, we also explored the actionable logs produced with enhanced auditing of object access. This allowed us to develop a detection for an attacker enumerating Group Policy Preference files in the hopes of finding some passwords!
Of course, there are limitations to the detections we’ve explored. Share enumeration performed ‘low and slow’ could easily blend into typical corporate traffic, and legitimate network scanning or auditing tools could easily exhibit the same behaviours.
The main takeaways from this second lab are:
- An introduction to two techniques used for enumerating file shares and their contents.
- The value of object access logs for detecting these activities.
- Leveraging an understanding of expected GPP file access to fine-tune our search for suspicious activity.
Now… about that C3 share!