Attack Detection Fundamentals: Discovery and Lateral Movement - Lab #4
By Alfie Champion on 8 July, 2020
In the third part of WithSecure Consulting's Attack Detection Workshop series, covering Discovery and Lateral Movement, we explored a number of offensive techniques for discovering assets of value, be that users or file shares, and methods for moving between compromised hosts.
We also explored the detection strategies that can be employed to spot these using our own detection stacks. As with previous workshops, the following blog provides a fourth step-by-step guide to recreating the demos from that Discovery and Lateral Movement workshop, as well as exercises to further the reader's understanding of the concepts shown.
A recording of the workshop can be found here.
In the previous labs (here, here and here), we’ve looked at Discovery techniques for enumerating users and groups, and opportunities to detect this based on suspicious LDAP queries using telemetry from ETW. We also used object access audit logs for the purposes of detecting share access and our use of an exposed share for pivoting using C3. In several cases, we’ve also taken a look at the code bases of our attacker tooling to identify opportunities to detect it.
For this lab, we’re going to be taking a look at the SysInternals tool, PsExec. Many will be familiar with its use amongst system administrators, and many threat actors have used it as a means of lateral movement! In terms of detection opportunities, we’re going to be focusing largely on the event log entries that it produces, augmenting this with telemetry from Sysmon. The research paper on Lateral Movement from JPCERT, linked in the references below, is a definitive resource on this topic and covers many other techniques aside from PsExec.
References
- https://docs.microsoft.com/en-us/sysinternals/downloads/psexec
- https://www.jpcert.or.jp/english/pub/sr/20170612ac-ir_research_en.pdf
DISCLAIMER: Set up of the tools and the testing environment might not be covered comprehensively within this lab. We will assume basic familiarity with Linux/Windows command line and the ability of the reader to deploy the necessary frameworks. For that, it is recommended to follow the suggested references for the official tutorials and walkthrough published by the framework's author.
Required Tools
- Active Directory domain with at least one DC and workstation
- HELK (optional)
- Sysmon
- Wireshark
- Metasploit
Walkthrough
1 – Basic Execution
Using PsExec is super-simple from an end-user perspective. In our scenario we’re going to be executing it from a workstation to execute commands on our domain controller. Download the PsExec executable onto our workstation and open a Command Prompt.
Execute a “runas” command to spawn a new prompt in the context of a user with admin control of the target host. The command should look something like this:
runas /user:UK\Administrator cmdWe can verify we are in the correct user context by attempting to list the C drive of our target host using a simple “dir” command:
dir \\dc2\c$If we’ve successfully launched a session as our Administrator user, we should see the contents of the domain controller C drive listed.
Now we can execute PsExec to obtain a semi-interactive shell on the target. Run the following command:
PsExec.exe -accepteula \\dc2 cmd
And that’s it – simple! We can execute commands on the domain controller.
2 – Detection at Source
While seamless to the end user, there’s a lot going on both on our workstation host and our target host. We’ll dig into the workstation telemetry first.
The first thing we can see here is our use of alternative credentials. In order to access our target host, we’ve had to authenticate as the “Administrator” user and, in doing so, we’ve generated a 4648 in the Security log. In our scenario, immediately we’ve identified a detection opportunity as our standard workstation user has suddenly escalated to Domain Administrator!
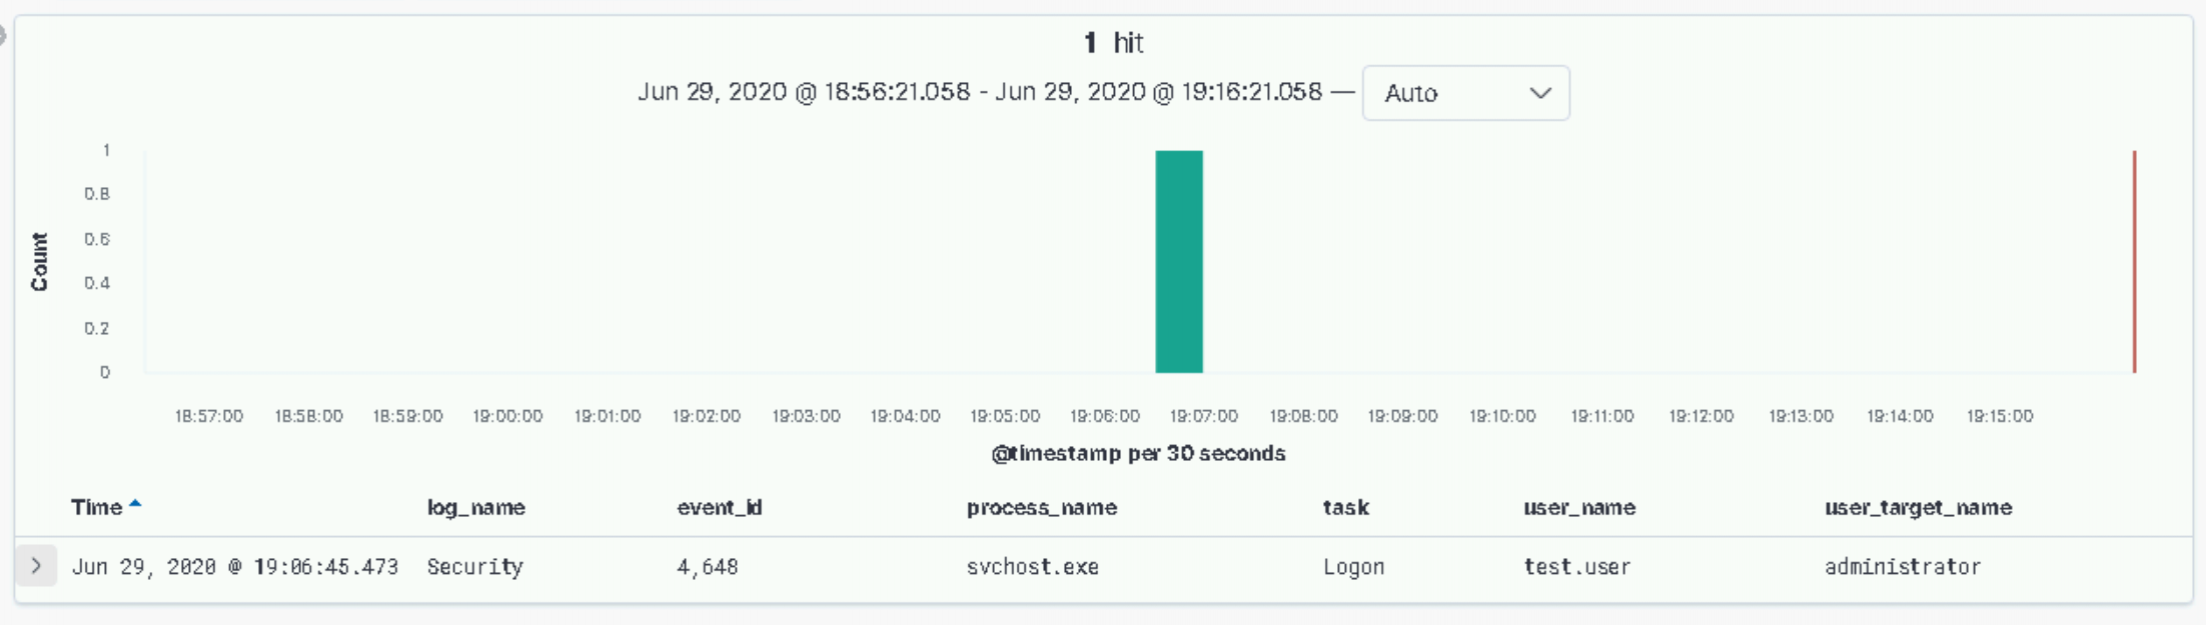
Of course, in a more realistic scenario it’s not going to be as ‘cut and dry’ as that. Especially where PsExec is used as a legitimate admin tool. Furthermore, if we’d authenticated to a host as our user with administrative privileges on the target host, rather than using runas to switch context, we wouldn’t have generated this event. Let’s keep going.
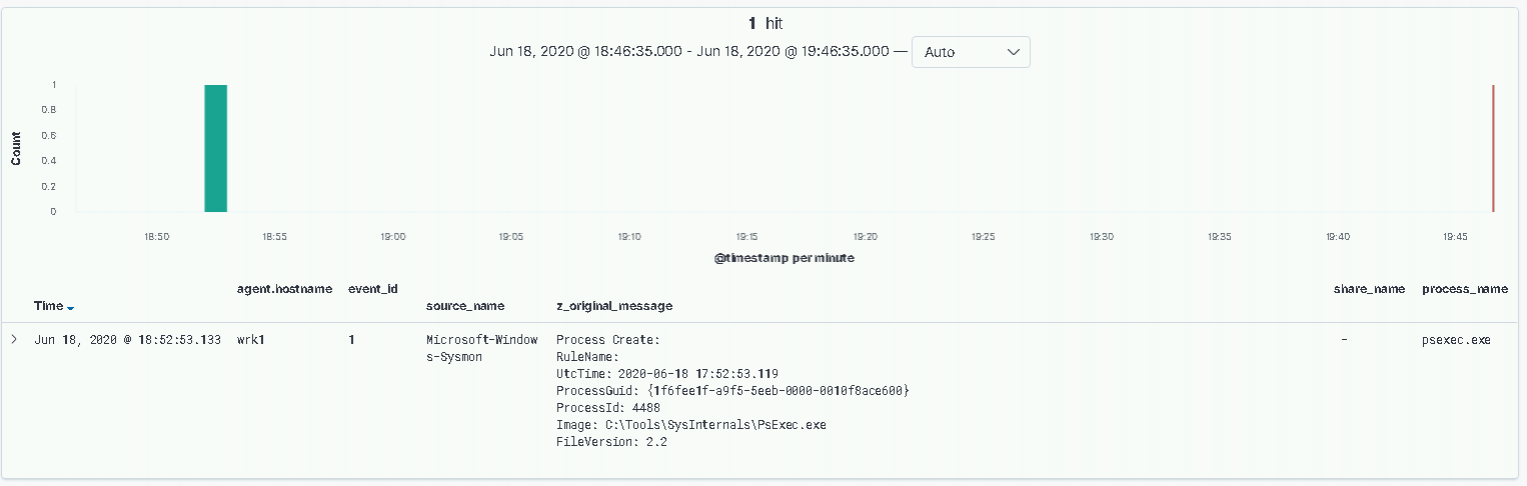
The next event, one which we’ve seen many times throughout this series, is Sysmon EID 1 process creations. In the above screenshot, we can see PsExec.exe running on our workstation host.
One simple tactic to evade detection logic, based on this event alone, is to simply change the name of the executable! Inspecting the subsequent process creation event, we get the following:
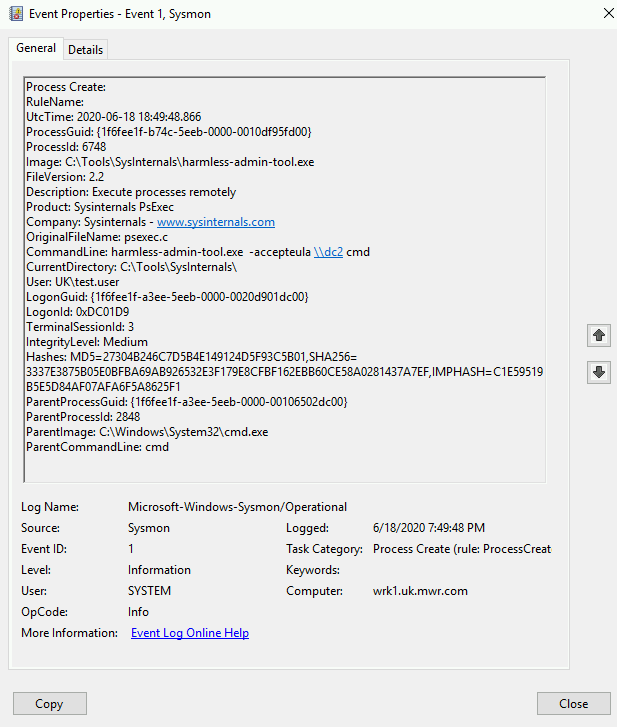
Note the changed “Image” entry with all the surrounding metadata of PsExec remaining, and the “OriginalFileName” entry maintaining the “psexec” name. Focussing solely on this event, we have opportunities to alert upon attempted evasion. We’ll look at more behavioural detection shortly using a Sigma rule from Samir Bousseaden as inspiration.
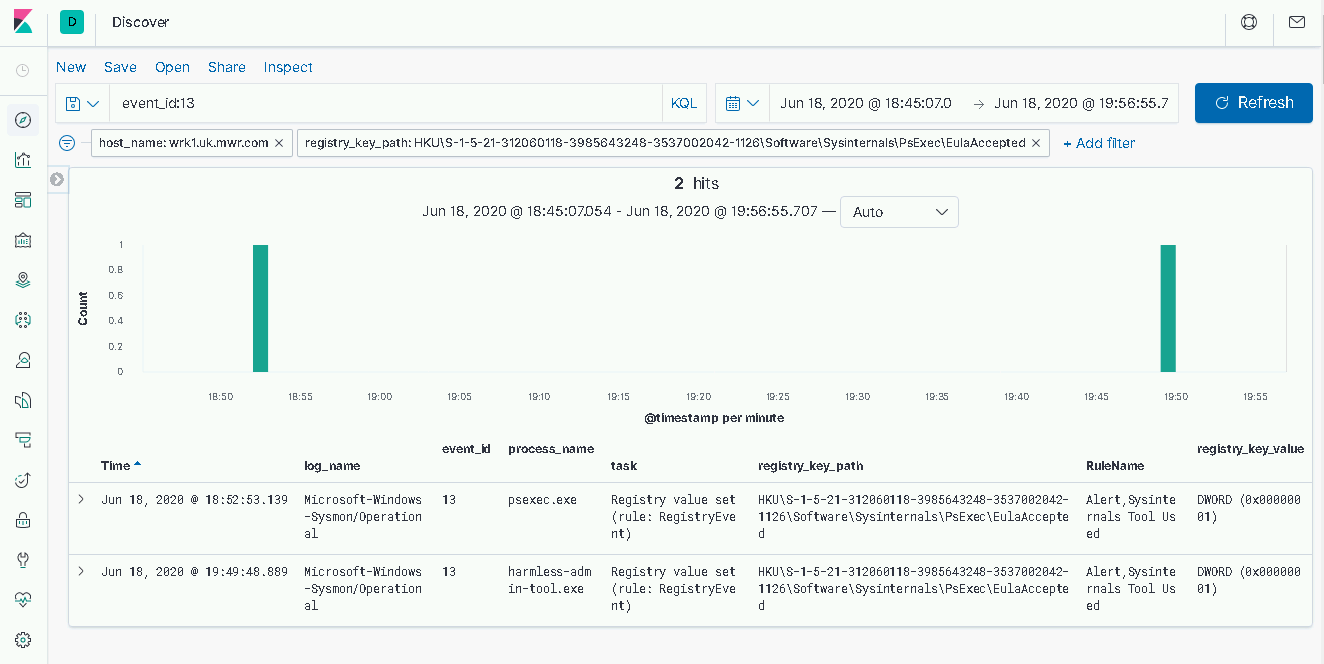
A final event on our source host is the setting of a registry key value to confirm we have accepted the EULA for the PsExec tool upon its first use. This registry key is located at the following path:
HKEY_USERS\[SID]\Software\Sysinternals\PsExec\EulaAcceptedObviously, in the event that malicious use of PsExec is taking place on a host that has previously executed the tool, this offers us little from a detection perspective. Nevertheless, querying standard user workstations for the presence of this key could be a useful hunting exercise.
It’s worth mentioning here too that an attacker could well operate from a host upon which we don’t have visibility, either by physically connecting their own device to the corporate network, or through proxying their traffic through an initially compromised host.
3 – Detection on Target
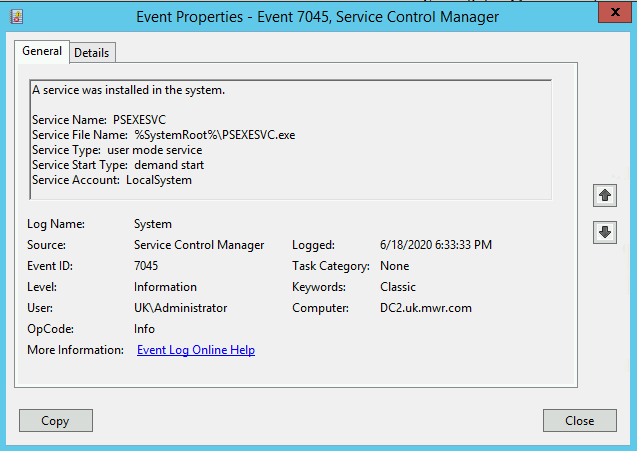
To actually achieve code execution on the target host, PsExec is installed on the target as a service. By default this is named ‘PSEXESVC’. From the endpoint logs, we observe a 7045 event ID for initial service installation, followed by a 7036 EID when the service is launched.
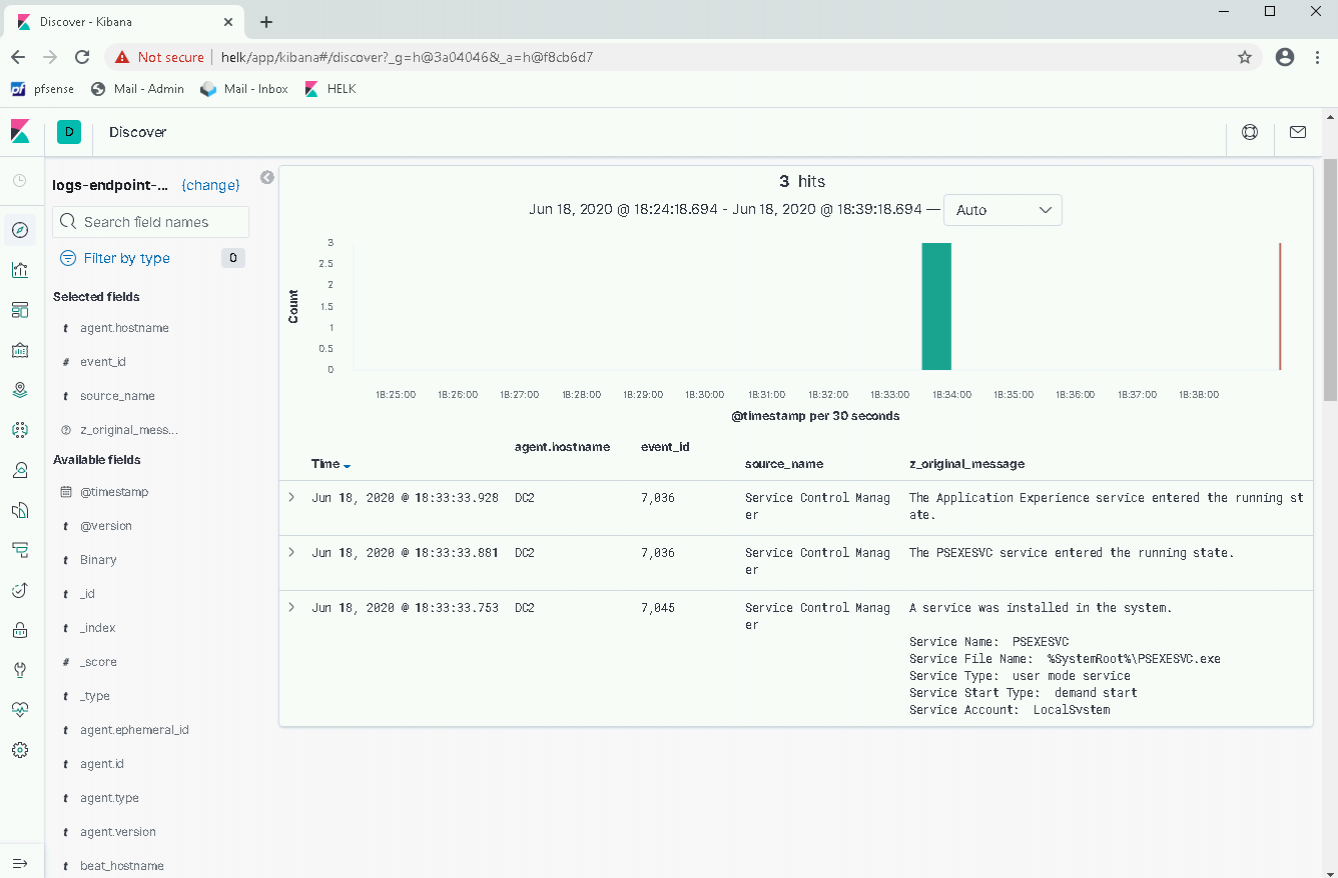
Notably, the PSEXESVC service is uploaded to the ADMIN$ share of the target (i.e. "C:\Windows"), before it is installed as a service. Another opportunity to leverage our 5145 EID?
As we mentioned earlier, let’s take a look at Samir’s Sigma rule. Now, this is specifically to identify behaviour similar to that of PsExec, but from a binary with a different name. The specific behaviour in question is the use of three named pipes, suffixed with stdin, stdout and stderr, that are used to interact with the PSEXESVC service to provide us with our semi-interactive shell.
title: Suspicious PsExec Execution
id: c462f537-a1e3-41a6-b5fc-b2c2cef9bf82
description: detects execution of psexec or paexec with renamed service name, this rule helps to filter out the noise if psexec is used for legit purposes or if attacker uses a different psexec client other than sysinternal one
author: Samir Bousseaden
date: 2019/04/03
references:
- https://blog.menasec.net/2019/02/threat-hunting-3-detecting-psexec.html
tags:
- attack.lateral_movement
- attack.t1077
- attack.t1021.002
logsource:
product: windows
service: security
description: 'The advanced audit policy setting "Object Access > Audit Detailed File Share" must be configured for Success/Failure'
detection:
selection1:
EventID: 5145
ShareName: \\*\IPC$
RelativeTargetName:
- '*-stdin'
- '*-stdout'
- '*-stderr'
selection2:
EventID: 5145
ShareName: \\*\IPC$
RelativeTargetName: 'PSEXESVC*'
condition: selection1 and not selection2
falsepositives:
- nothing observed so far
level: high
We can see this named pipe interaction with our 5145 EIDs in the below screenshot. Note the “ShareRelativeTargetName” field entries with the following naming convention:
[service-name] – [source-host] – [PID] – [std-pipe]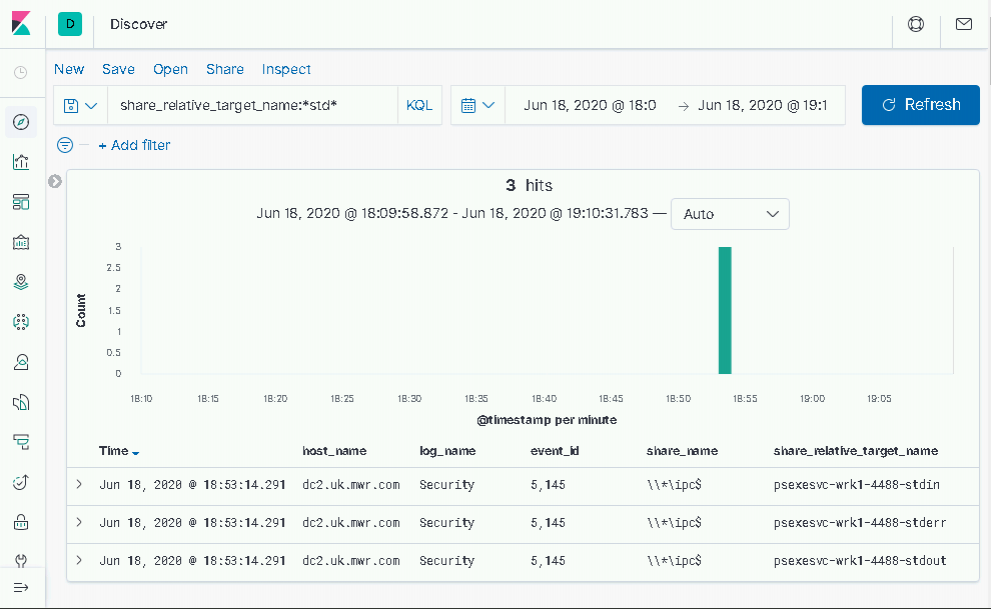
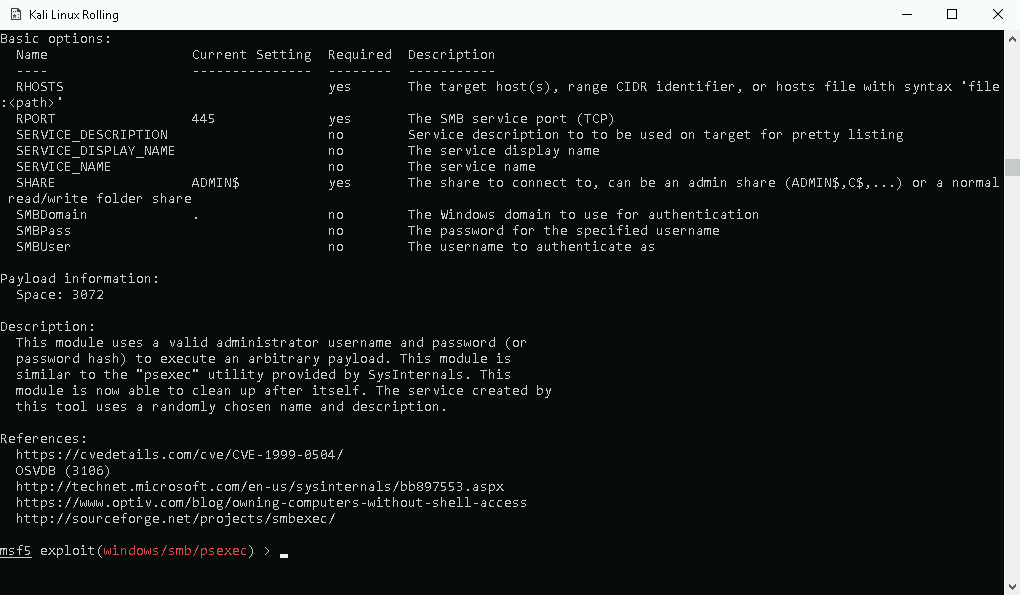
2- Metasploit Variation
Variations on the PsExec tool are present in several offensive frameworks, including Metasploit and Cobalt Strike. These implementations follow a similar behavior of moving over a service executable, installing the service and executing commands, but many customisation options exist. Note in the screenshot of Metasploit below, the options for service name and description changes, as well as the location for uploading the service executable.
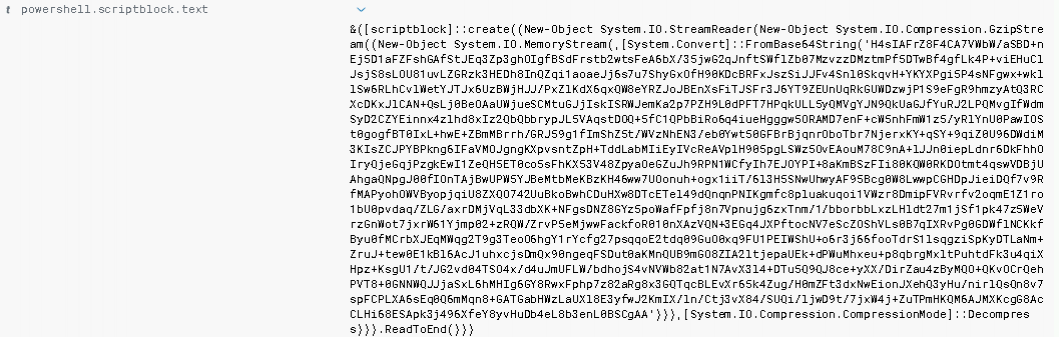
Using the windows/smb/psexec module, our 7045 event – generated by service installation – includes an ImagePath that now contains a launcher for a meterpreter implant.

Reading through the command above, we can see that PowerShell is being used to launch meterpreter. Aside from the suspiciously large service ImagePath, this execution opens up an additional telemetry source which we could create detections, PowerShell Script Block Logging.
It is left as an exercise for the reader to explore the customisation options for the PsExec Metasploit module and find ways to evade detections based on default behaviours.
Conclusion
In this fourth lab of the Discovery and Lateral Movement workshop, we covered how an attacker could make use of the SysInternals tool, PsExec to move laterally between two hosts. We explored the detection options both on the originating host, and the target, and considered the limitations both with regards to the source host not being visible to us, and the many customisation options we have in frameworks like Metasploit. We utilised multiple events in our detections including service creation events, process creation events, and registry key changes.
The main takeaways from this third lab are:
- An awareness of the customisation options available when executing PsExec.
- Importance of telemetry from service creation and registry key change events.
In our final lab, we're going to take a look at WMI for Lateral Movement - let's go!