Attack Detection Fundamentals: Discovery and Lateral Movement - Lab #5
By Alfie Champion on 8 July, 2020
In the third part of WithSecure Consulting's Attack Detection Workshop series, covering Discovery and Lateral Movement, we explored a number of offensive techniques for discovering assets of value, be that users or file shares, and methods for moving between compromised hosts.
We also explored the detection strategies that can be employed to spot these using our own detection stacks. As with previous workshops, the following blog provides a fifth and final step-by-step guide to recreating the demos from that Discovery and Lateral Movement workshop, as well as exercises to further the reader's understanding of the concepts shown.
A recording of the workshop can be found here.
In the previous lab, we looked at a means of lateral movement using the Sysinternals tool, PsExec. We saw detection opportunities from anomalous user logins (when we used Domain Administrator creds on our workstation!), registry keys being set, and services being installed on the target host. We also looked at ways to detect some variations of PsExec including a simple renaming of the executable, to the module in Metasploit.
For this final lab, we’re going to be taking a look at lateral movement using Windows Management Instrumentation, or WMI. As with PsExec, there are many implementations of WMI available for use. Covenant, the .NET framework we’ve used extensively throughout this series, has WMI tasks it can execute, as does Metasploit. Other tools, such as Impacket have implementations too.
First, we’re going to take a look at the built-in Windows WMIC command, before reviewing detection opportunities for one of the tools mentioned above, Impacket’s wmiexec.
References
DISCLAIMER: Set up of the tools and the testing environment might not be covered comprehensively within this lab. We will assume basic familiarity with Linux/Windows command line and the ability of the reader to deploy the necessary frameworks. For that, it is recommended to follow the suggested references for the official tutorials and walkthrough published by the framework's author.
Required Tools
- Active Directory domain with at least one DC and workstation
- HELK (optional)
- Sysmon
- Wireshark
- Impacket
Walkthrough
1 – Basic Execution
To get us started, let’s perform a “runas” as before, spawning a Command Prompt as the “Administrator” user.

With this context we can once again target our domain controller with the following “wmic” command:
wmic /node:dc2 process call create “calc”The command arguments are relatively self explanatory, but for completeness:
- /node:dc2 – we’re targeting our DC2 host.
- process – we’re selecting the alias for Win32_Process
- call – as opposed to other methods used to query values (e.g. get), we’re executing a method.
- create – we’re creating a new instance
- “calc” – the process that’s going to be executed. This could be extended to “cmd /c [command]” to execute arbitrary commands.
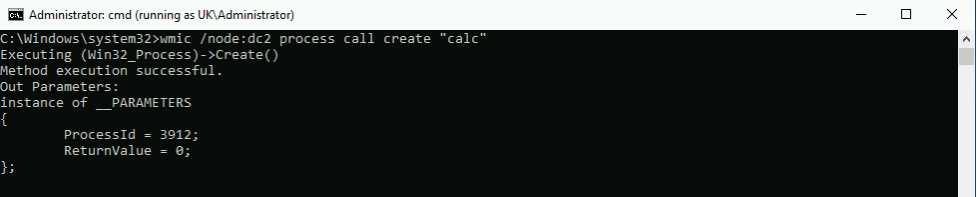
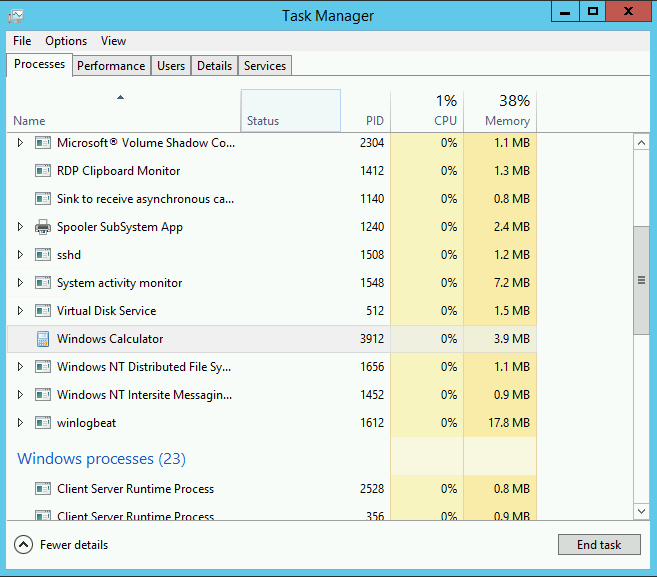
Running the command, we can see it’s been successful and has provided us with the Process ID of the newly-spawned calc. Viewing the Task Manager on the target host, we can see the process running.
2- Detection
Much like PsExec, in terms of logs from the source host, we’re expecting to see the following:
- EID 4648 – If we needed to authenticate as an alternative user, in our case this was the “Administrator” user.
- EID 1/4688 – A new process of “wmic” was created (as seen below)
- EID 5/4689 – Our process terminated.
If we turn our attention to the target host, the first thing we can observe is the process creation of our “calc”.
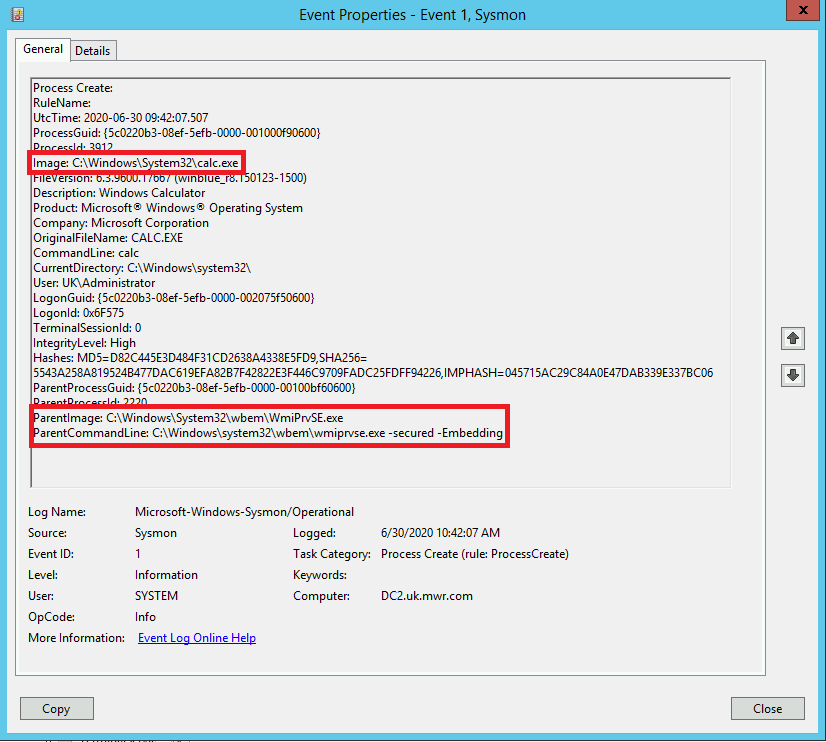
The most important thing to note here is the parent-child relationship. We have our process spawning from a parent of “C:\Windows\System32\wbem\WmiPrvSE.exe” and the parent command line includes the “-secured -Embedding” flags. An initial strategy we could adopt here is to hunt for the processes that have spawned from parents with these arguments, potentially filtering for least frequent occurrences.
3- wmiexec variation
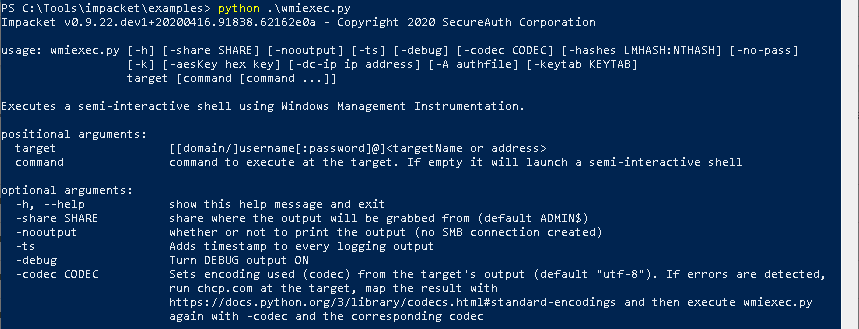
Now, let’s look at the Impacket variation of this, wmiexec. This is a python utility that allows us to leverage WMI to execute commands or obtain a semi-interactive shell. As in the screenshot below, we can run the following command to obtain a shell on our target host:
python wmiexec.py [domain]/[user]@[target-host]
We can add an additional argument to the end of this to execute a specific command, similar to what we did with wmic, but in the above example we’re spawning a shell and executing our “whoami” command. Let’s look at the process creation events this produces.

Analysing the “CommandLine” entries from our EID 1/4688s, we can see a distinct pattern.
cmd.exe /q /c [command] 1> \\127.0.0.1\admin$\__[file] 2>&1Immediately, we can see an opportunity to hunt for processes with this pattern that are spawned from our WmiPrvSE.exe parent process, with the flags we saw before.
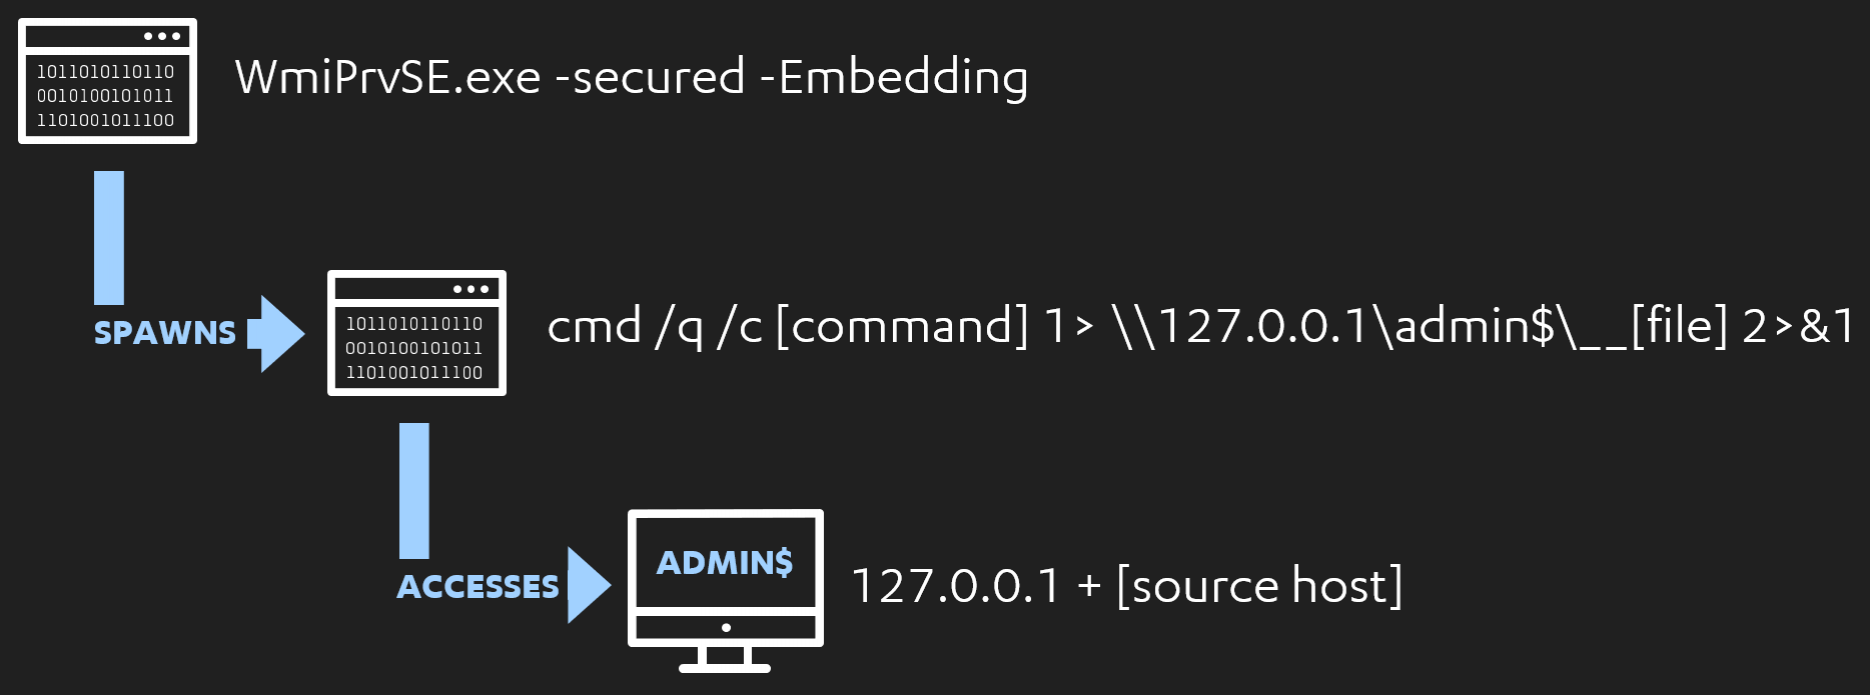
We also have detection opportunities based on the object access telemetry we’ve leverage in previous labs. If we filter for 5145 events involving our target host’s admin$ share, we can see the following.
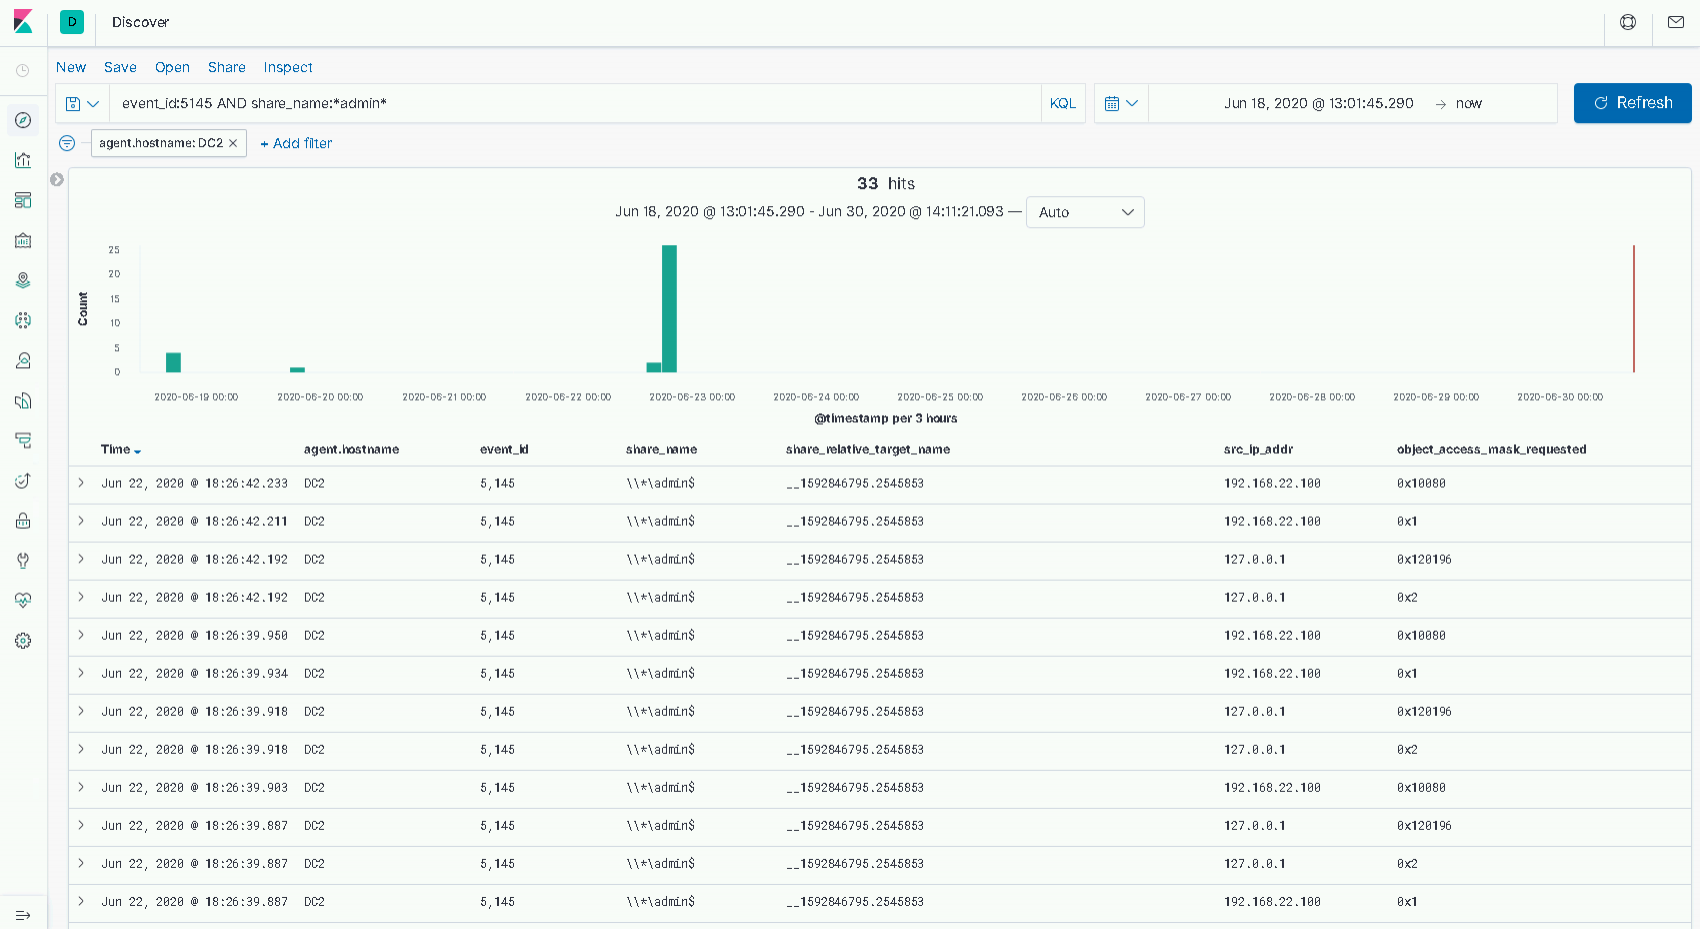
In this case we have two source IP addresses, 127.0.0.1 and 192.168.22.100. The former, of course is our local host. We can see two access masks here, the most notable is 0x2. From the C3 lab, we know this is a WriteData mask, and is almost certainly the event produced when our wmiexec command pipes its output into a file in the "C:\Windows" directory.
The latter IP address, 192.168.22.100, happens to be our attacker host in this environment. We can see two masks of interest:
- 0x1 – The ReadData mask.
- 0x10080 – The DELETE mask and the ReadAttributes masks combined.
If we read through these logs chronologically, we can see a high-level flow of:
- The local host writes data to the file.
- The remote host reads the data.
- The remote host deletes the file.
As we observed with PsExec, there are many customisation options that we should consider when building and evaluating our detections. With wmiexec specifically, reviewing the help output below, we can see two options immediately. We could use the “nooutput” flag to prevent output being written and subsequently read from the share, and we could also change which share we use for this purpose.
4 – Network Detection
In Riccardo Ancarani’s blog on hunting for impacket, we also see another avenue for detection. We could inspect the network traffic between our source and target host. For the purposes of our lab, we can perform this by simply running WireShark, or similar, while carrying out our wmiexec commands.
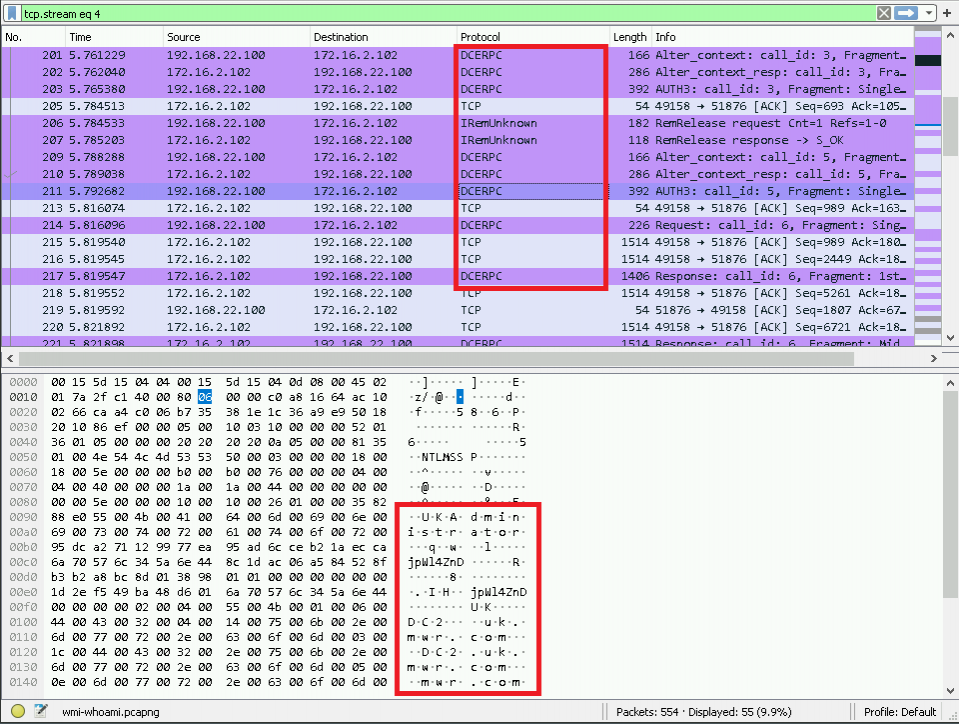
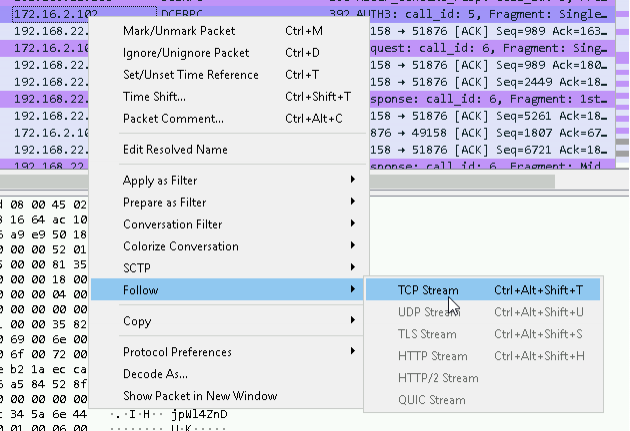
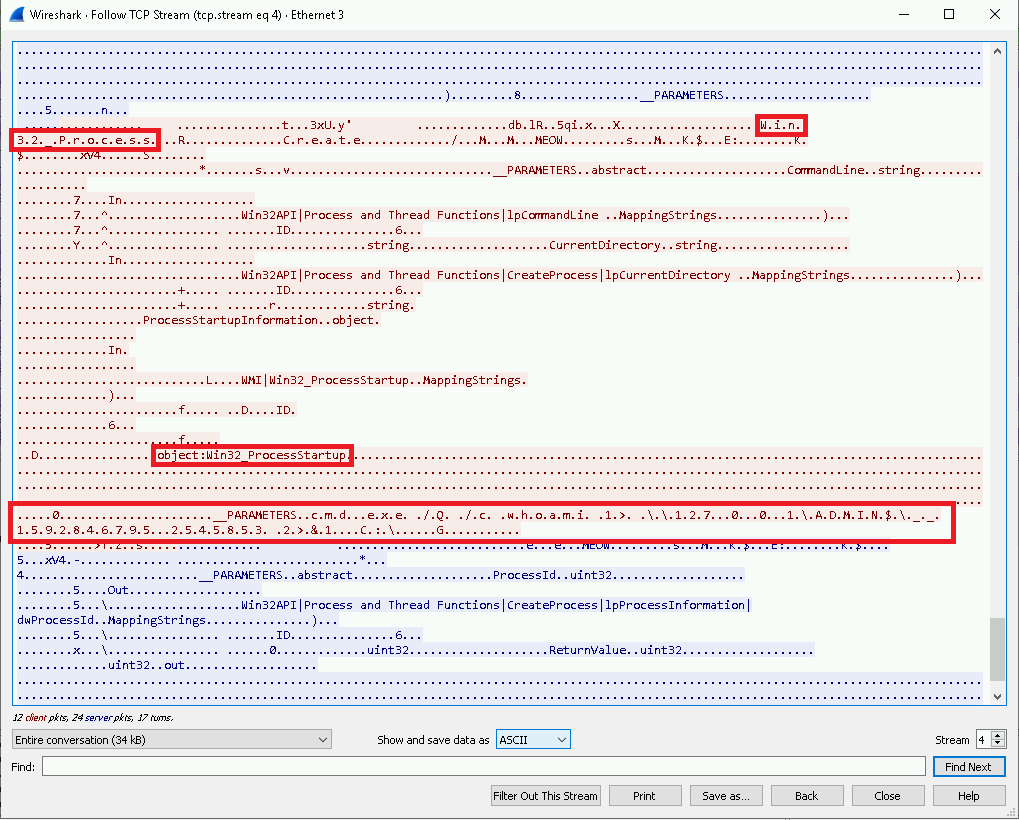
The first thing we can observe is the Distributed Computer Environment Remote Procedure Calls (DCERPC) between our two hosts. We can ‘follow’ the TCP stream using the option shown below:
Here we can observe the interaction between the hosts in plain-text. Without going too deep here, we can see a reference to the Win32_Process alias from the native “wmic” command we executed at the start of the lab. We can also observe the GUID entry, {8502C566-5FBB-11D2-AAC1-006008C78BC7}, which correlates to the CIM_Process DCOM object.

As we continue through the interaction between the two hosts, we can see a reference to the Win32_ProcessStartup object. Reading through Microsoft’s MSDN article on the object we see:
The Win32_ProcessStartup abstract WMI class represents the startup configuration of a Windows-based process. The class is defined as a method type definition, which means that it is only used for passing information to the Create method of the Win32_Process class.
Immediately after the reference to Win32_ProcessStartup, we can see our wmiexec command following the specific command structure we identified previously.
While we won’t take this any further in this lab, we could look to create an IDS alert (using something like Snort, Zeek or Suricata) to alert us when hosts attempt to move laterally using WMI.
Conclusion
In this fifth and final lab of the Discovery and Lateral Movement workshop we covered how an attacker could make use of WMI both using the native “wmic” executable, and a tool such as Impacket’s wmiexec.
We noted that what we’re seeing from wmiexec is customisable within our offensive tooling, and that the EID 1 process creation events with a very specific command line structure are a great indicator, but not infallible.
It’s also worth mentioning that, while we didn’t explore it here, integration with attacker frameworks see’s similar outcomes to what we observed from the PsExec module in MetaSploit; for example, PowerShell one-liners (hello EID 4104s!) spawning from the “WmiPrvSE.exe” process. It’s left as an exercise to explore these possibilities.
The main takeaways from this final lab are:
- Parent-child process relationships with “WmiPrvSE.exe”
- The process creation command line arguments observed from Impacket’s wmiexec.
- The ADMIN$ share access that facilitates our semi-interactive shell.
- The network artefacts we can observe by capturing the traffic between our two test hosts.