Attack Detection Fundamentals: C2 and Exfiltration - Lab #3
By Alfie Champion on 15 July, 2020
In the fourth and final part of WithSecure Consulting's Attack Detection Fundamentals Workshop series, covering Command and Control (C2) and Exfiltration, we explored a number of attacker techniques for maintaining communication with an implant, blending in with corporate network traffic.
We also explored the detection strategies that can be employed to spot these channels using our own detection stacks, including ways to spot these channels being used for exfiltration. As with previous workshops, the following blog provides a final step-by-step guide to recreating the demos from that C2 and Exfiltration workshop, as well as exercises to further the reader's understanding of the concepts shown. A recording of the workshop can be found here.
In the previous two labs (here and here), we looked at HTTP and DNS C2 channels - two common protocols that are typically permitted out of a corporate network. We looked at ways to analyse these, using attributes like user agents, URIs, packet size and uncommon DNS record types. Of course, we could enrich these detections using external sources, such as domain categorisation and domain age. In our final lab of the workshop, and of the series, we're going to be looking at a C2 technique that makes the identification of command and control channels even more challenging. We'll use C3 to establish a command and control channel over Dropbox, masking our implant traffic as file uploads and downloads.
One critical telemetry source for monitoring C2 traffic is the logs from a web proxy. Rather than implement a web proxy in our lab environment we will once again turn to our ETW providers for a log that is reasonably similar (and as we'll see, in some cases even better!). We've used Ruben Boonen's SilkService and Roberto Rodriguez's HELK in previous labs, so we won't go into the specifics of those. We’re going to use the Microsoft-Windows-WebIO ETW Provider, which provides us with, amongst other things, visibility of web requests made by some system processes. Our configuration can be seen below:
<SilkServiceConfig>
<!--
Microsoft-Windows-WebIO ETW Provider
-->
<ETWCollector>
<Guid>870b50e1-04c2-43e4-82dd-1a1444a56364</Guid>
<ProviderName>50B3E73C-9370-461D-BB9F-26F32D68887D</ProviderName>
<CollectorType>user</CollectorType>
<OutputType>eventlog</OutputType>
</ETWCollector>
</SilkServiceConfig>
As mentioned above, it’s worth noting that web proxy logs would provide a very similar capability with regards to hunting for suspicious web requests; though, as we’ve seen before, ETW allows us to trivially map generated telemetry to the processes that produced it. We’ll see the benefits of this in the following lab.
References
- SilkETW and SilkService
- Covenant
- Threat Hunting with ETW and HELK
- Microsoft ETW Introduction and Overview
- C3 - Walkthrough
- Countercept's Hunting for C3
DISCLAIMER: Set up of the tools and the testing environment might not be covered comprehensively within this lab. We will assume basic familiarity with Linux/Windows command line and the ability of the reader to deploy the necessary frameworks. For that, it is recommended to follow the suggested references for the official tutorials and walkthrough published by the framework's author.
Required Tools
- HELK
- SilkService
- Sysmon
- C3
- Covenant or Cobalt Strike (optional, if we want to explore post-exploitation activities performed through our Dropbox channel)
Walkthrough
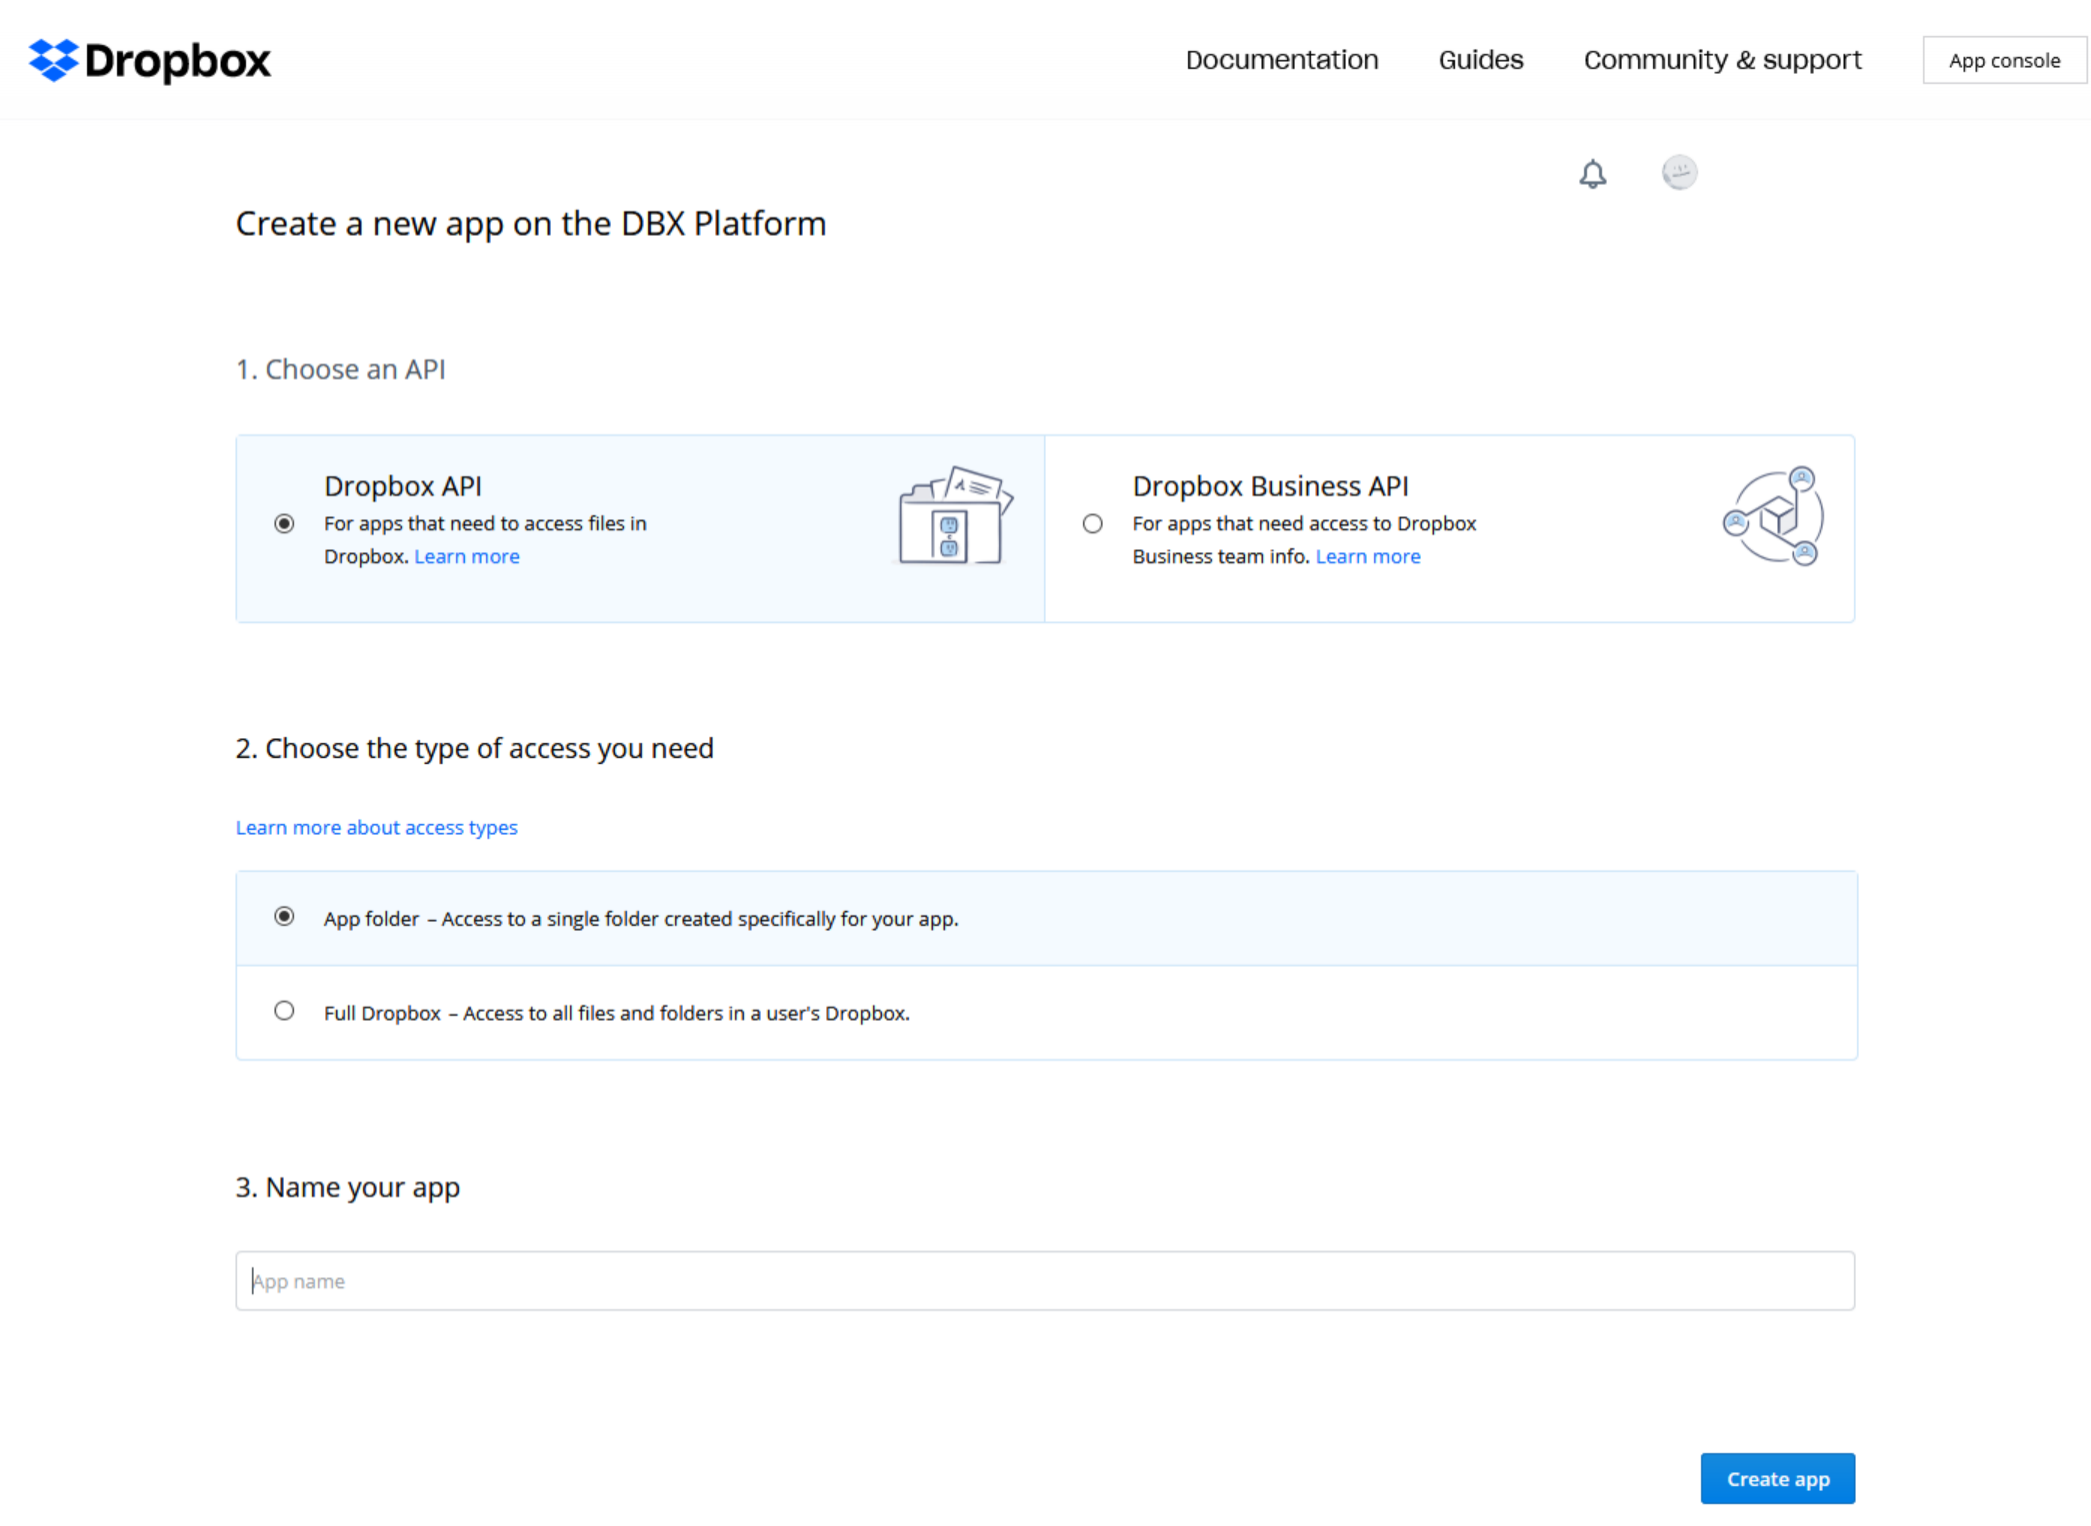
1 - Dropbox Setup
In our Dropbox account, we can navigate to the Developer App Console and create a new app. Here we can configure our app to use the “Dropbox API”. For the purposes of C3, the “App folder” access is sufficient. Finally we can give our app a unique name.
Having successfully configured the app, we can now generate an access token which can be used to interact with our account.
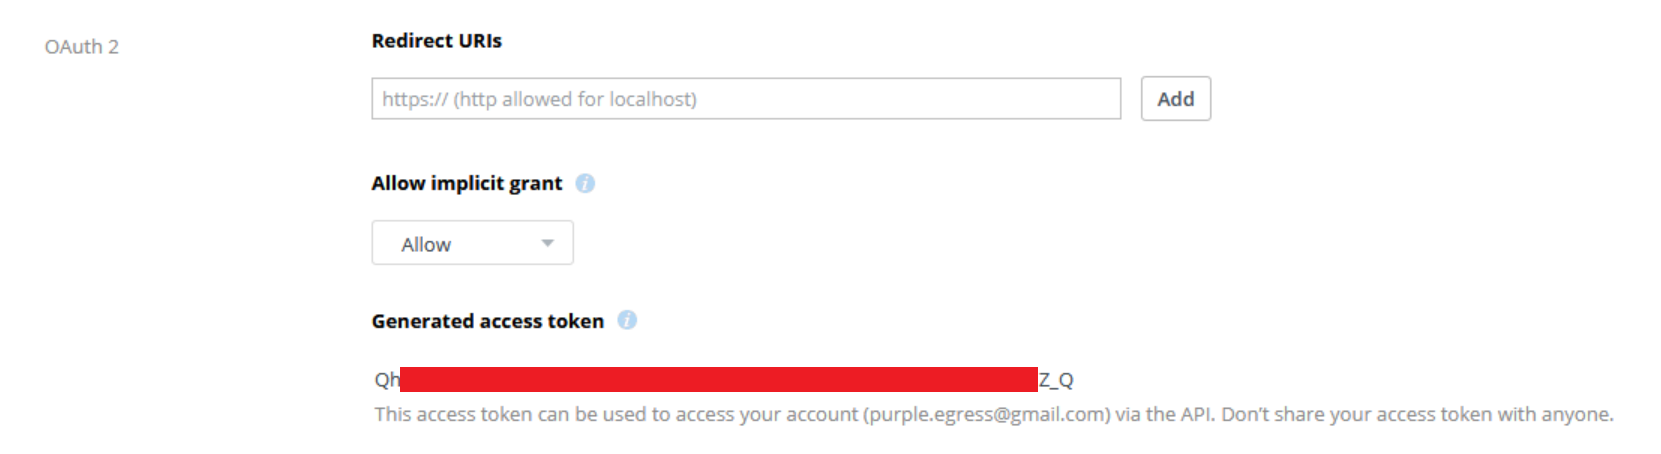
We can now take this access token and configure a negotiation channel in C3.
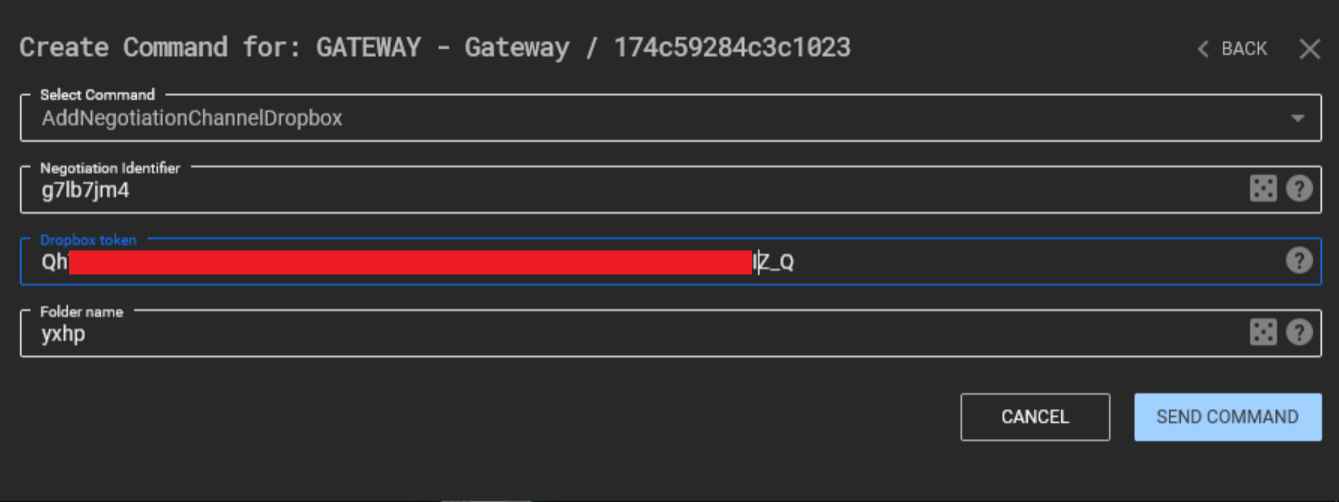
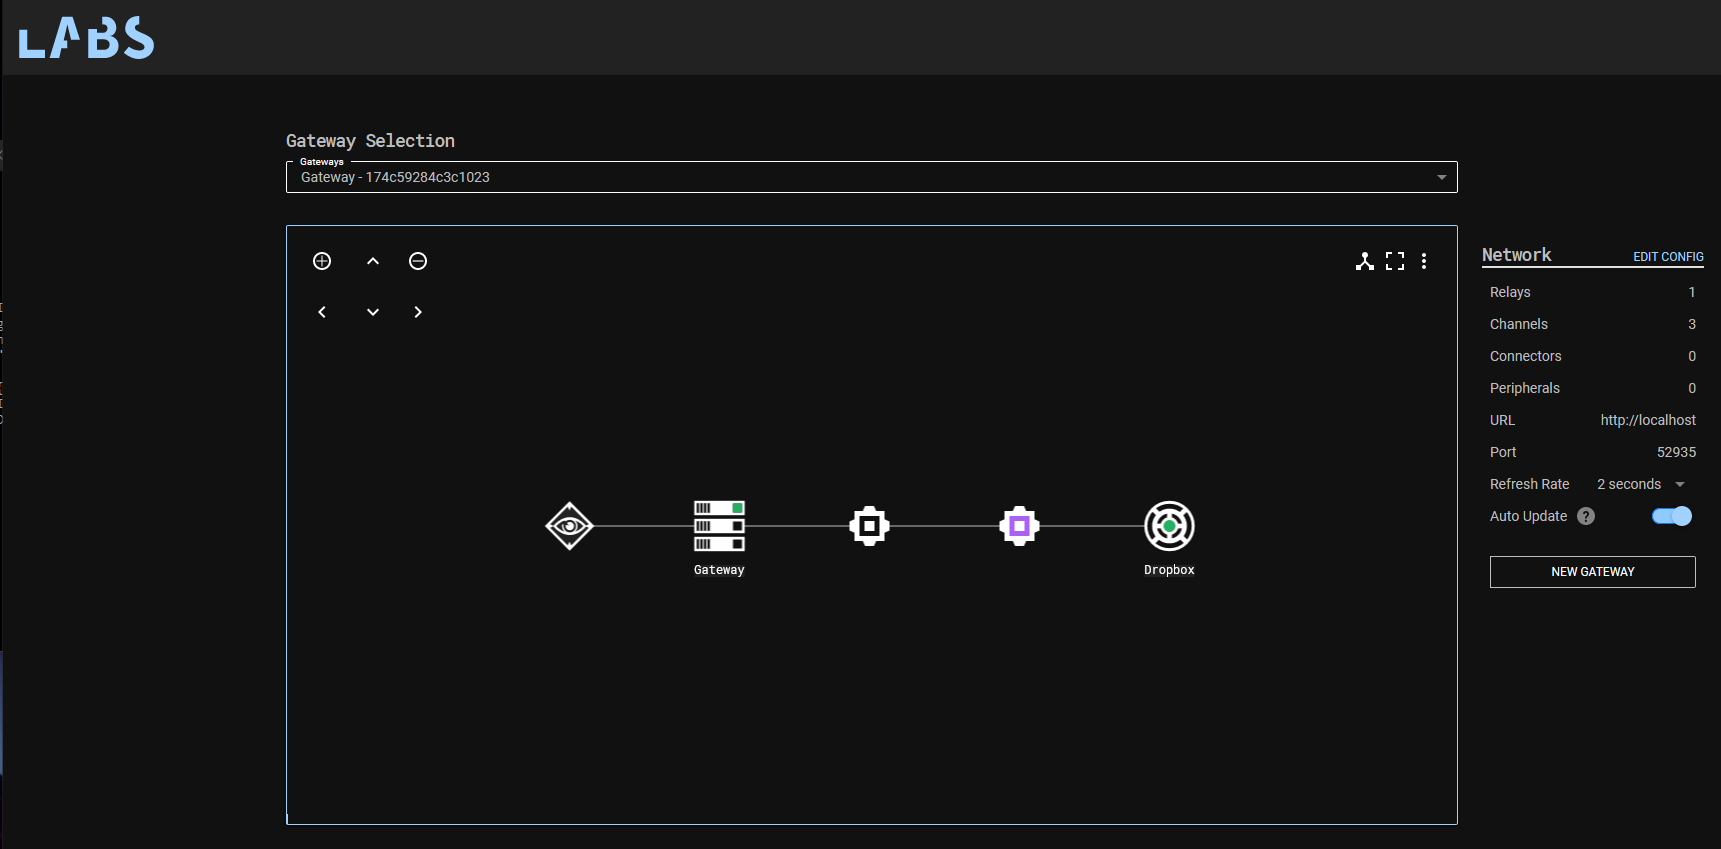
If all has gone well, C3 will create a new folder in our Dropbox app folder, in this case with the name "yxhp".
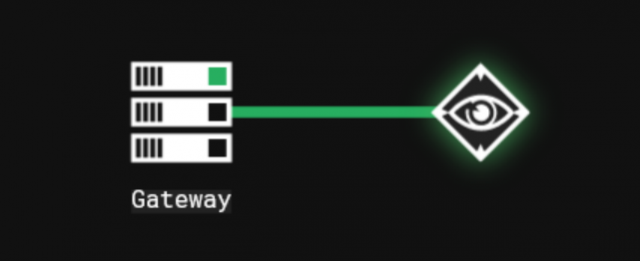
As we’ve done before, we can now request a new Relay, configured to communicate over our established Dropbox channel. If we execute the Relay on our target host, we should see files written to our Dropbox folder.
We now have a command and control channel communicating over Dropbox!
2 - Detections
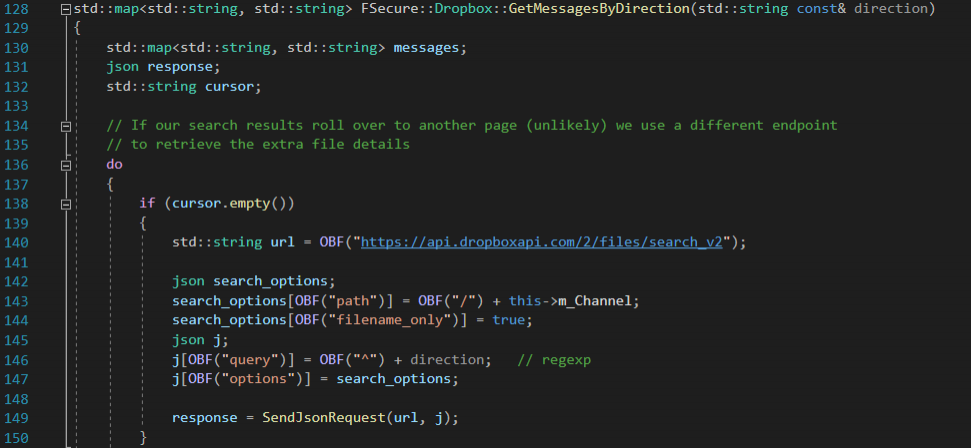
If we take a look at the codebase for the C3 Dropbox channel, we can see a number of API endpoints used. For example, the “GetMessagesByDirection” function uses the following URL:
https://api.dropboxapi.com/2/files/search_v2This “search” endpoint allows us to fetch a list of all files that are destined for our Relay, based on the Dropbox folder they’re in, and the filenames in use. We can see the query being constructed in the below code:
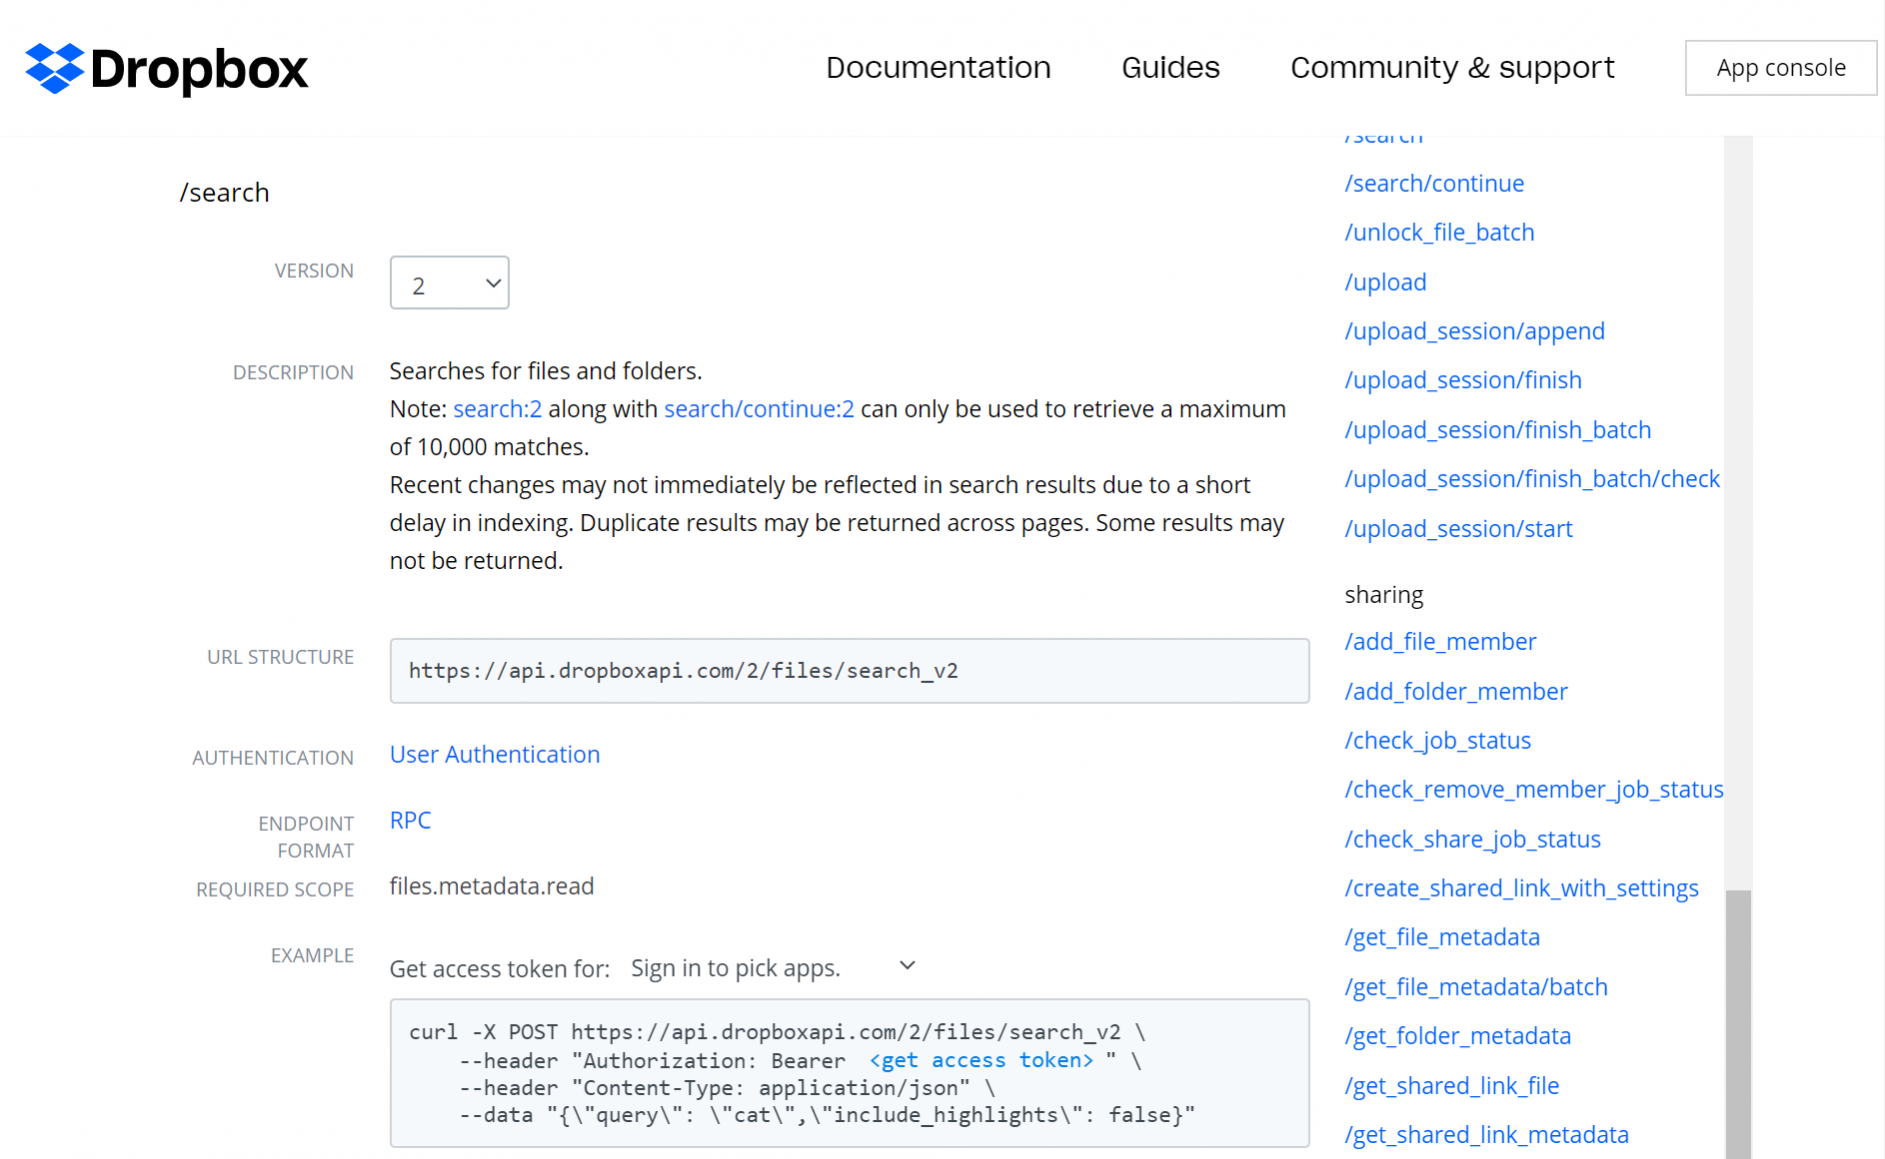
We can confirm this functionality by checking the Dropbox API reference documentation:
It's worth mentioning that the "search" API endpoint is used here to efficiently retrieve a filtered list of files from our channel folder (i.e. the inbound files, see line 146 in the screenshot above). An alternative implementation could use the "list_folder" endpoint and have us filter the file names ourselves. Hunting for both implementations might be useful.
A full list of the URL’s used in the Dropbox channel can be seen below:
C3 Function | URL |
WriteMessageToFile | https://content.dropboxapi.com/2/files/upload |
ListChannels | https://api.dropboxapi.com/2/files/list_folder |
CreateChannel | https://api.dropboxapi.com/2/files/create_folder_v2 |
GetMessageByDirection | https://api.dropboxapi.com/2/files/search_v2 |
ReadFile | https://content.dropboxapi.com/2/files/download |
DeleteFile | https://api.dropboxapi.com/2/files/delete_v2 |
Now, before the Relay can communicate with Dropbox, it must first resolve the domain name (“api.dropboxapi.com”) it intends to use for polling the configured folder. Likewise, as we can see from the above table, a second URL needs resolving to write messages to Dropbox (“content.dropboxapi.com”). With Sysmon configured to log DNS queries, we can see our Relay executable producing EID 22s for each query.
Immediately, we have a detection opportunity here - we would expect a very small number of processes to legitimately make DNS queries for these URLs (browsers and Dropbox client applications, to name a few). If we’re operating in a highly-restricted corporate environment, that has no legitimate use for Dropbox, any process making such DNS requests may be worthy of investigation!

Having reviewed the C3 channel code, we know that our Relay will repeatedly check the contents of the Dropbox folder for files to read. Much like the UNC file share we saw in our last lab using C3, we would expect to see similar beaconing behaviour here.
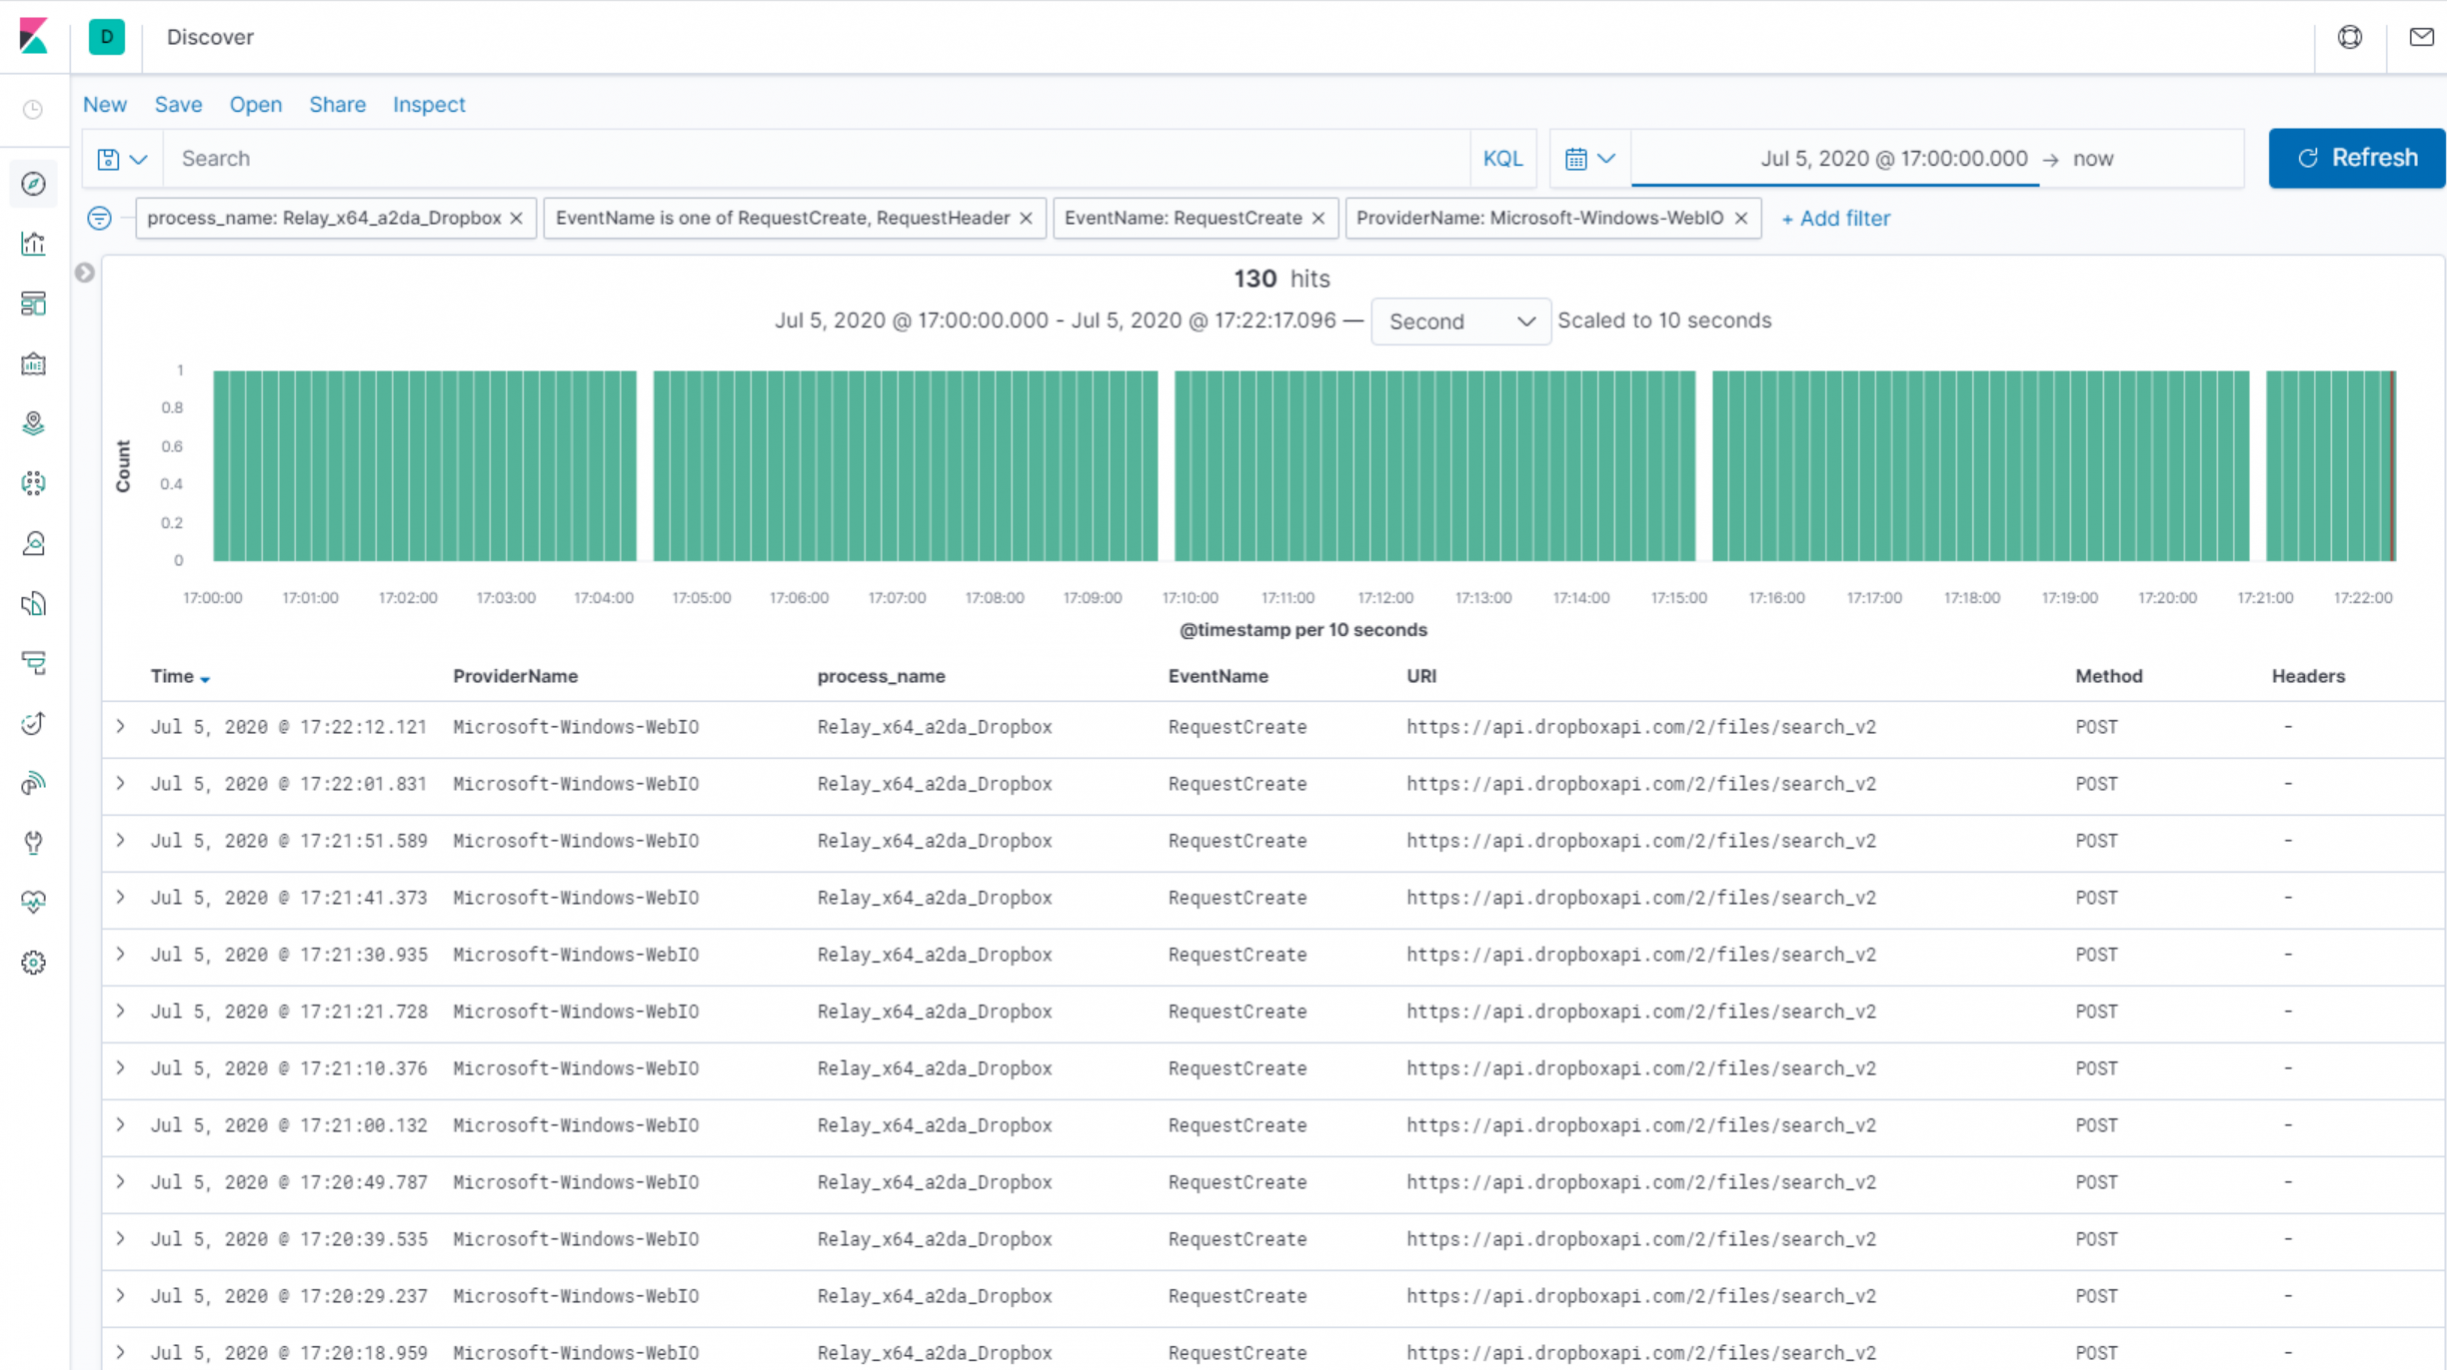
If we hunt in our Microsoft-Windows-WebIO ETW provider, we can see our Relay process creating requests to the “search” API endpoint consistently every 10 seconds. We have another detection opportunity!
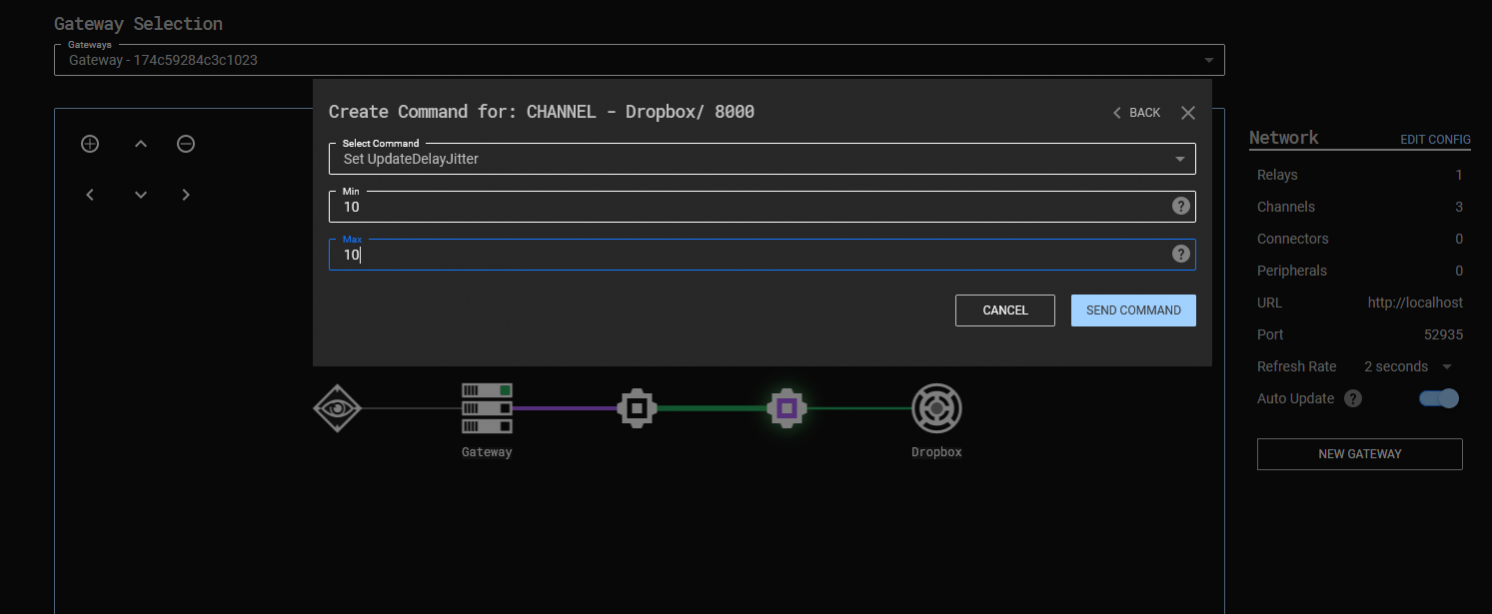
Of course, it’s worth mentioning that this polling frequency is entirely within our control as an attacker. If we click the “Gateway Return Channel” node (the purple node, just before the Relay in the C3 graph below), we can use the “Set UpdateDelayJitter” command to set “Min” and “Max” values. These allow us to specify the minimum and maximum amount of time (in seconds) the Relay should wait, prior to polling our “search” function again. The Relay will then pick a random wait time within these two boundaries before each request. This variation in polling times, also known as jitter, is designed to evade security controls that seek to identify beaconing behavior.
In a real attack scenario, it’s common to see threat actors establish a long-haul command and control channel. These channels are used as a backup to other C2 channels and have a greatly-reduced polling frequency maintaining an attackers foothold within a target environment, should other C2 channels be “burnt”.
It’s worth considering therefore, that we might not be “fortunate” enough to see such stand-out, high-frequency traffic between our Relay and the Dropbox’s APIs. And that, if this is the case, we may have to rely on other detection opportunities, such as anomalous DNS queries and web requests.
Finally, let’s take a look at our Relay’s network behaviour in the event that it is tasked with carrying out some function. For the purposes of this lab, we can just use the Relay “ping” command to induce a write action, though you may wish to use a Covenant Grunt peripheral, as we explored in the previous workshop.
Observing the web requests created from our Relay executable, we can see the calls to “download”, “delete” and “upload”. From a functional perspective, what we’re seeing here is:
- Ahead of the below requests, our attacker C3 server (a.k.a. Gateway) has written a message to our Relay.
- Our relay will make an API request to download this file (using “https://content.dropboxapi.com/2/files/download”).
- Once downloaded and read, it will delete the file (using “https://api.dropboxapi.com/2/files/delete_v2”).
- It will then upload a response to the message (using “https://content.dropboxapi.com/2/files/upload”).
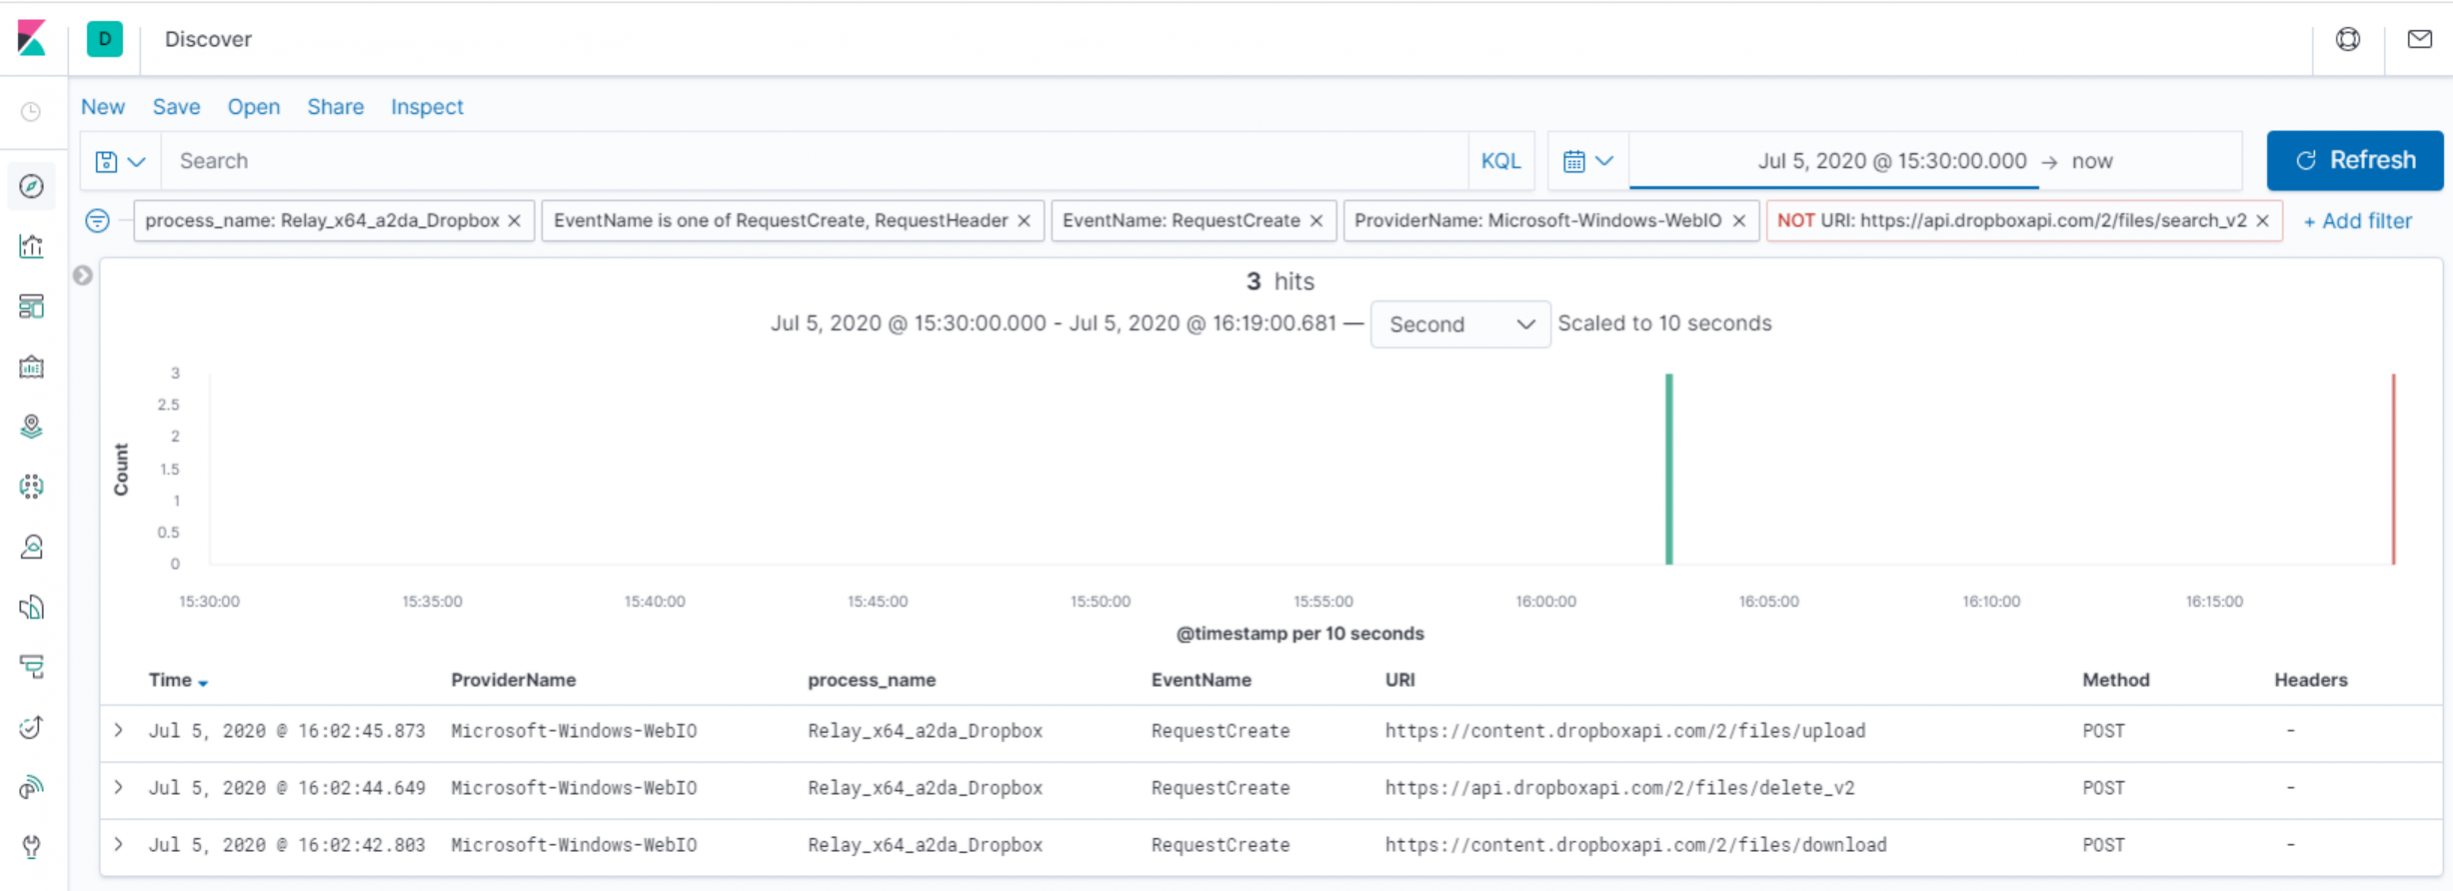
Notably, we can see that these three requests are performed as our Relay processes each task from the C3 server. We may have an opportunity to detect this behaviour based on the presence of these three requests in close-proximity.
Conclusions
In this final lab of our workshop series, we covered how an attacker could make use of a legitimate third party service, like Dropbox, to maintain communications with an implant in a target environment. We used our proxy-like ETW logs, as well as the telemetry provided by Sysmon to identify opportunities to detect this malicious activity.
The main takeaways from this final lab are:
- An overview and demonstration of C2 using a legitimate web service.
- Opportunities to detect these channels through identifying processes making anomalous DNS lookups and subsequent network connections.
- A basic review of the C3 channel code to identify URLs to hunt for.
- A simple example for identifying beaconing behaviour.
That's it for our Attack Detection Fundamentals workshop series - thanks for joining us!