Automating Pwn2Own with Jandroid
By on 1 November, 2019
In this post, we describe a purpose-built tool for automatically (or, more accurately, semi-automatically) identifying exploitable logic bugs within Android applications.
Background
Firstly, what are logic bugs and why do we care about them?
A logic bug is a bug in code that, rather than causing the code to crash, results in unexpected behaviour. In certain cases, the unexpected behaviour can have security ramifications, such as enabling arbitrary code execution.

As for the “why do we care?”… It all originated with Mobile Pwn2Own (p2o) competitions. In these competitions, the goal is to achieve code execution or file exfiltration with minimal to no user interaction (a single browser click or SMS is normally all that’s allowed, and the exact expected outcome varies year-by-year).
The traditional route for exploiting mobile platforms was to look for memory corruption vulnerabilities, such as buffer overflows. However, active mitigations make this class of vulnerability more and more difficult to detect. Luckily, clever people from F-Secure (then MWR) found that logic bugs could be exploited to realise the same goal, and in fact used them to win Mobile Pwn2Own two years in a row [See "Chainspotting" and "The Mate Escape" for details].
What does a logic bug look like?
This is tricky, because different logic bugs enable you to do different things, and there will be different signatures to look out for with each. The platform of execution is obviously key here, because it determines the exact method calls or configuration that we need to look for. In this post, we focus on the Android OS.
Because Mobile Pwn2Own normally begins with clicking a link within the mobile browser, a typical starting point when looking for logic bugs in Android is to look for browsable activities where the URL to browse to is under the control of the user (and therefore, the attacker).
Browsable or exported activities that call web views with a JavaScript Interface defined on them are even more interesting, because the functions defined within the JavaScript Interface might allow you to do lots of different things. Calls to the Android PackageInstaller are always interesting because these may be exploitable to install packages of your choice.
So how do we go about finding these bugs?
Logic bugs within an Android application are normally identifiable via an analysis of the application code as well as its manifest file. So, for example, if we wanted to find an app with browsable activities, we could grep for “android.intent.category.BROWSABLE” within decompiled APKs. If we wanted to look for a web view with a JavaScript Interface, we could grep for “Landroid/webkit/WebView;->addJavascriptInterface”. We could then manually check whether the JavaScript functions receive any input from the browsable intent. However, manually analysing an Android APK can be a tedious process and, given the number of applications that come pre-installed on most modern Android phones, manually analysing all the APKs on a device would consume a large amount of time.
During "Chainspotting", Rob Miller and Georgi Geshev came up with the idea to create something along the lines of Joern for Android, to simplify the bug hunting process. A proof-of-concept was created at that point, and has now brought about Jandroid: a tool to analyse APKs and identify those that may satisfy one or more bug conditions.
Note that Jandroid doesn’t necessarily output definite bugs. But it can help narrow down the list of possibilities to a more manageable pool of APKs.
Design choices: hard-coded vs. templates
One way to find logic bugs automatically would be to code for every possible flavour of known logic bugs. However, this wouldn’t be too extensible because, if a new logic bug becomes known, you would need to understand the previously written code and then add to it.
In the hopes of making the extension process easier, Jandroid uses templates, which are (in theory) easier to understand and add to when compared with hard-coded checks. That is, the user specifies patterns that Jandroid should look for within the APK code and/or manifest. If a new logic bug becomes known, then we only need to add a new template.
Templates allow for pattern checking against the Android Manifest, as well as for searching or tracing within the APK code. See "Defining templates" for more details on the template structure.
Analysis and output
Jandroid uses Androguard to perform the required analyses against all given templates and returns a True/False output for each. Depending on the template specification, it can also output details on exactly which part of an application matched the specified template.
Jandroid by default writes its analysis output to JSON files. It also provides an option for graphing the output, so that a user can visualise the trace/exploit chains. More about that later.
Usage
This is all peachy, but how do we use Jandroid?
Using Jandroid is a 6-step process (the first time at least).
- First, obviously, you have to download Jandroid. This is available on the F-Secure Labs Github.
- Install all pre-requisites. This can be done by navigating to the base folder (also referred to as <Jandroid home>) and executing pip install -r requirements.txt.
- Next, define any templates you want. The next section describes this step in greater detail. Note that Jandroid comes with some pre-defined templates. If you don’t want to use them, rename the file extension to something other than .template.
- Also, set any configuration options you want. This can be done by modifying the <Jandroid home>/config/jandroid.conf file. You can, for example, choose to run Jandroid in multiple parallel threads. However, this can use up a lot of memory, so do this only if you’re running Jandroid on a fairly powerful server.
- Copy your APK files to <Jandroid home>/apps/.
- Finally, run Jandroid from within the <Jandroid home>/src folder using the following command:
python jandroid.py [-h] [-f FOLDER] [-p [{android}]] [-e [{device,ext4,img}]] [-g [{neo4j,visjs,both}]]
Here, FOLDER is the folder containing .apk or .dex files.
Jandroid also supports extracting files from system.img or .ext4 files (specified using the -e flag). If this option is to be used, then the system.img or .ext4 file must also be placed within FOLDER.
The -p flag selects the platform (currently only "android" is supported).
The -g flag indicates graphing options (discussed in detail here).
After the initial setup, you will probably only need the last four steps (in many cases, just the last two) for subsequent runs of the code.
Defining templates
A template as used in Jandroid is simply a JSON file with a .template extension. It has specific sections, some of which are optional, as well as fixed keywords that can be used to specify patterns. Patterns can be specified on the APK manifest as well as on the code, and must be specified in a certain format.
A template has four possible first-level keys:
- METADATA (required): Contains generic information. Right now, it contains only one sub-key for the bug name.
- MANIFESTPARAMS: Sub-keys are structured like an Android Manifest, where a user can specify tags or tag values to match.
- CODEPARAMS: Can have SEARCH and/or TRACE sub-keys. SEARCH performs a simple search for a class, method or string within the Android smali code. TRACE checks for the presence of a link between two given endpoints and can output a “chain” of the method calls that result in the link.
- GRAPH: Used to specify data that is to be graphed.
Any template must have at least one of MANIFESTPARAMS or CODEPARAMS. The GRAPH key is needed only if the output is to be graphed.
To make a bit more sense of all that, let’s consider a use case where we want to identify a browsable activity that calls the loadUrl method of a webview that has a JavaScriptInterface. The existence of such a path could indicate that URL parameters are being obtained from the browsable intent.
METADATA
The first key is simple enough. We add a METADATA key with a NAME sub-key, and give the template a unique name.
"METADATA":
"NAME": "BrowsableJSLoad"
}
MANIFESTPARAMS
Identifying browsable activities is something that requires an analysis of the AndroidManifest.xml file. So we add a MANIFESTPARAMS key. This key follows the same structure as the AndroidManifest.xml file, but we can skip some levels by specifying a starting BASEPATH.
"MANIFESTPARAMS": {
"BASEPATH": "manifest->application->activity OR manifest->application->activity-alias",
"SEARCHPATH": {
"intent-filter": {
"action": {
"LOOKFOR": {
"TAGVALUEMATCH": "<NAMESPACE>:name=android.intent.action.VIEW"
}
},
"category": {
"LOOKFOR": {
"TAGVALUEMATCH": "<NAMESPACE>:name=android.intent.category.BROWSABLE"
}
},
"data": {
"RETURN": ["<NAMESPACE>:host AS @host", "<NAMESPACE>:scheme AS @scheme"]
}
}
},
"RETURN": ["<smali>:<NAMESPACE>:name AS @activity_name"]
The BASEPATH key specifies the level we want to start from. Since we only want browsable activities, we don’t care about the upper levels. So, we start from the activity (or activity-alias) tag. Multiple starting points at the same level can be specified using the OR keyword.
The SEARCHPATH specifies the tree structure to search.
At any branch within SEARCHPATH, you can have the following keys:
* LOOKFOR: What it is that you want Jandroid to look for (we're all about very obvious names here). This can have the following sub-keys:
* TAGEXISTS: Check for the existence of a tag.
* TAGNOTEXISTS: Check for the absence of a tag.
* TAGVALUEMATCH: A tag and value to match.
* TAGVALUENOMATCH: Check that a tag does not have a particular value.
* RETURN: You can return values at any level, and these values can then be used by the code analysis process or graphed. So in this example, we return any activity that satisfies the condition of having a BROWSABLE intent and a VIEW action. We also return the host and scheme of any intent filter defined for the activity, which satisfies the BROWSABLE condition.
Note that we use a generic <NAMESPACE> placeholder for the namespace. This is because, in rare cases, a namespace other than "android" is used. By using a placeholder, we leave it to Jandroid to enumerate all the namespaces and substitute them for the placeholder.
CODEPARAMS
Now we need to find any web view that has a JavaScript Interface defined on it. We also want the loadUrl method to be called on this web view and for there to be a path from the browsable activity/activities we identified in the first step to the loadUrl call. All of this has to be done within the Android code, not the manifest, so we add a CODEPARAMS key.
To make things easier, we split this into two parts. We first SEARCH for all web views with JavaScript Interfaces. Note that this must be defined as smali, not Java.
"CODEPARAMS": {
"SEARCH": {
"SEARCHFORCALLTOMETHOD": {
"METHOD": "Landroid/webkit/WebView;->addJavascriptInterface",
"RETURN": "<class> AS @web_view"
}
},
We then TRACE for the presence of a path between the web view's loadUrl method and the browsable activity/activities that were identified during the manifest analysis stage. We return this path for later use.
"TRACE": {
"TRACEFROM": "<method>:@web_view[]->loadUrl(Ljava/lang/String;)V",
"TRACETO": "<class>:@activity_name",
"TRACELENGTHMAX": 10,
"RETURN": "<tracepath> AS @tracepath_browsablejsbridge"
}
}
GRAPH
Finally, we specify what we want graphed. In this case, we want the entire path from the browsable activity to the loadUrl call (which is what we RETURNed in the previous step).
"GRAPH": "@tracepath_browsablejsbridge WITH <method>:<desc>:<class> AS attribute=nodename"
The output from executing Jandroid against a dataset of 38 APKs using this template has been graphed below (in the section "Visual analysis of the output"). As you can see, only 2 APKs satisfy this bug template, which greatly reduces the manual analysis effort.
Visual analysis of the output
There are two main graph output formats available: Neo4j or vis.js.
Neo4j is a graph database, which also includes a visualisation tool called Neo4j Desktop. Jandroid creates a node for every APK method that satisfies one or more bug template. It then creates edges labelled :CALLS between nodes of a single trace chain (i.e., nodes that satisfy a single bug template with a trace output).
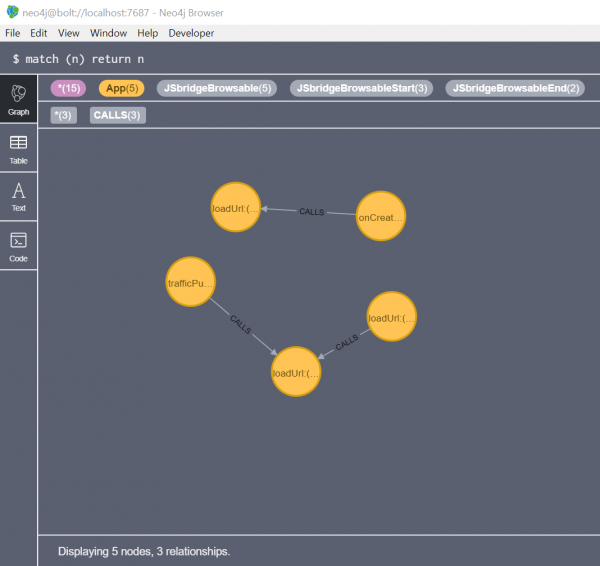
Neo4j output from executing Jandroid against 38 APKs with one template
The main advantage of a Neo4j graph and Neo4j Desktop is that the database can be queried in a standard way using Cypher queries. However, Neo4j Desktop lacks certain visualisation features that would simplify the analysis process, and so Jandroid also includes the option for a custom vis.js graph.
Vis.js is a simple JavaScript library that allows for the creation of a “network” of nodes and edges, to be presented within an HTML container. Once Jandroid completes its analysis, it creates an HTML page dynamically and adds to it the nodes and edges of methods that satisfied one or more bug templates. The data within the graph is much the same as for Neo4j. Custom visualisation options are also provided. However, while the network can be interacted with, it can't be queried.
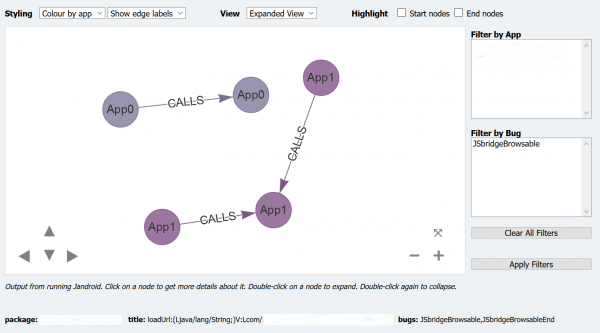
Custom (Vis.js) graph from executing Jandroid against 38 APKs with one template
(app-specific data is hidden)
To get the best of both worlds, Jandroid can be executed with the -g both flag, to output to both Neo4j and vis.js. To output only Neo4j, use -g neo4j; to get only the custom vis.js graph, use -g visjs.
Bug chaining
It’s somewhat unlikely that a single bug would enable a full exploit. In the past, it has been the case that different logic bugs in different applications have been chained together to achieve an exploit. For example, an app with a browsable activity that takes URLs from user input could launch an exported activity in another app that allows for arbitrary file downloads (and so on).
With Jandroid, individual logic bugs are specified as templates and a possible exploit chain, i.e., an order of exploitation, is specified using a “links” file. Like templates, a links file is just a JSON file with a .links extension. Jandroid creates edges labelled :EXPLOITS between nodes satisfying different bugs, based on information provided within the .links file.
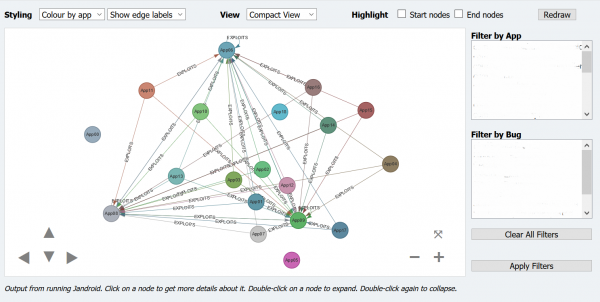
Custom (Vis.js) graph from executing Jandroid against 38 APKs with multiple templates
GUI
Jandroid comes with a basic GUI. It’s a bit clunky, but can be useful in the template creation process. Not all template creation options are available via the GUI, but you can use it to create a “skeleton” with the basic options, and then modify the output as needed. The GUI can also be used to configure and run Jandroid and to obtain its logs and output.
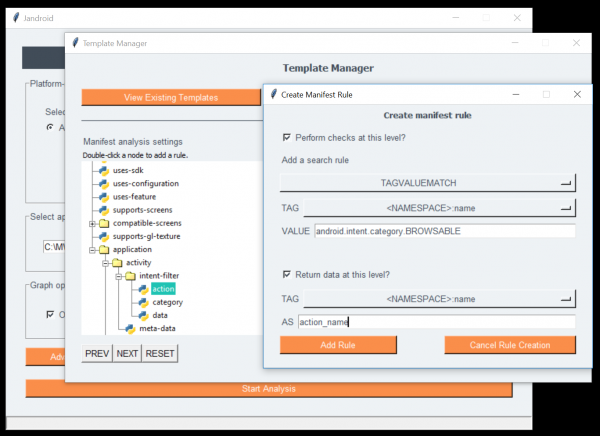
Template creation with Jandroid GUI
The GUI can be launched by executing python jandroid-gui.py from within the <Jandroid home>/gui folder, or by double-clicking the jandroid-windows.bat file from within the base directory on Windows. Note that the GUI has only been tested on (a single system on) Windows and may not behave properly on other platforms.
Caveats
Jandroid can’t identify bugs that aren't defined in a template. It isn’t that smart. It can only pattern-match against given templates. It also can't automatically generate exploits for identified bugs.
Further, the use of Androguard as the decompilation tool means it can take up to a minute to create the analysis object before the actual Jandroid analysis can begin. It also consumes a fair amount of memory. However, Androguard is a good tool for APK analyses and greatly simplifies the analysis process.