Timeinator
Overview
The timing attack performed by Timeinator is similar to the "sniper" mode in Burp Intruder, however instead of sending a single request for every payload, timeinator is able to send multiple requests for each payload and display the minimum and maximum times taken to receive a response as well as the mean and median averages. This can improve the reliability of a timing attacks talking place over an unreliable network connection, such as the internet.
Response times are displayed for each payload, and the table cells are coloured to make patterns obvious at a glance. The fastest response time in each column will be coloured green and the slowest will be coloured red. Anything in between those values will be coloured a shade in between green and red.
An example is shown below:
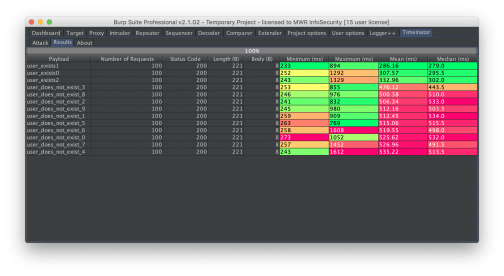
In this example, the web server took longer to respond when a username did not exist in the application. It is possible to quickly see (by looking at the minimum, mean and median times) that when the payload matched a username that was present in the application, the response time was lower than the when the username was not present in the application. It is also worth noting that in this example, at least one response for the “user_exists1” and “user_exists2” usernames a long time to be received. This could have resulted in a false-negative, if only a single request was made.
Usage
The plugin is available at https://github.com/mwrlabs/timeinator. It has been submitted to the BApp store and is currently awaiting approval.
In order to use the extension, Burp Suite must be configured to use Jython, which can be downloaded from here. This is because the extension is written in Python.
After adding the extension to Burp the following steps are a quick guide to getting started with the Timeinator:
- Enable the extension in order to add a tab titled Timeinator to the Burp Suite user interface.
- Send a request to the extension by right clicking on a request anywhere in Burp Suite and choosing the “Send To Timeinator” menu item. This will populate the “Attack” tab under the Timeinator tab.
- Select the section of the request that should be replaced with the payloads then click the “Add §” button. This will add a § symbol either side of the characters that should be replaced with the payload. More than one payload position can be chosen in a single request.
- Choose how many requests to make for each payload.
- Type or copy and paste the payloads into the “Payloads” text area. Place a single payload on each new line.
- Hit the “Start Attack” button. Results will be displayed in the Results” tab. If there is more than one payload then results will be colour coded to make timing differences easier to spot. Slower requests will be coloured red and faster requests will be coloured green.
Credits
This tool was developed by Graeme Robinson.