Twinkly Twinkly Little Star
By Mark Barnes on 21 December, 2018
Twinkly
It's Christmas and what better way of celebrating this festive season than hacking some smart Christmas lights?
'Twinkly' are IoT LED Christmas lights by LED Works, an Italian startup that produce a range of smart light products that contain individually addressable LEDs. These lights can be controlled with a smart phone application over local WiFi allowing for the lights to display arbitrary lighting patterns and produce some stunning effects.
Here at MWR, we love smart devices so we purchased a set (the 'wall' kind) for the office [0].
Talk to me
The mobile application communicates with the lights over a local network. Initially, you directly connect to the lights as an access point and then configure them to join your home network. After that, you can communicate with it over your local network and it no longer presents itself as an access point.
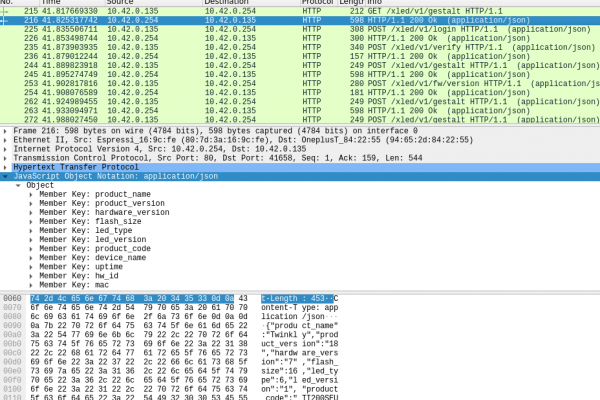
All communications from the application to the lights is done through RESTful HTTP API endpoints on the lights on port 80. The communications are not encrypted, however the WiFi password is sent encrypted during set up (albeit trivial to decrypt).
As the communications are not encrypted, it is simple to Man-in-the-Middle the traffic and analyse the API.
API
In order to communicate with the lights, the phone application first needs to find them. It does this by performing a UDP broadcast to port 5555 with the message '\x00discover'. The lights then respond with their IP address in a UDP response along with the name of the device.

Once the application knows the IP address of the lights, it authenticates with them, receives an authentication token and retrieves information about the device.
The authentication process, although a good idea, is flawed. First, the application makes a POST request to the endpoint '/xled/v1/login' with a base64 encoded 32 bit random number. The lights respond with an authentication token, how long it will be valid for, and a base64 encoded response to the challenge. This response is based on the random challenge number, the MAC address of the lights and a shared secret. The phone application sets the authentication token as a HTTP header and sends the received challenge response back to the lights on the endpoint '/xled/v1/verify'. This finalises the authentication allowing for authenticated endpoints to be called.
This process only authenticates the lights to the application and not visa-versa. This makes the authentication routine simple to implement and requires no knowledge of any shared secrets, the MAC address of the lights, or the challenge generation algorithm.
A number of endpoints were identified while using the application and we built a simple Python Class to interact with the lights programatically, which can be found in Appendix 0x01. A more complete implementation has also been built by @scroolik which can be found here https://xled.readthedocs.io/en/latest/
Armed with the ability to control the lights individually, we connected up a Raspberry PI with a SNES controller and developed a version of Snake that can be played on our lights for the whole office to enjoy.
Reversing
Hardware
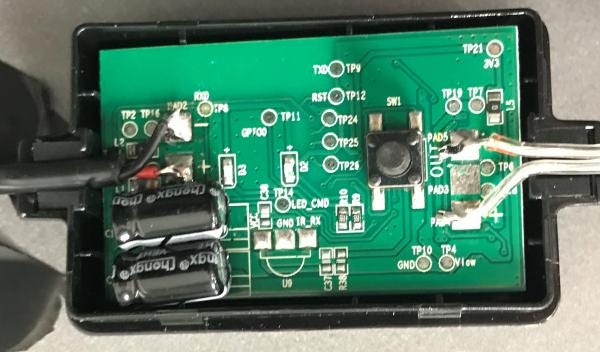
The lights controller is contained within a plastic box with a couple of LED lights and a button (to perform a factory reset). The casing just clips together and is simple to dismantle by hand.
On one side of the PCB are the LEDs, the button, a couple of capacitors, some test points and a unpopulated IR detector (presumably left over from a previous revision). Some of the test pads are labelled with useful names such as RXD, TXD, RST, GND and GIPO0.
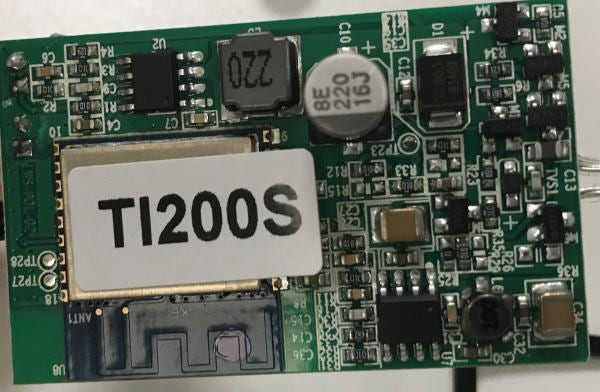
The other side of the PCB is more populated. There are two different power circuits and an ESP-WROOM-02 module which contains a ESP8266 WiFi SoC and SPI flash.
To program an ESP8266, you pull GPIO0 Low and reset the device via the RST pin which causes the device to enter its ROM based serial bootloader. This allows the device to be programmed over UART (TXD/RXD) but can also be used to read the SPI flash. This explains the test pads on the device and thus it is likely that these pads would allow for us to pull the firmware off the device or update it, but as we will see this was not required.
Android Application
To get the Android application to analyse, we first install the application onto an Android device via the Play Store. With device debugging enabled, we can use adb to pull the APK from the phone. First we identify the package name:
$ adb shell pm list packages | grep -i twinkly
Then locate the APK file
$ adb shell pm path com.twinkly
Then pull the APK fime from the device
$ adb pull /data/app/com.twinkly-STUFF/base.apk ./twinkly.apk
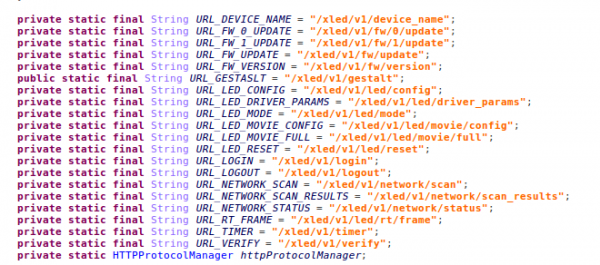
After decompiling the application it was easy to find the calls to the API endpoints and the algorithms for building authentication challenge-responses and encrypting/decrypting WiFi passwords.
Within the applications 'assets' folder there were firmware update binaries for the lights.
Firmware
The firmware for the device is split into two files called xled.elf-0x00000.bin and xled.elf-0x40000.bin. The first contains the application firmware for the device and the other contains a SDK provided by Xtensa (who make the ESP chips). Despite the file names they are not ELFs (not even the festive kind). The numbers in the file names correspond to the memory location the images are stored on within the SPI flash.
To perform a firmware update, the phone application posts these files to API endpoints along with SHA1 checksum of the files. These firmware updates are not signed however and thus it is trivial to upload arbitrary firmware to the device over the local network without any real authentication or authorisation, making it straightforward to gain arbitrary code execution.
We already know the MCU is an ESP8266 which unfortunately is not supported by our favourite disassembler IDA Pro. Thankfully there are some resources online from other researchers building some tooling for disassembling and loading ESP8266 binaries into IDA. [1] [2]
The loader built in [1] however did not load our first binary and required some modifications. This is available in the Appendix 0x02.
The processor module in [2] does not support IDA 7.x, however a port is available in this comment in its github repo [3].
Once the first binary was loaded into IDA we could import the second binary (SDK) and load it at address 0x40240000 which is where the SPI flash is mapped into memory.

IDA does an OK job of fixing things up but more work real is needed to improve the IDA processor and loader scripts.
Following cross references from strings used in the API endpoints, the main endpoint handling routine can be found and reversed.
Although it looks reasonably complex it was not too hard to follow its logic. Doing so revealed a number of additional endpoints that were not defined or used by the Android application. Some of these have been included in the python Class.
Hack all the things !!
Up to now, we have talked about a couple of small issues such as poor authentication and the possibility of unauthorised firmware updates. These vulnerabilities are only exposed locally on the same network and admittedly against a low power MCU that controls Christmas lights.
But we can do better! So now lets turn our attention to some fully remote attacks :D
MQTT
Twinkly Lights boast that they can also be controlled over Google Assistant which lets you turn your lights on and off or change their pattern to some preset patterns or a custom pattern uploaded using the phone application.
This functionality is provided by 'Message Queuing Telemetry Transport' (MQTT) which is a publish-subscribe messaging protocol. In this protocol, device/nodes connect to a central broker, they can then subscribe or publish messages to 'topics' which are message queues which other devices can also subscribe of publish to.

Twinkly Lights connect to a private broker with a single username and password which are hardcoded in the firmware. The connection to the broker is also unencrypted and thus it is trivial to snoop on the connection and discover these credentials.
Each Twinkly lights have 3 topics they subscribe/publish to:
/xled/status/$MAC/
/xled/appstatus/$MAC/
/xled/command/$MAC/
When the lights first turn on they publish their connection state, the SSID they are connected to, and their internal IP to the topic '/xled/status/$MAC'. This is an arguably low risk information disclosure.
An interesting feature of MQTT allows you to subscribe to topics using wild cards, defined by the symbol '#'. Thus if we subscribe to the root with the topic '#' we are subscribing to all topics and see all the lights publishing their information.

Monitoring the root for unique mac addresses we estimate there are almost 20,000 devices out there.
To turn the lights on/off or change the mode using Google Assistant application it publishes commands to the '/xled/command/$MAC/' topic which the lights also subscribe to.
For example, if the command {'command': 'switchoff'} is sent to this topic for a given set of lights it will turn the lights off.

As any MQTT node can publish to any topic, it is thus possible for anyone to issue commands to any set of lights and turn them off. We tested this remotely from AWS against the lights in the office and it worked perfectly.
It would not take much to build a script which turns off all connected lights in the world!! I am not saying this has been built or hooked up to some kind of button. But ...

DNS Rebinding
DNS rebinding is an attack technique which has recently seen some interest, but is still not that well known. DNS rebinding allows for an attacker controlled web page to bypass the Same-Origin policy in most browsers. It works by an attacker switching the DNS A record for the domain after the page has been loaded. When the executing javascript makes an AJAX request to the original page, the DNS record is switched to another IP address and the browser thinks this is within the same origin as the original domain. This can even allow attackers to enumerate and perform HTTP requests to internal infrastructure of the target just by browsing to their website.
As authentication to the lights does not require any knowledge that can only be known out of bounds locally and the communications don't use HTTPS, it is thus vulnerable to DNS rebinding attacks.
Using MWR's 'dref' [4] framework by serain we built a site which when browsed to will enumerate an internal network, find any Twinkly lights, and display a message on them.
We wont be sharing the payload for this attack because not only is it possible to display arbitrary LED patterns it is also possible to perform malicious firmware updates which could allow an attacker to pivot onto the targets network via the lights or create a festive IoT bot net.
Conclusion
The target here were IoT Christmas lights, which is not exactly a high value target. However, they presented a number of vulnerabilities which we see all too often in other IoT equipment and products which we have performed product security reviews of and where these kinds of vulnerabilities could be much more serious.
0. https://www.twinkly.com/products/wall/
1. https://boredpentester.com/reversing-esp8266-firmware-part-1/
2. https://github.com/themadinventor/ida-xtensa
Appendix 0x01
import json
import urllib2
import socket
import time
class twinkly:
def __init__(self, ip = '192.168.4.1'):
self.token = None
self.ip = ip
self.path = 'http://' + ip
def postData(self, data,url):
req = urllib2.Request(self.path+url)
if self.token != None:
req.add_header('X-Auth-Token',str(self.token))
req.add_header('Content-Type','application/json')
response = urllib2.urlopen(req, json.dumps(data))
if response.getcode() == 401:
self.token = self.login()
self.postData(data, url, self.token)
elif response.getcode() == 200:
return json.loads(response.read())
else:
self.postData(data, url, self.token)
def postRaw(self, data,url):
req = urllib2.Request(self.path+url)
if self.token != None:
req.add_header('X-Auth-Token',str(self.token))
req.add_header('Content-Type','application/octet-stream')
response = urllib2.urlopen(req, data)
if response.getcode() == 401:
self.token = self.login()
postRaw(url, self.token)
elif response.getcode() == 200:
return json.loads(response.read())
else:
postRaw(url, self.token)
return json.loads(response.read())
def doGet(self, url):
req = urllib2.Request(self.path+url)
if self.token != None:
req.add_header('X-Auth-Token',str(self.token))
response = urllib2.urlopen(req)
return json.loads(response.read())
def login(self):
challenge = 'A'*64
data = {
'challenge': challenge
}
jResp = self.postData(data, '/xled/v1/login')
self.token = jResp['authentication_token']
chall = jResp['challenge-response']
data = {"challenge-response": str(chall)}
self.postData(data, '/xled/v1/verify')
def get_mode(self):
url = "/xled/v1/led/mode"
return self.doGet(url)
def set_mode(self, m):
url = "/xled/v1/led/mode"
data = {
'mode': m
}
return self.postData(data, url)
def set_rt_mode(self):
return self.set_mode('rt')
def set_movie_mode(self):
return self.set_mode('movie')
def set_demo_mode(self):
return self.set_mode('demo')
def set_off_mode(self):
return self.set_mode('off')
def set_effect_mode(self):
return self.set_mode('effect')
def set_restart_mode(self):
return self.set_mode('restart')
def get_led_reset(self):
url = "/xled/v1/led/reset"
return self.doGet(url)
def uploadMovie(self, data):
url = "/xled/v1/led/movie/full"
return self.postRaw(data, url)
def set_movie_config(self, f_delay, leds, f_num):
url = "/xled/v1/led/movie/config"
data = {
'frame_delay': f_delay,
'leds_number': leds,
'frames_number': f_num
}
return self.postData(data, url)
def get_movie_config(self):
url = "/xled/v1/led/movie/config"
return self.doGet(url)
def get_gestalt(self):
url = "/xled/v1/gestalt"
return self.doGet( url)
def get_fw_version(self):
url = "/xled/v1/fw/version"
return self.doGet( url)
def logout(self):
url = "/xled/v1/logout"
data = {}
return self.postData(data, url)
def get_timer(self):
url = "/xled/v1/timer"
return self.doGet(url)
def set_timer(self,time_on, time_now, timeoff):
url = "/xled/v1/timer"
data = {
'time_on': time_on,
'time_now': time_now,
'time_off': time_off
}
return self.postData(data, url)
def set_device_name(self, name):
url = "/xled/v1/device_name"
data = {
'name' : name
}
return self.postData(data, url)
def get_device_name(self):
url = "/xled/v1/device_name"
return self.doGet(url)
def get_network_scan(self):
url = "/xled/v1/network/scan"
return self.doGet(url)
def get_network_scan_results(self):
url = "/xled/v1/network/scan_results"
return self.doGet(url)
def set_rt_frame(self, data):
url = "/xled/v1/led/rt/frame"
return self.postRaw(data, url)
def udp_rt_frame(self, data, numLeds):
header = [0] * 10
frame[0] = 0x00
frame = "".join(map(chr, frame))
def get_driver_params(self):
url = "/xled/v1/led/driver_params2"
return self.doGet(url)
def set_driver_params(self, timing_adjust_1=10, timing_adjust_2=62):
url = "/xled/v1/led/driver_params2"
data = {
'timing_adjust_2': timing_adjust_2,
'timing_adjust_1': timing_adjust_1
}
return self.postData(data, url)
def get_mqtt(self):
url = "/xled/v1/mqtt/config"
return self.doGet(url)
def set_led_config(self, first_led_id = 0, length = 200):
url = "/xled/v1/led/config"
data = {'strings': [{'first_led_id': first_led_id, 'length': length}]}
return self.postData(data,url)
def get_led_config(self):
url = "/xled/v1/led/config"
return self.doGet(url)
def get_network_status(self):
url = "/xled/v1/network/status"
return self.doGet(url)
def set_echo(self, message):
url = "/xled/v1/echo"
data = message
return self.postData(data, url)
def get_production_info(self):
url = "/xled/v1/production_info"
return self.doGet(url)
def get_status(self):
url = "/xled/v1/status"
return self.doGet(url)
def get_reset_2(self):
url = "/xled/v1/led/reset2"
return self.doGet(url)
def get_offsets(self):
url = "/xled/v1/fw/offsets"
return self.doGet(url)
Appendix 0x02
#!/usr/bin/python
from struct import unpack_from
from idaapi import *
# import # import idc
def accept_file(li, n):
retval = 0
li.seek(0)
check = li.read(2)
print check
if check == "e903".decode("hex"):
retval = "ESP8266 firmware"
return retval
def load_file(li, neflags, format):
li.seek(0)
# set processor type (doesn't appear to work)
set_processor_type("xtensa", SETPROC_ALL);
# load ROM segment
(magic, segments, flash_mode, flash_size_freq, entrypoint) = struct.unpack('<BBBBI', li.read(8))
print "Reading firmware"
print "Magic: 0x%x" % magic
print "Segments: 0x%x" % segments
print "Entry point: 0x%x" % entrypoint
print "\n"
# (rom_addr, rom_size) = unpack_from("<II",li.read(8))
# li.file2base(16, rom_addr, rom_addr+rom_size, True)
# add_segm(0, rom_addr, rom_addr+rom_size, ".boot_rom", "CODE")
# add_entry(0, entrypoint, "rom_entry", 1)
# print "Reading boot loader code"
# print "ROM address: 0x%x" % rom_addr
# print "ROM size: 0x%x" % rom_size
# print "\n"
# # Go to user ROM code
# li.seek(0x73a0, 0)
# # load ROM segment
# (magic, segments, flash_mode, flash_size_freq, entrypoint) = struct.unpack('<BBBBI', li.read(8))
# add_entry(1, entrypoint, "user_entry", 1)
# print "Reading user firmware"
# print "Magic: %x" % magic
# print "Segments: %x" % segments
# print "Entry point: %x" % entrypoint
# print "\n"
# print "Reading user code"
for k in xrange(segments):
(seg_addr, seg_size) = unpack_from("<II",li.read(8))
file_offset = li.tell()
if(seg_addr == 0x40100000):
seg_name = ".user_rom"
seg_type = "CODE"
elif(seg_addr == 0x3FFE8000):
seg_name = ".user_rom_data"
seg_type = "DATA"
elif(seg_addr <= 0x3FFFFFFF):
seg_name = ".data_seg_%d" % k
seg_type = "DATA"
elif(seg_addr > 0x40100000):
seg_name = ".code_seg_%d" % k
seg_type = "CODE"
else:
seg_name = ".unknown_seg_%d" % k
seg_type = "CODE"
print "Seg name: %s" % seg_name
print "Seg type: %s" % seg_type
print "Seg address: %x" % seg_addr
print "Seg size: %x" % seg_size
print "\n"
li.file2base(file_offset, seg_addr, seg_addr+seg_size, True)
add_segm(0, seg_addr, seg_addr+seg_size, seg_name, seg_type)
li.seek(file_offset+seg_size, 0)
return 1