Attack Detection Fundamentals 2021: AWS - Lab #1
By Alfie Champion on 21 April, 2021
In part three of WithSecure Consulting's Attack Detection Fundamentals workshop series for 2021, we covered an end-to-end kill chain in AWS, from initial access and discovery using some 'compromised' credentials, through to the installation of persistence and the exfiltration of data from an S3 bucket.
The slides and recording for this workshop can be found here and here respectively.
In this lab, we are going to explore the techniques used to gain situation awareness, understanding 'who' our user is, and 'what' they might have access to. Following this we'll turn our attention to the log entries we will have produced along the way.
NOTE: The corresponding CloudTrail log can take fifteen minutes or more to arrive following an API call being made, so expect some delay following your activities!
Required Tools
- An AWS account suitable for testing purposes.
- Terraform
- AWS CLI
DISCLAMER: Set up of the tools and the testing environment is not covered comprehensively within this lab. We will assume basic familiarity with command line and the ability of the reader to build the necessary tools.
Walkthrough
Lab Environment
Unlike in previous labs, we're going to require some cloud resources to be deployed and configured prior to us playing out any offensive or defensive scenarios. To achieve this, we'll be using Terraform. Terraform is an immensely popular tool for developing Infrastructure-as-Code and provides us with a means to define, spin up and teardown environments with ease.
To allow you to follow along with this lab, we've provided a test environment written with Terraform here. As discussed in the workshop, the primary components of the environment can be seen below.
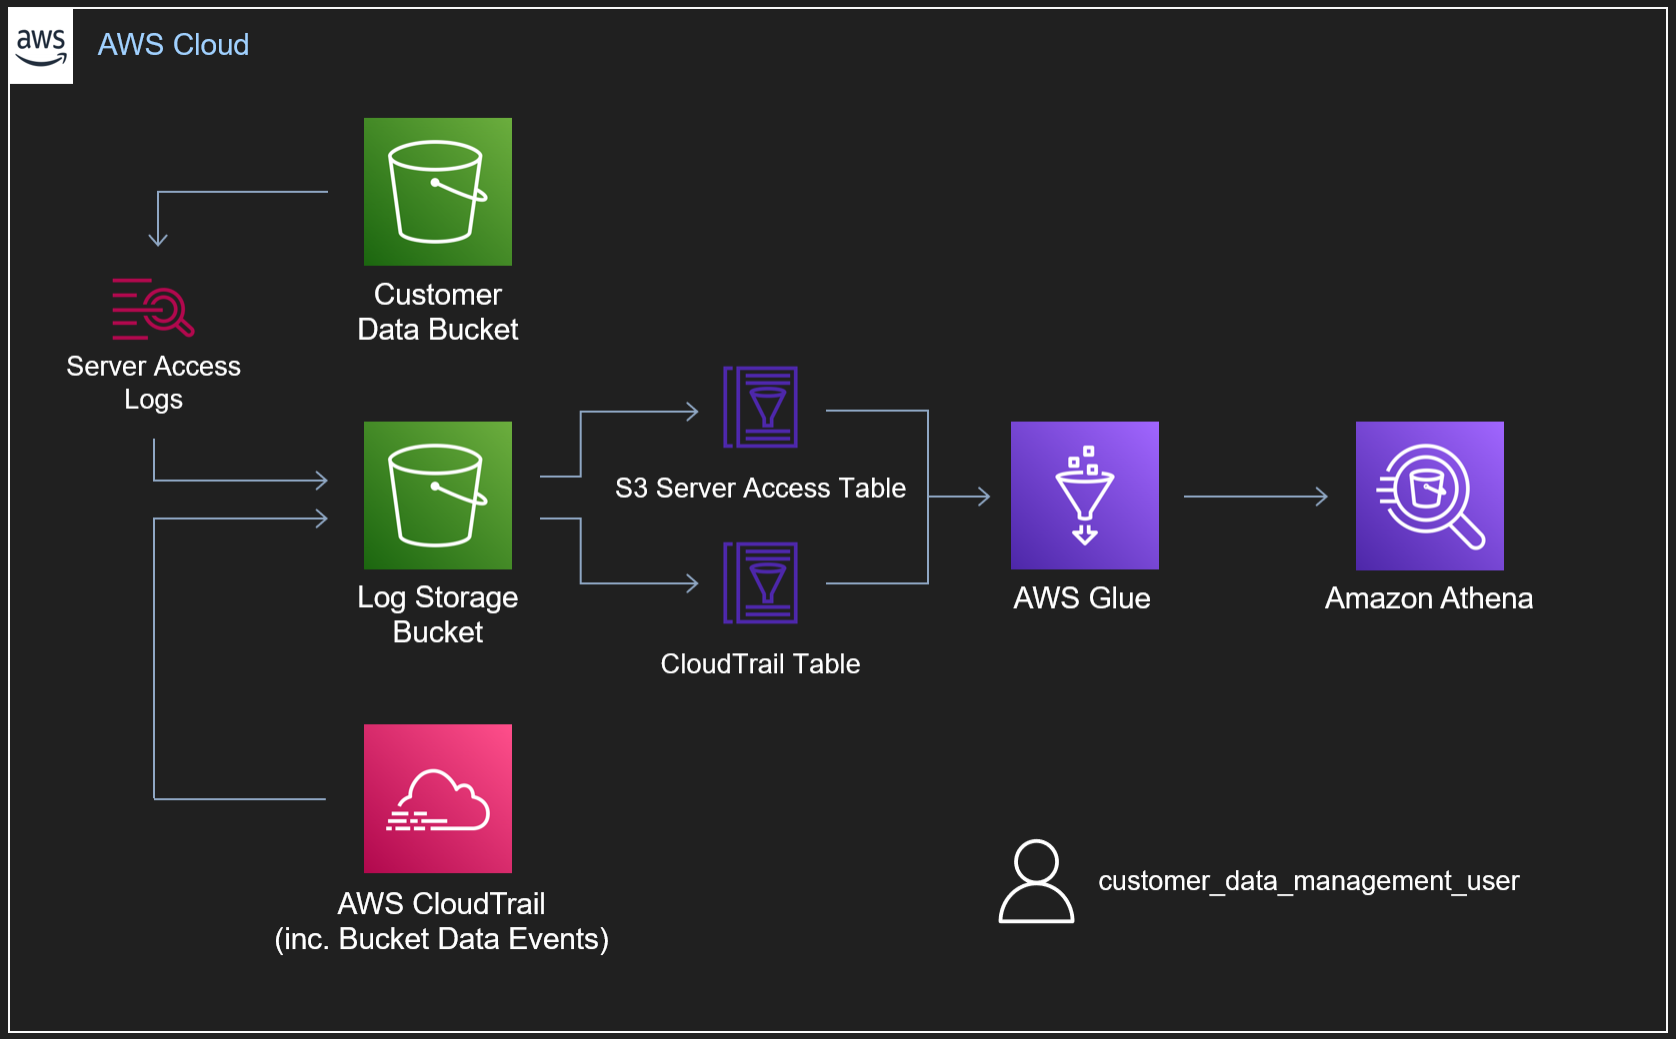
Within our lab environment, we have two buckets:
- Our 'Customer Data' bucket
- Our 'Log Storage' bucket
For the purposes of this lab, our 'Customer Data' bucket has Server Access Logging enabled, as well as Data Events going into a CloudTrail log. Both of these log sources are being stored in our 'Log Storage' bucket. Notably, in a 'real' logging setup, we likely wouldn't enable both Server Access Logging and Data Events as they provide much of the same information (as we'll see in a subsequent lab). Similarly, it's considered best practice to forward our logs outside of the account to a centralised security or logging account, preventing an attacker destroying evidence in the event our account is compromised - as it's about to be!
To query the two telemetry sources, we've defined schemas for both using the AWS Glue Data Catalog. From here, we can use Athena to make SQL queries against the data in our S3 Log Storage bucket.
Finally, our Terraform script will provision a user, "customer_data_management_user" with the following inline JSON policy.
{
"Version": "2012-10-17",
"Statement": [
{
"Action": [ "s3:GetObject" ],
"Effect": "Allow",
"Resource": "${aws_s3_bucket.bucket_for_exfil.arn}/*"
},
{
"Action": [ "s3:ListBucket" ],
"Effect": "Allow",
"Resource": "${aws_s3_bucket.bucket_for_exfil.arn}"
},
{
"Action": [
"s3:ListAllMyBuckets",
"iam:*"
],
"Effect": "Allow",
"Resource": "*"
}
]
}
This policy provides our user with several privileges:
- They can list all buckets in the account.
- They can list the contents of only the 'Customer Data' bucket.
- They can download the objects from only the above bucket.
- They have unrestricted IAM privileges.
For those with even the most foundational knowledge of AWS, that last privilege should be ringing alarm bells! This 'customer_data_management_user' has the ability to view, create, modify and delete all users and privileges within the account. They're effectively an API call or two away from full control of the account.
We'll leverage this in the next lab to install persistence within the account, but most importantly it should be clear that this lab environment should only be deployed in a test account.
Lab Deployment
Having installed Terraform (this lab used version 0.14.10), we can begin deployment. With access keys configured, we can run the following commands to complete deployment:
terraform init
terraform plan
terraform apply [-auto-approve]
If all goes well, Terraform should output the access key which will act as our compromised user.
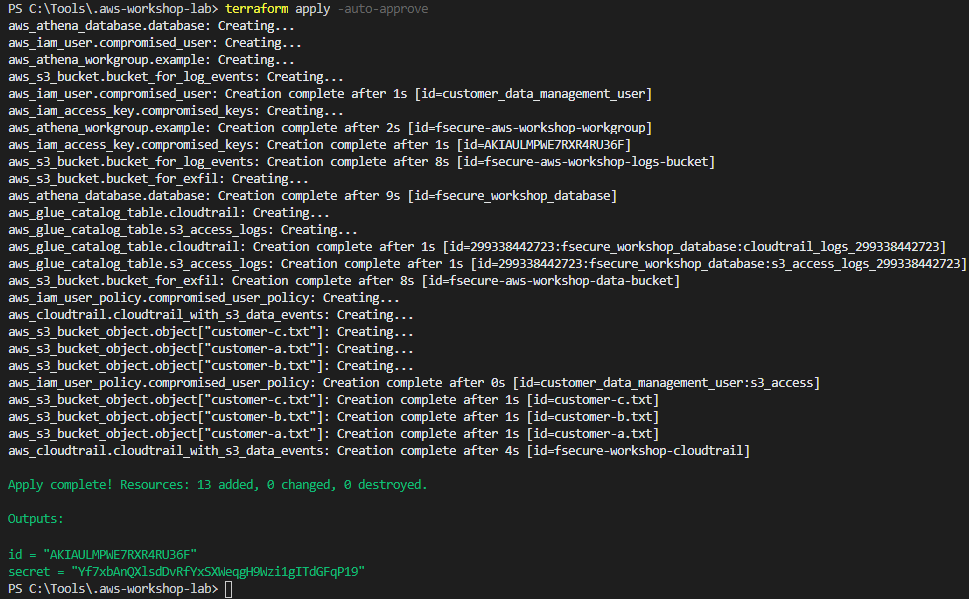
Make sure to configure your AWS CLI with these credentials so we can perform API calls in the context of our "customer_data_management_user"!

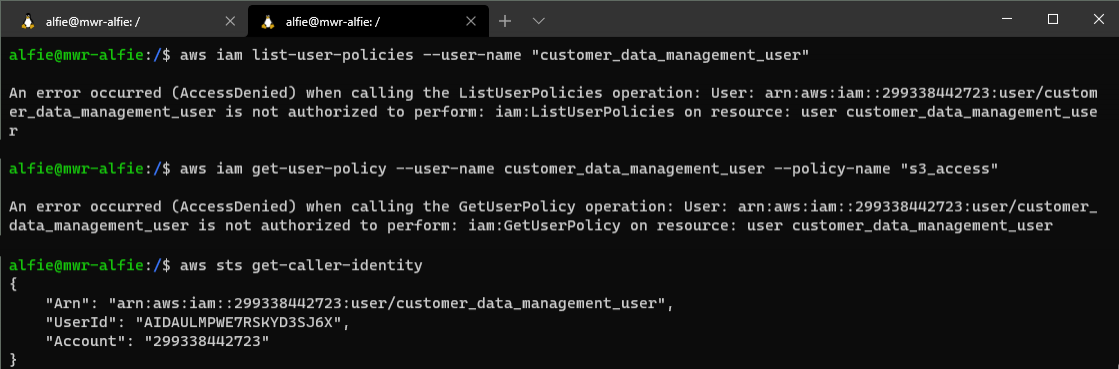
IAM Enumeration
Assuming that we have no idea what these keys provide us access to (use your imagination a little!), let's start by running a GetCallerIdentity API call and seeing the output of that.
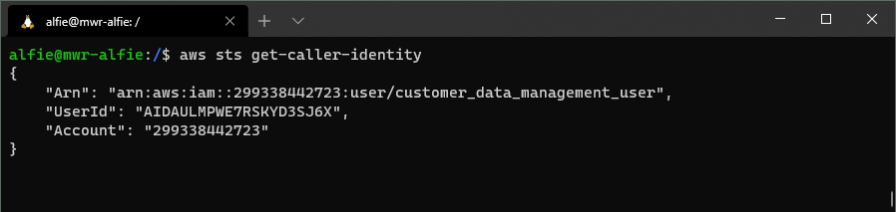
OK, we have our helpfully named "customer_data_management_user" ARN!
Let's try and enumerate the policies that are attached to our user, we can do this with a ListUserPolicies API call.

Looking at our results, we see a very invitingly named "s3_access" policy. We can try and view the contents of that policy with a GetUserPolicy API call.
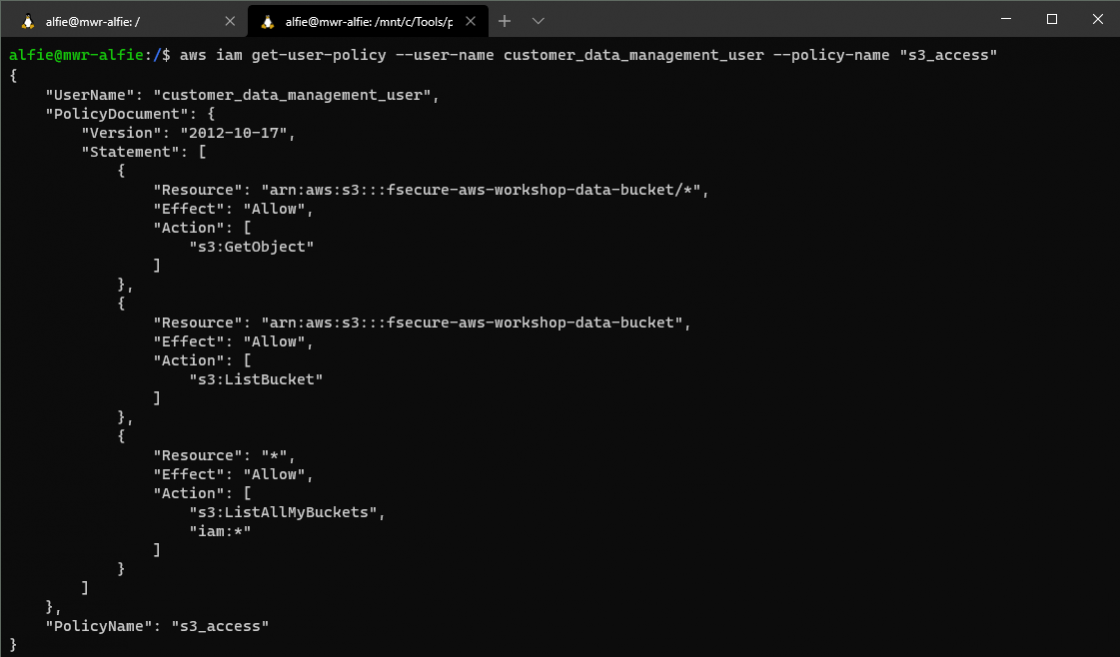
Just as we discussed in the setup, we can see the S3 bucket resources we have available to us, and the ability to list other buckets we might not have access already provisioned to.
As an aside, in this scenario our ability to list user policies and view their contents is facilitated by that dangerous "iam:*" permission. If we were to remove this - either through modifying the Terraform or jumping into the IAM UI and doing it manually - we would only be able to see the GetCallerIdentity call operating successfully. The rest would provide an AccessDenied result.
Detection
Athena Setup
Let's turn our attention to the telemetry we will have generated performing the Discovery actions above.
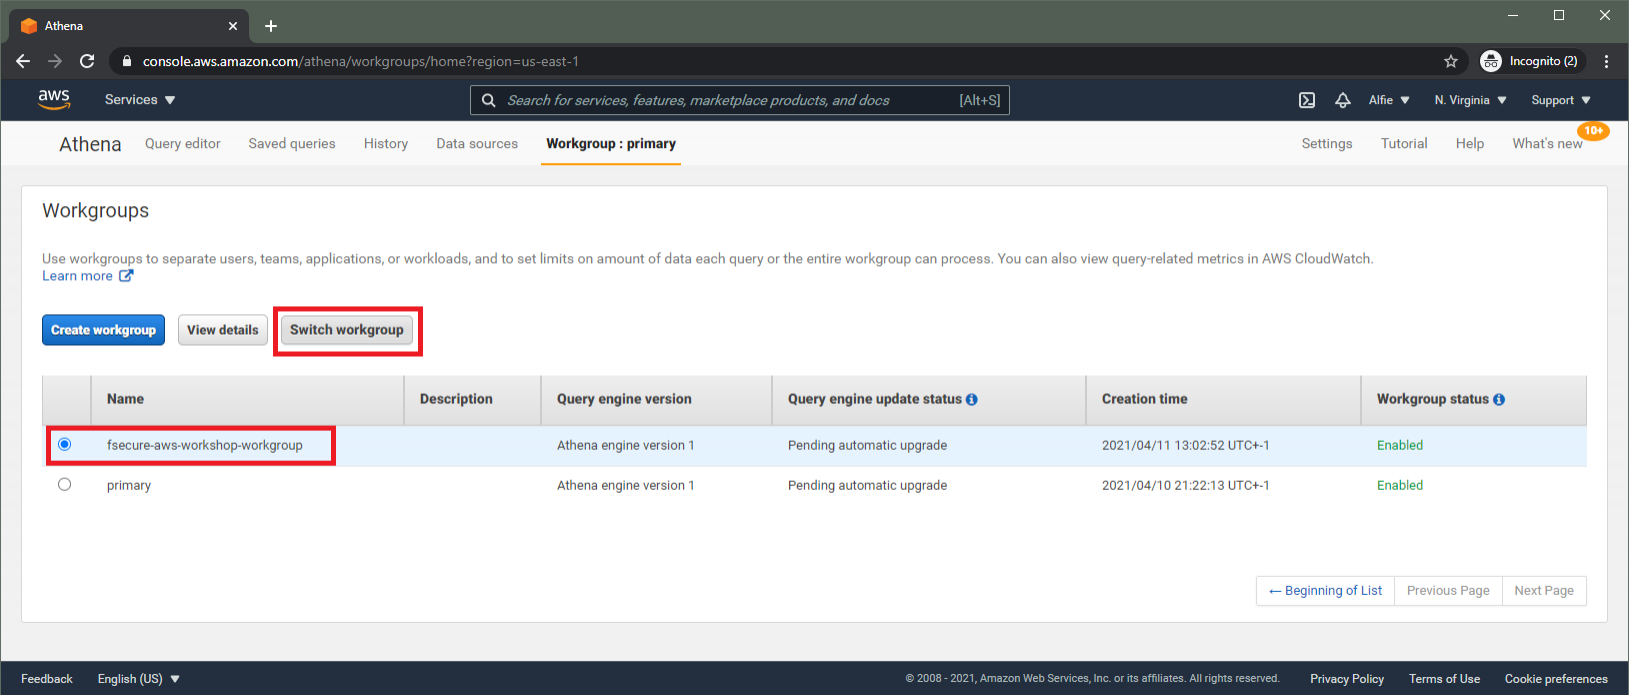
Our interaction with the IAM service will all have been logged within the CloudTrail we've configured. Navigating to the Athena console, first we must change our Workgroup to the "fsecure-aws-workshop-workgroup" that we've deployed. Select the "Workshop" tab, and switch to this workgroup, as below.
Switching back to the "Query Editor" view, make sure the database is changed to "fsecure_workshop_database".
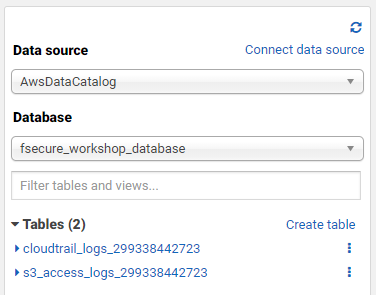
With this complete, we should see the two tables our Terraform scripts have prepared for us (where the account ID is specific to your account).
- cloudtrail_logs_[AWS_ACCOUNT_ID]
- s3_access_logs_[AWS_ACCOUNT_ID]
Querying for Compromised User Activity
Now we're ready to start executing SQL queries against this data. Firstly, let's view all activities conducted by our "customer_data_management_user" user by executing the following query
SELECT *
FROM "fsecure_workshop_database"."cloudtrail_logs_[AWS_ACCOUNT_ID]"
WHERE userIdentity.username = 'customer_data_management_user'
Reviewing the returned data, you should see the significant amount of metadata that's provided for each row returned. For any given action we can see things like:
- The entity that conducted the activity
- The timestamp of the event
- The AWS service they interacted with (e.g. IAM)
- The API call they made (e.g. ListUserPolicies)
- The source IP that made the API call
- The user agent of the request
If you remove the filter for our compromised user and look at other user's events, you might notice the "userIdentity" field also provides us with details of whether a user authenticated with MFA, and whether they conducted their activities through the web-based AWS Management UI or the CLI.
If you've performed the above Discovery activities through the AWS CLI, you'll notice the user agent field reflects that. When we use the Pacu framework later, you'll see the user agent references "boto3" - the python library the framework is built on.
Let's query specifically for the "GetCallerIdentity", "ListUserPolicies" and "GetUserPolicy" event names and return a subset of fields to make triage a bit simpler.
SELECT eventtime, eventname, eventsource, requestparameters, errorcode
FROM "fsecure_workshop_database"."cloudtrail_logs_[AWS_ACCOUNT_ID]"
WHERE userIdentity.username = 'customer_data_management_user'
AND eventname in ('ListUserPolicies', 'GetUserPolicy', 'GetCallerIdentity')
Executing the query, we should be able to see all the instances where we made these API calls. In the below screenshot, you can see the "errorcode" column being populated with our "AccessDenied" message from when we removed the "iam:*" permissions from our user.

As an aside, it's worth mentioning that the metadata in CloudTrail events includes a "readOnly" value. This can be a useful query filter for identifying the API calls issued that affected change on the AWS account.
Much like on-premise, suspicious Discovery activities can be difficult to detect in many cases, as they often utilise legitimate functionality. As an exercise for the reader, browse around the AWS management console and query for the events your user generated as a result - note how 'noisy' that is!
Conclusions
In this lab, we've got to grips with the AWS environment we'll use for the workshop. We've explored the (misconfigured) permissions of our "compromised user", and used the AWS CLI to perform some initial IAM-focussed reconnaissance.
Following our reconnaissance, we turned our attention to the telemetry provided by AWS CloudTrail, and made use of Athena to perform some simple queries against this data, identifying several metadata entries that could help us refine our queries.
In our next lab, we'll install some IAM-based persistence mechanisms in the account, ensuring we can maintain privileged access to the AWS account, in the event that our access keys are deleted.