A bit of a Fixer Upper - Testing FIX-backed applications
By Oliver Simonnet on 24 November, 2021
TLDR
I woke up one day and realized I didn't know much about the FIX protocol. So I spent a few days looking into it and then created a Burp extension to make my life easier. Then I thought, why not write a blog post about what I learned and the fun I had.
Read on to learn about:
- What the FIX protocol is.
- A way to intercept non-HTTP traffic.
- A way to wrap non-HTTP traffic inside HTTP requests and relay them to Burp.
- A way to quickly augment Burp with Python to introduce custom ad hoc functionality.
- Get your hands on a new little burp extension I've written that might help.
You can get the extension here:
https://github.com/FSecureLABS/FixerUpper
WTF is FIX?
FIX stands for Financial Information eXchange which is a TCP-based protocol (not an API) used for performing real-time exchange of price and trade information within financial markets. And when i say this, what I mean is information such as quotes (Message Type: R / S), electronic orders (Message Type: D), execution reports (Message Type: 8), and other messages related to securities trading.
The design of the protocol is - for the most part - limited to reliability and low latency and not so much to do with security. For example, there did not seem to be many features (if any) within the protocol itself for ensuring confidentiality of data or non-repudiation of transactions. So it seems security measures are mostly left up to the end-user community to solve.
There also didn't seem to be all that much out there in regards to the security of the FIX protocol or security testing of FIX technologies. Though, I did find some resources:
- There appear to be a few enterprise level services for testing FIX technologies like FIXSIM
- There were also some open source tools like Fizzer and Fixer for fuzzing FIX endpoints.
- And I found a couple of white papers on the subject including, but not limited too:
- A FIX Security White paper, published by fixtrading.org in 2017 (updated 2021)
- And Exploiting the FIX Protocol published by GIAC in 2012
But in general, compared to other technologies I've researched, it seems to remain a rather unexplored tech in this regard.
FIX Protocol Architecture
The FIX protocol consists of multiple "layers": Session, Presentation, and Application:
The Session layer encapsulates the protocol itself and considers:
- Session / connection initiation, maintenance, and termination
- Handshaking, data integrity, and message delivery and sequence
The Presentation layer encapsulates how the protocol is encoded / represented:
- Tagvalue, SBE, JSON, FIXML, ASN.1, etc
The Application layer encapsulates business specific functions, such as:
- Order creation, cancellation, replacement
- Subscriptions, report execution, etc
FIX Message Structure
If we work on the assumption that the original TagValue encoding is used, FIX messages are ASCII-based containing multiple field definitions delimited by a Start of Header (SOH) control character (0x01)
The definition for each field includes name, number, data type, and value. For example, the "BeginString" field is defined as follows:
- Name : BeginString
- Number : 8
- Data Type : String
- Value : FIX.4.2
So the "BeginString" field in this case is represented as “8=FIX.4.2” within the raw message. This indicates that the protocol version being used for the message is FIX 4.2.
Note: although I've used 4.2 here, this is not the only - or most up to date - version of the FIX protocol. There are multiple version in use. But I'll point out some difference between 4.2 and 4.4 as we go.
But anyway, each FIX message can be split into three sections:
Section 1) Standard Header - This includes the following field definitions
- BeginString (8)
- BodyLength (9) (Note, this must always be the 2nd field in the message)
- MsgType (35)
- MsgSeqNum (34)
- SenderCompID (49)
- TargetCompID (56)
- SendingTime (52)
Section 2) Message Body - This contains the various field definitions that are required for the particular message being sent by the application.
Section 3) Standard Trailer - This includes only the CheckSum (10) tag which is generated by taking the number of bytes in the message and converting it into a 3-digit module 256 number.
Below I've included the breakdown of an example "ORDER SINGLE" message (Note that a CompID is used to uniquely identify a company):
8=FIX.4.2|9=136|35=D|34=23|49=BANZAI|52=20211101-14:14:05.682|56=FIXIMULATOR|11=1635776045686|21=3|38=10|40=1|54=1|55=EUR/USD|59=0|60=20211101-14:14:05.682|10=092|
---- HEAD ----
08 > BeginString > FIX.4.2
09 > BodyLength > 136 bytes
35 > MsgType > D (ORDER SINGLE)
34 > MsgSeqNum > 32
49 > SenderCompID > BANZAI
52 > SendingTime > 20211101-14:14:05.682
56 > TargetCompID > FIXIMULATOR

---- BODY ----
11 > ClOrdID > 1635776045686
21 > HandlInst > 3 (MANUAL ORDER)
38 > OrderQty > 10
40 > OrdType > 1 (MARKET)
54 > Side > 1 (BUY)
55 > Symbol > EUR/USD
59 > TimeInForce > 0 (Day)
60 > TransactTime > 20211101-14:14:05.682

---- TRAILER ----
10 > CheckSum > 092
FIX Authentication Sequence
The Authentication sequence for a FIX connection consists of the client (initiator) sending a Logon(35=A) message. The server then validates this message and its parameters, and responds with its own Logon(35=A) acknowledgement message. We can see an example of this exchange below:
CLIENT(BANZAI) ---- REQUEST ----> SERVER(FIXIMULATOR)
8=FIX.4.2|9=74|35=A|34=463|49=BANZAI|52=20211101-17:30:03.913|56=FIXIMULATOR|98=0|108=30|10=103|

CLIENT(BANZAI) <---- RESPONSE ---- SERVER(FIXIMULATOR)
8=FIX.4.2|9=74|35=A|34=370|49=FIXIMULATOR|52=20211101-17:30:03.941|56=BANZAI|98=0|108=30|10=101|
The above two messages both agree the same information using:
- 35=A (Message Type: Authentication (Login))
- 49=BANZAI || FIXIMULATOR (Sender CompID)
- 56=FIXIMULATOR || BANZAI (Target CompID)
- 108=30 (Heartbeat Interval 30 seconds - used to keep the connection alive)
What's interesting here is that this is a FIX 4.2 Login message which has no authentication information (at least it doesn't seem to in its definition). However a more recent version of the FIX protocol (FIX 4.4) seems to support authentication within the Login message using the Username (553) and Password (554) field definitions:
8=FIX.4.4|9=102|35=A|49=BuySide|56=SellSide|34=1|52=20190605-11:40:30.392|98=0|108=30|141=Y|553=Username|554=Password|10=104|These are however specified to be optional fields.
4.2 Logon message - https://www.onixs.biz/fix-dictionary/4.2/msgtype_a_65.html
4.4 Logon message - https://www.onixs.biz/fix-dictionary/4.4/msgtype_a_65.html
Testing FIX-backed applications
So in case you forgot already, FIX is a lower-level TCP/IP protocol, rather than a higher-level HTTP protocol like you might be used to if you're a frequent web app pentester or have done other thick client tests that have a web API back-end. So when testing this specifically, we should (given it's in scope of course) consider test cases for both the Session and Application layers.
The FIXSIM website has a blog post with some general guidance on testing FIX protocol integrations you can find here - but in general, as a starting point, we can keep the following in mind:
Session Layer Testing Overview
As already discussed, the FIX client (known as the "initiator") will open a connection to the FIX server (known as the "acceptor") and send a Logon message. If everything is fine, the acceptor will respond with its own Logon message to confirm the session has started. If the message is rejected (for example it is malformed) the connection should be terminated.
If we assume the Logon message is valid, the exchange of messages can begin, at which point the FIX implementation should ensure the messages are delivered and the message sequence order is maintained.
When considering testing at this layer, we can start by exploring how the initiator and / or acceptor handles things like:
- Dropped messages;
- Malformed messages;
- Invalid message sequencing;
- Message replaying;
- Clear-text vs TLS connections.
These types of test cases can lead to the discovery of issues like: denial of service, crashes, replay attacks, clear-text-communication, and buffer overflows.
When considering the use of TLS, it seems common that these technologies have no native TLS support. In these cases, additional utilities like Stunnel are used to wrap the clear-text FIX protocol within an encrypted TLS tunnel.
Application Layer Testing Overview
As mentioned earlier, the Session layer ensures the successful transmission, structure, and sequence of FIX messages. On top of this we then have the Application layer, responsible for the business-level logic and validation.
Here we can start to think of the more "regular" application testing concept. For example:
- Input validation:
- Is the data rendered in the client?
- How is it parsed and represented / used?
- Custom Tags?
- All the injections (SQLI?)
- Authorization:
- Should the user be able to establish a FIX connection to begin with?
- Are credentials required (field definitions 553 and 554)?
- Logic Flaws:
- Order placed for 100 X but 200 X shows on report.
- Order for 500 x made but max 200 is meant to be enforced.
Testing using MITM_Relay + Burp + Python
OK so enough theory, now let's talk about at least one way of doing some testing when the FIX protocol is used!
With the exception of the SOH characters, FIX protocol messages consists of printable ASCII characters. This is good news for us human beings, as we can read printable ASCII pretty well!
Another benefit of this is that you know what else is ASCII based? HTTP! So surely we can merge the two rather well by taking the TCP protocol and bring it into the more user-friendly HTTP world?
Yes! That we can! Thanks to handy tools like MitM_Relay: https://github.com/jrmdev/mitm_relay
Initial Testing Setup
At a high level we're going to create the following testing architecture:
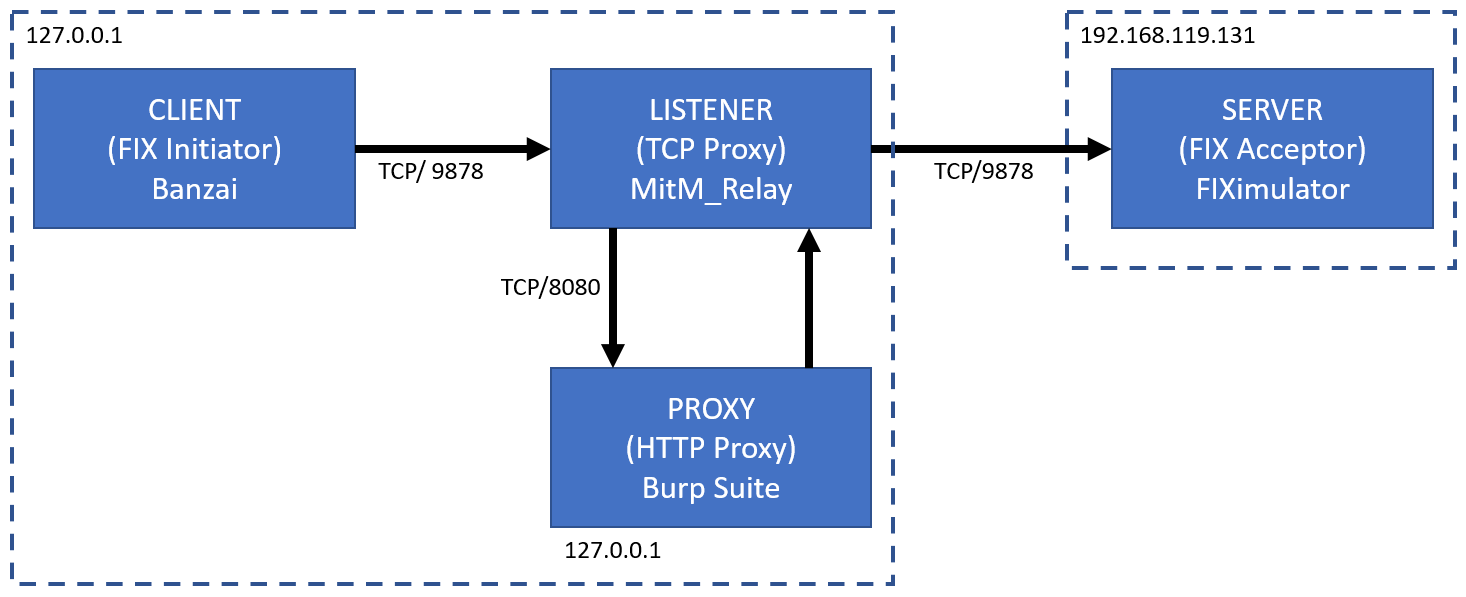
FIX Server Setup
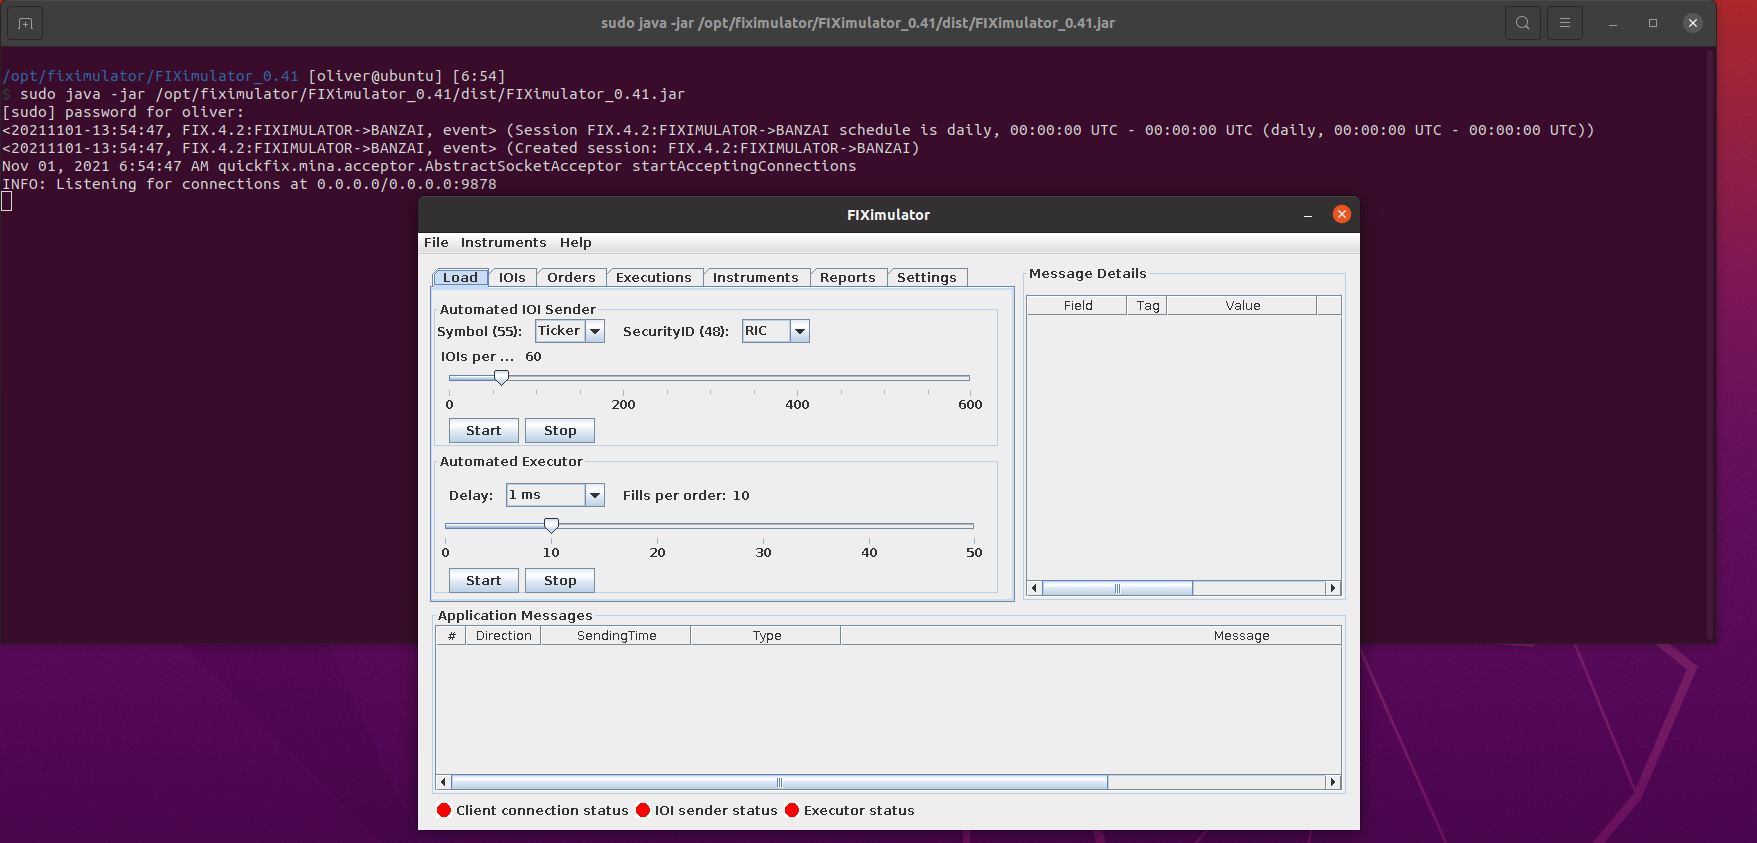
Let's begin by getting a FIX server started. I have used FIXimulator as the server for this research which you can get from: http://fiximulator.org/. This is an application written in Java as a part of a thesis project and can be used to accept and process FIX connections / messages.
It can be configured using the configuration files within its "/config" directory. As we will see shortly, I use a client called Banzai, which has its own configuration file within FIXimulator as seen below:
/opt/fiximulator/FIXimulator_0.41 [oliver@ubuntu] [6:57]
$ cat config/FIXimulator_BANZAI.cfg
[default]
...
BeginString=FIX.4.2
ConnectionType=acceptor
...
SocketAcceptPort=9878
...
[session]
SenderCompID=FIXIMULATOR
TargetCompID=BANZAI
...
The above configuration sets the server up to accept the following:
- As the the acceptor with an ID of FIXIMULATOR
- Accept FIX.4.2 connections from BANZAI Company
- By listening on port 9878
With the configuration ready, we can start FIXimulator using the following command
/opt/fiximulator/FIXimulator_0.41 [oliver@ubuntu] [6:54]
$ sudo java -jar /opt/fiximulator/FIXimulator_0.41/dist/FIXimulator_0.41.jar
...
<20211101-13:54:47, FIX.4.2:FIXIMULATOR->BANZAI, event> (Session FIX.4.2:FIXIMULATOR->BANZAI schedule is daily, 00:00:00 UTC - 00:00:00 UTC (daily, 00:00:00 UTC - 00:00:00 UTC))
<20211101-13:54:47, FIX.4.2:FIXIMULATOR->BANZAI, event> (Created session: FIX.4.2:FIXIMULATOR->BANZAI)
Nov 01, 2021 6:54:47 AM quickfix.mina.acceptor.AbstractSocketAcceptor startAcceptingConnections
INFO: Listening for connections at 0.0.0.0/0.0.0.0:9878
Now we have a FIX server application listening on port 9878 (on our localhost):
FIX Client Setup
Next we can get the FIX client (Banzai) running, which you can also download from: http://fiximulator.org/. This is a demo FIX client application also written in Java.
Similar to the server, you can configure the client and define the parameters it should use for establishing the FIX session within its configuration file, "config/banzai.cfg":
/home/oliver/Downloads/Banzai [oliver@ubuntu] [7:02]
$ cat config/banzai.cfg
[default]
...
ConnectionType=initiator
SenderCompID=BANZAI
TargetCompID=FIXIMULATOR
SocketConnectHost=192.168.119.131
...
[session]
BeginString=FIX.4.2
SocketConnectPort=9878
The above configuration set the client up to perform the following:
- As the the initiator with an ID of BANZAI
- Establish a FIX.4.2 connection to FIXIMULATOR Company
- By opening a socket connection using IP 192.168.119.13 and port 9878
With the client configuration ready, we can start Banzai using the following Java command
/home/oliver/Downloads/Banzai [oliver@ubuntu] [10:20]
$ java -jar dist/Banzai.jar
...
<20211101-17:30:01, FIX.4.2:BANZAI->FIXIMULATOR, event> (Session FIX.4.2:BANZAI->FIXIMULATOR schedule is daily, 00:00:00 UTC - 00:00:00 UTC (daily, 00:00:00 UTC - 00:00:00 UTC))
<20211101-17:30:01, FIX.4.2:BANZAI->FIXIMULATOR, event> (Created session: FIX.4.2:BANZAI->FIXIMULATOR)
Nov 01, 2021 10:30:02 AM quickfix.mina.initiator.InitiatorIoHandler sessionCreated
INFO: MINA session created: /192.168.119.131:53978
<20211101-17:30:03, FIX.4.2:BANZAI->FIXIMULATOR, outgoing> (8=FIX.4.29=7435=A34=46349=BANZAI52=20211101-17:30:03.91356=FIXIMULATOR98=0108=3010=103)
<20211101-17:30:03, FIX.4.2:BANZAI->FIXIMULATOR, event> (Initiated logon request)
<20211101-17:30:03, FIX.4.2:BANZAI->FIXIMULATOR, incoming> (8=FIX.4.29=7435=A34=37049=FIXIMULATOR52=20211101-17:30:03.94156=BANZAI98=0108=3010=101)
<20211101-17:30:03, FIX.4.2:BANZAI->FIXIMULATOR, event> (Received logon response)
Excellent. below we can see the client UI in all its Java-y glory:
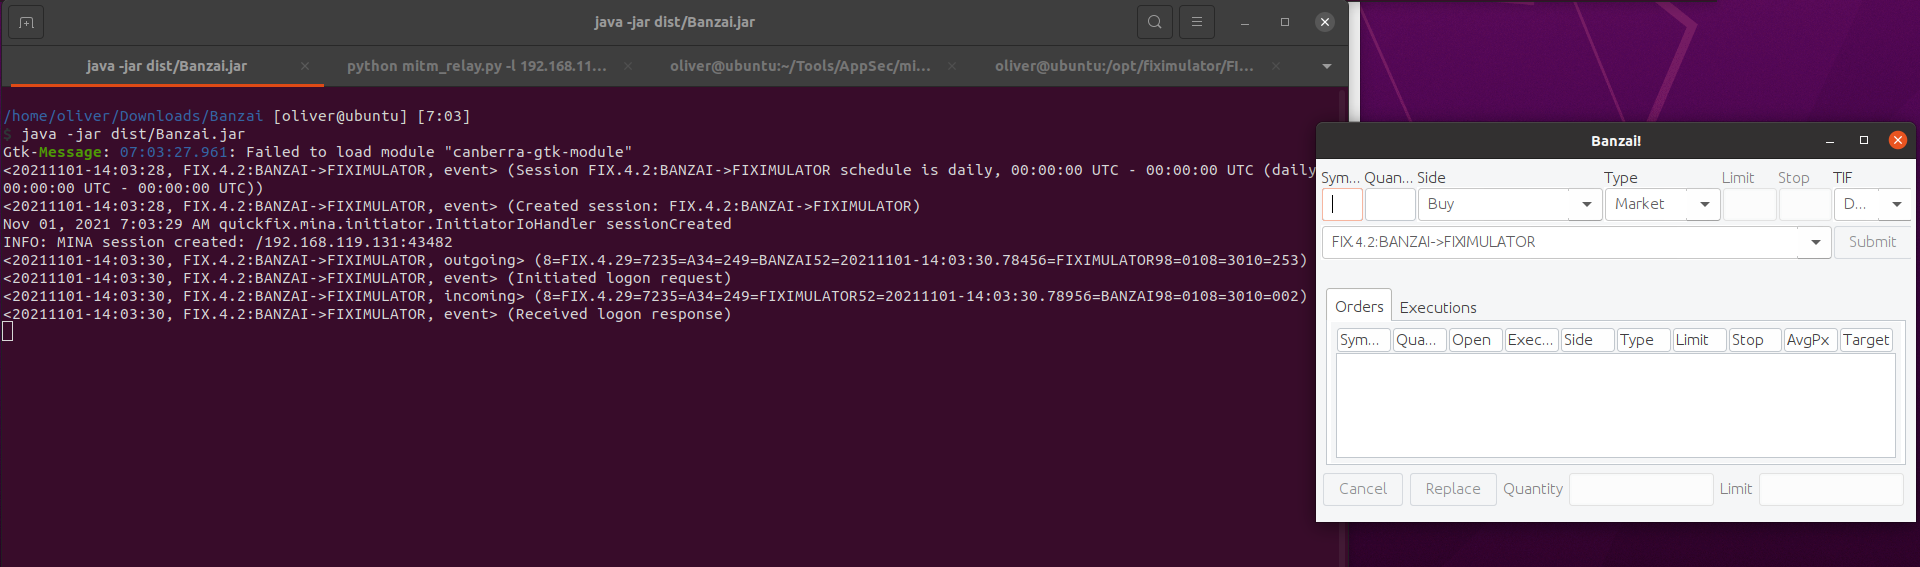
If we look closely above, we can see that once the Banzai client is started it instantly connects to FIXimulator and exchanged the Logon messages previously discussed. So far so good!
Now, let's do a quick test and see if we can do a quick test trade of.... 10[?]... AVT[?] - sure why not:
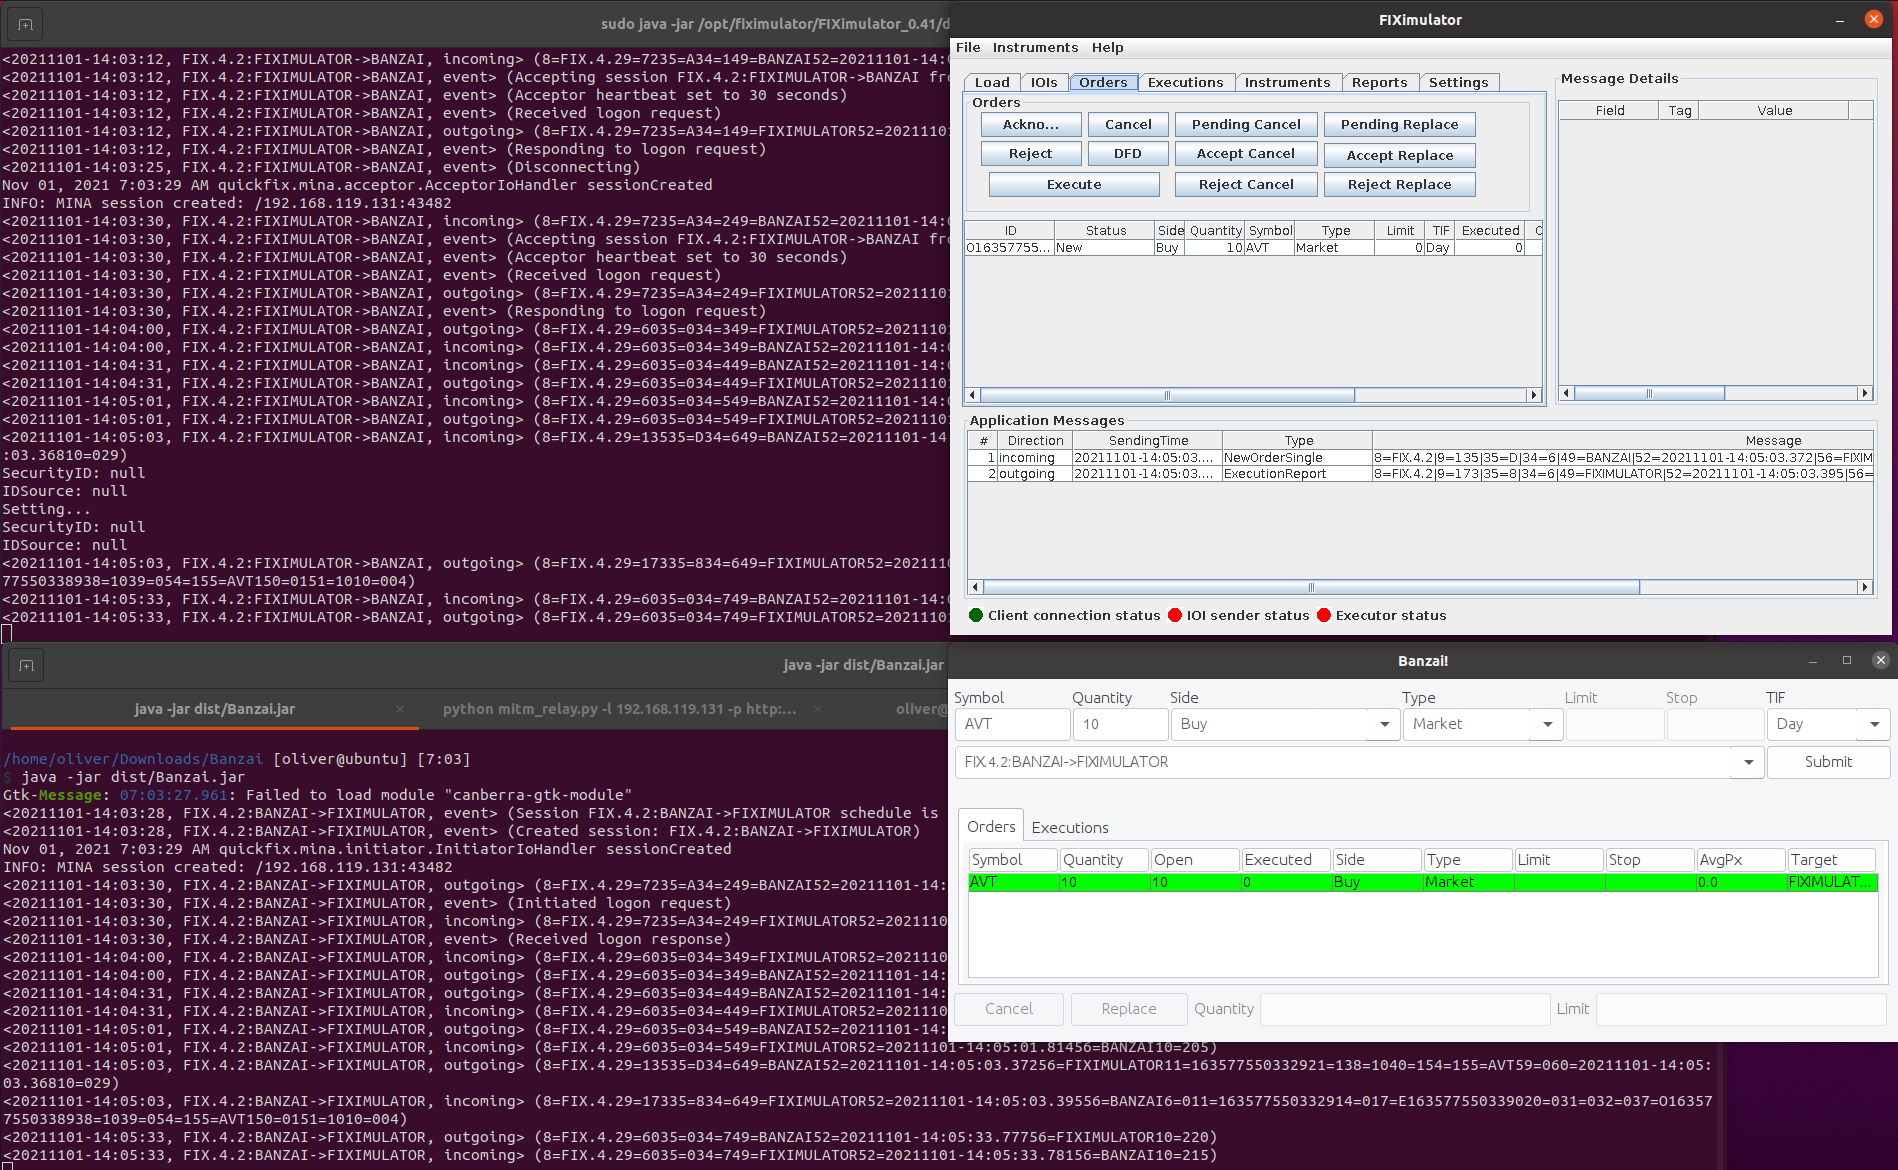
Yep. Works. Nice!
MitM_Relay Setup
Now have a working FIX client and server, but we can't exactly intercept or modify any of the FIX messages being exchanged. To do this we need to use MitM_Relay to wrap the TCP messages in HTTP requests and then send them to burp for manipulation.
This is simple enough! We can just use the following mitm_relay.py command:
$ python mitm_relay.py -l 192.168.119.131 \
-p http://192.168.119.131:8081 \
-r tcp:9878:192.168.119.131:9878
This command does the following:
- python mitm_relay.py -l 192.168.119.131
- Start MitM_Relay listening on 192.168.119.131 (My local IP)
- -p http://192.168.119.131:8081
- Proxy the traffic to http://192.168.119.131:8081 (burp suite)
- -r tcp:9878:192.168.119.131:9878
- Create a relay from local port 9878 to 192.168.119.131:9878
This command is 99% fine, and would be fine in a situation where the server is remote. But in this specific case I'm running the client, relay, and server on my local host. So I can't start a relay on port 9878 whilst also having the FIX server listening on the same port 9878.
But this is a simple fix. All we need to do is bind the relay to a different local port, and configure the FIX client to connect to that port instead... 9877 for example (sure why not):
- replace "-r tcp:9878:192.168.119.131:9878" with "-r tcp:9877:192.168.119.131:9878"
- and change "SocketConnectPort" from 9878 to 9877 within "Banzai/config/banzai.cfg"
Now we can start the relay:
/home/oliver/Tools/AppSec/mitm_relay [git::master] [oliver@ubuntu] [7:07]
$ python mitm_relay.py -l 192.168.119.131 -p http://192.168.119.131:8081 -r tcp:9877:192.168.119.131:9878
[!] Server cert/key not provided, SSL/TLS interception will not be available. To generate certs, see provided script 'gen_certs.sh'.
[i] Client cert/key not provided.
[+] Webserver listening on ('127.0.0.1', 49999)
[+] Relay listening on tcp 9877 -> 192.168.119.131:9878
With the relay listening, we can again start the FIX client:
/home/oliver/Downloads/Banzai [oliver@ubuntu] [7:09]
$ java -jar dist/Banzai.jar
...
<20211101-17:30:01, FIX.4.2:BANZAI->FIXIMULATOR, event> (Session FIX.4.2:BANZAI->FIXIMULATOR schedule is daily, 00:00:00 UTC - 00:00:00 UTC (daily, 00:00:00 UTC - 00:00:00 UTC))
<20211101-17:30:01, FIX.4.2:BANZAI->FIXIMULATOR, event> (Created session: FIX.4.2:BANZAI->FIXIMULATOR)
Nov 01, 2021 10:30:02 AM quickfix.mina.initiator.InitiatorIoHandler sessionCreated
INFO: MINA session created: /192.168.119.131:53978
<20211101-17:30:03, FIX.4.2:BANZAI->FIXIMULATOR, outgoing> (8=FIX.4.29=7435=A34=46349=BANZAI52=20211101-17:30:03.91356=FIXIMULATOR98=0108=3010=103)
<20211101-17:30:03, FIX.4.2:BANZAI->FIXIMULATOR, event> (Initiated logon request)
<20211101-17:30:03, FIX.4.2:BANZAI->FIXIMULATOR, incoming> (8=FIX.4.29=7435=A34=37049=FIXIMULATOR52=20211101-17:30:03.94156=BANZAI98=0108=3010=101)
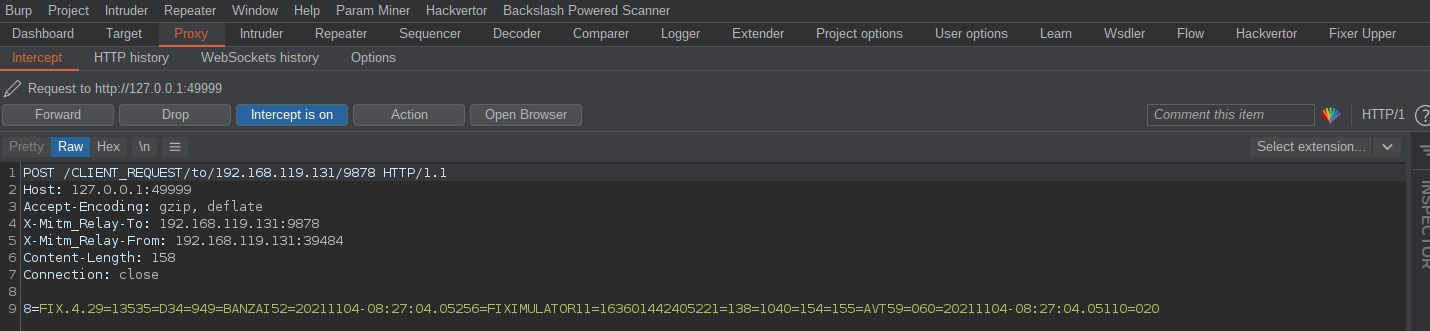
<20211101-17:30:03, FIX.4.2:BANZAI->FIXIMULATOR, event> (Received logon response)Excellent, we can again see the Logon exchange! So now if we take a look at the Burp Suite proxy history tab, we should see the FIX traffic being captured:
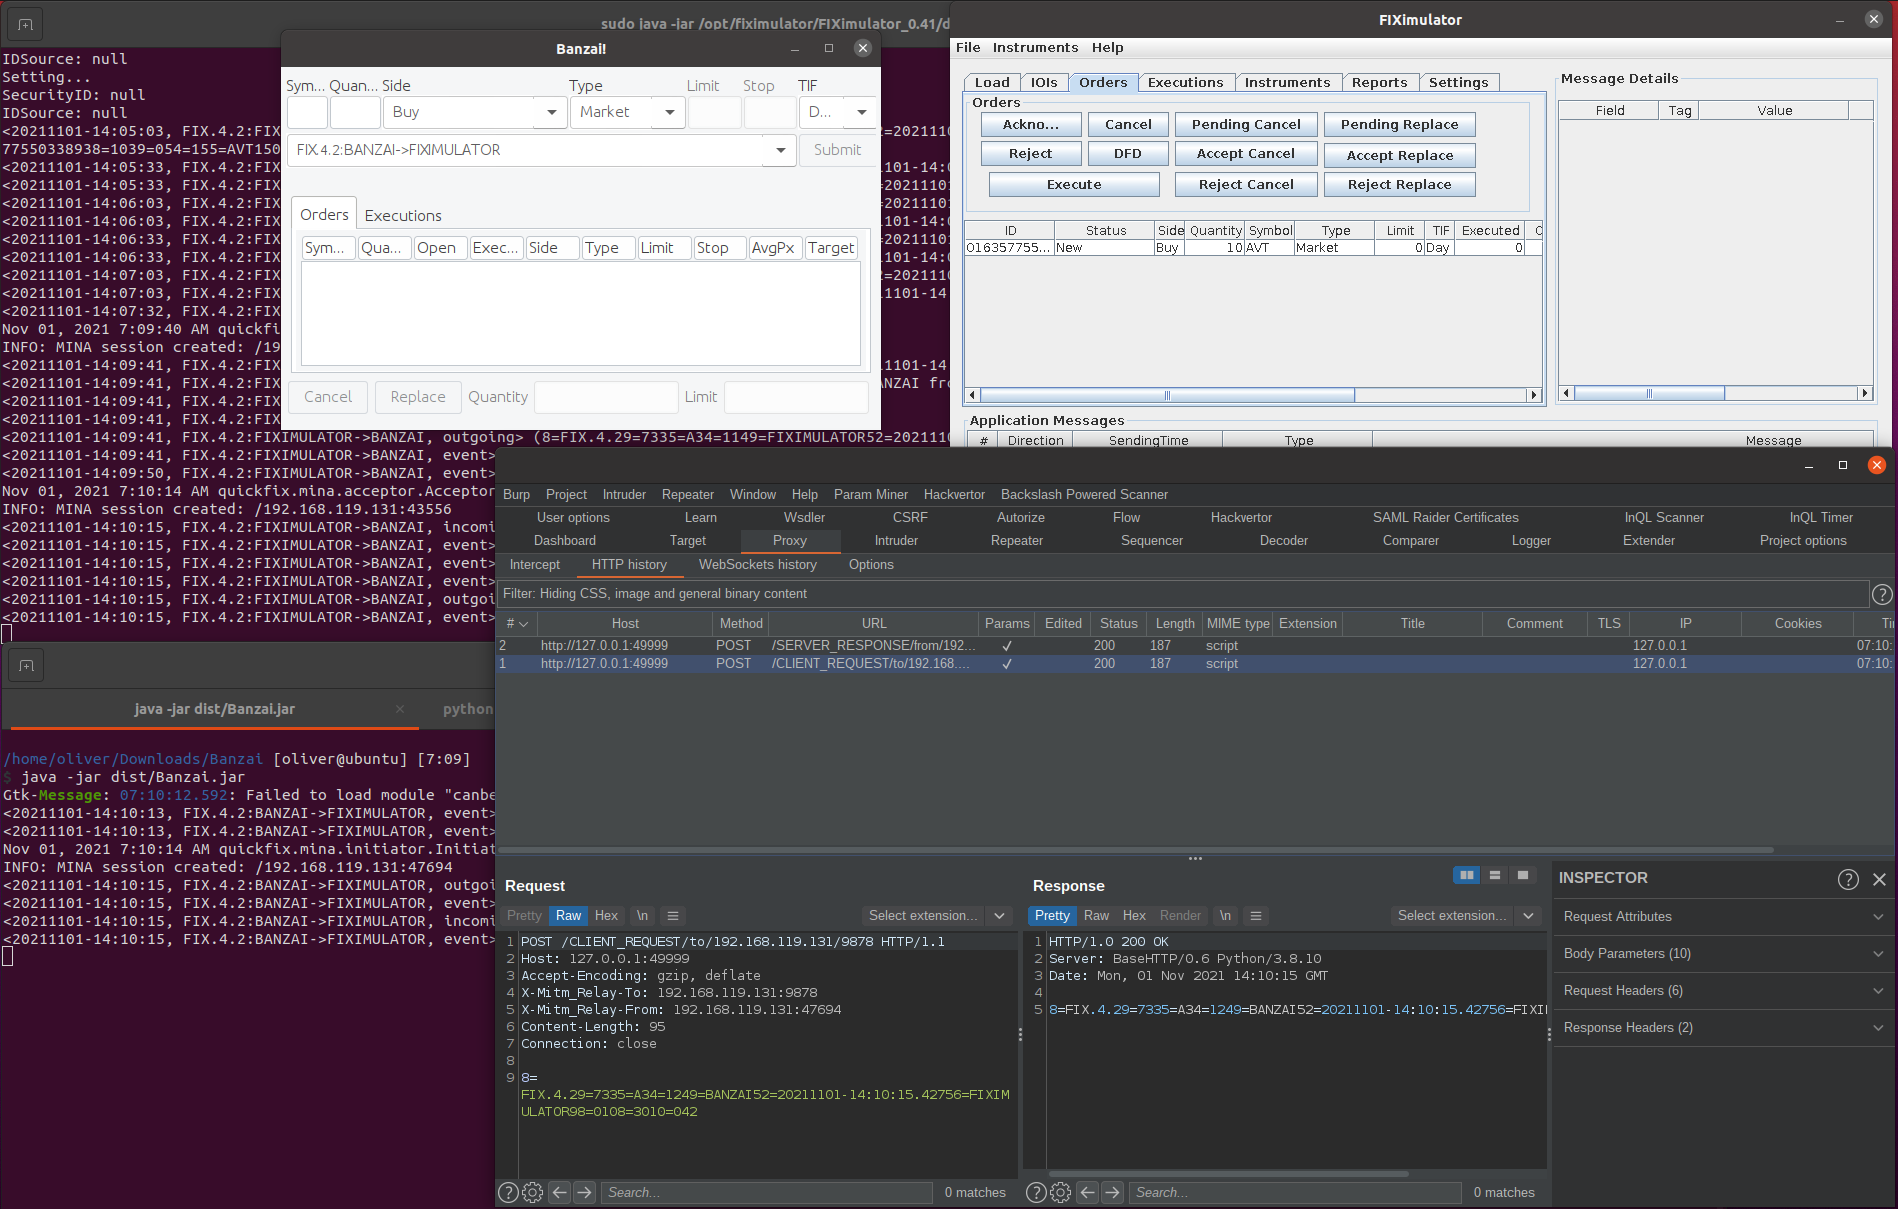
Cool! Lets try intercepting, changing, and forwarding on a FIX message:
... does the thing you do to modify stuff, and then looks at the server logs...
SEVERE: Invalid message: Expected CheckSum=93, Received CheckSum=92God damn it!
Yeah, it's a TCP protocol not a web API... there is a checksum field and a message length field that were calculated by the client and formed part of the message... once I altered the message in Burp it invalidated those key values.
Nothing a bit of Python can't fix! Time to get scripting!
Augmenting Burp with Python
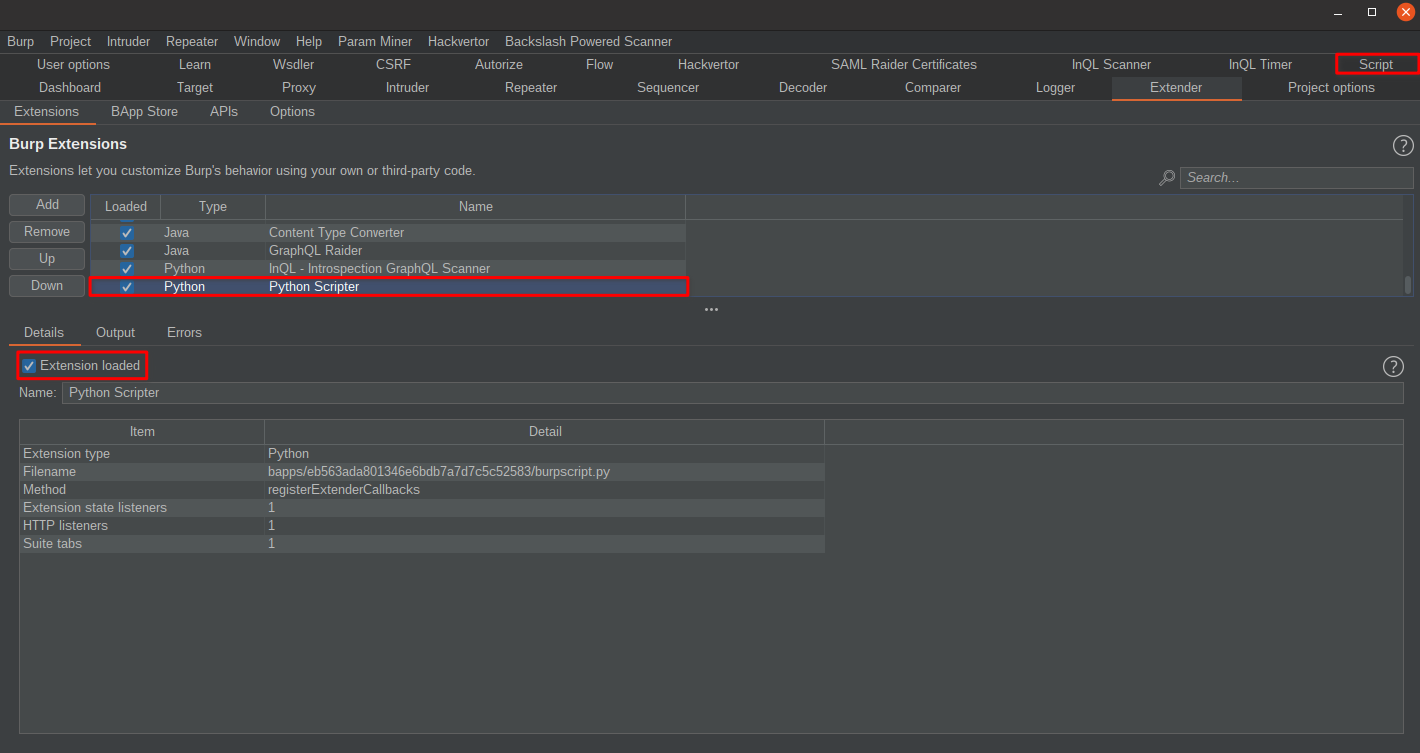
If you want to quickly augment or add functionality to Burp, there are a few ways. One options is to use the Python Scripter Burp extension:
https://portswigger.net/bappstore/eb563ada801346e6bdb7a7d7c5c52583
With the extension added, you will have a new "Script" tab within Burp:
Some info quick fire info for using Python Scripter:
- Where do I write code: Script tab
- Where can I see output: Extender tab > Select Extension > "Output" Tab
- Where can I see errors: Extender tab > Select Extension > "Errors" Tab
OK, with that out of the way, we can start writing some code within the Script tab's text editor - or better, within a nice IDE, and then just pasting it into the Script tab's text editor once done.
Scripting part 1 - Accessing the data within requests
Python Scripter makes use of Burp Suite's Extender API, so getting the request is simple enough: We create an if statement to check "messageIsRequest", convert the request bytes to an object, and then get the message body offset in order to store the request body in a variable as a string:
This is actually the same way you would write the code to process an HTTP message when writing an extension using IHttpListener. That would look like this:
from burp import IBurpExtender, IHttpListener
class BurpExtender(IBurpExtender, IHttpListener):

    def registerExtenderCallbacks(self, callbacks):
        self.helpers = callbacks.getHelpers()
        callbacks.registerHttpListener(self)

    def processHttpMessage(self, toolFlag, messageIsRequest, messageInfo):
        if messageIsRequest:
            req_bytes = messageInfo.getRequest()
            req_obj = self.helpers.analyzeRequest(req_bytes)
            req_body = req_bytes[(req_obj.getBodyOffset()):].tostring()
But within the Python Scripter window we don't need to worry about all that extra stuff, and we can instead just write:
if messageIsRequest:
    req_bytes = messageInfo.getRequest()
    req_obj = helpers.analyzeRequest(req_bytes)
    req_body = req_bytes[(req_obj.getBodyOffset()):].tostring()
Scripting part 2 - Checking if it's a FIX message
Now we have the request body, we can just check if it starts with "8=FIX.4." to validate if its a FIX message. With this established we then want to:
- Update the "BodyLength" field with the accurate length of the message - which should be identical to its existing value, unless it's been modified via an intercept
- Recalculate the message checksum and update the "CheckSum" field - which again, should be identical to its existing value, unless the message was modified during an intercept
- We then want to rebuild the HTTP request with this new request body, and set the current request to the newly generated request.
if messageIsRequest:
    req_bytes = messageInfo.getRequest()
    req_obj = helpers.analyzeRequest(req_bytes)
    req_body = req_bytes[(req_obj.getBodyOffset()):].tostring()

    if req_body.startswith("8=FIX.4."):
        message = req_body
        message = update_field(message,  "9", calculate_length(message))
        message = update_field(message, "10", calculate_chksum(message))

        new_req = helpers.buildHttpMessage(req_obj.getHeaders(), message)
        messageInfo.setRequest(new_req)
OK, we now need to actually create the 3 new functions I've defined:
- update_field()
- calculate_length()
- calculate_chksum()
Scripting part 3 - Creating the update_field() function
So we want to update a single field in the FIX message, and we know a FIX message consists of "key=value" pairs delimited by a SOH character (0x01)...
With this in mind, we can pass the raw message (i.e. the request body as a string), specify which field we want to update (by its numerical representation) and specify the new value we want it to hold.
With the message at hand, the function can split the message into a List using the SOH character. We can then search this List for the "key=value" pair that starts with the field number we want, and then update the right side of the "=" with the new value.
Not pretty, but it gets the job done:
def update_field(raw_message, flag, new_value, SOH="\x01"):
    msg_fields = raw_message.split(SOH)
    for i, field in enumerate(msg_fields):
        if field.startswith(flag + "="):
            msg_fields[i] = flag + "=" + str(new_value)
            break
    new_message = SOH.join(msg_fields)
    return new_message
Now we just need to actually know what new values we need to pass to this function.
Scripting part 4 - Creating the calculate_length() function
So next let's figure out how to calculate the message length. From documentation I found that:
"Message length, in bytes, is verified by counting the number of characters in the message following the BodyLength (9) field up to, and including, the delimiter immediately preceding the CheckSum (10) field. ALWAYS SECOND FIELD IN MESSAGE. (Always unencrypted) For example, for message 8=FIX 4.4^9=5^35=0^10=10^, the BodyLength is 5 for 35=0^" [ref]
Knowing this, the data we want to process is the length of the whole message, excluding the checksum field (at the end) and the first two fields (BeginString and BodyLength).
We can get this data using the Python List slice notation. We will first convert the raw message into a List of fields, and then combining the list back into a string again whilst omitting the first 2 fields (BeginString and BodyLength) and the last field (CheckSum) of the array.
Keep in mind that as the FIX messages always end with an SOH character, using .split() on SOH results in an extra "empty" string element at the end of the List, so we need to use use "msg_fields[2:-2]" instead of "msg_fields[2:-1]" to achieve our goal:
def calculate_length(raw_message, SOH="\x01"):
    msg_fields = raw_message.split(SOH)
    length = len(SOH.join(msg_fields[2:-2]) + SOH)
    return length
Scripting part 5 - Creating the calculate_chksum() function
Lastly we need to recalculate the message checksum. The documentation for how to calculate the checksum states:
"The checksum of a FIX message is calculated by summing every byte of the message up to but not including the checksum field itself. This checksum is then transformed into a modulo 256 number for transmission and comparison. The checksum is calculated after all encryption is completed, i.e. the message as transmitted between parties is processed." [ref]
OK cool, so we can again take the raw message and then calculate the total sum of the decimal values of each character - excluding anything beyond the checksum field itself ("10=").
We then just need to calculate the remainder from dividing the value of the checksum by 256, and then left-pad that value with 0s to ensure it's always 3 characters long:
def calculate_chksum(raw_message):
    checksum = 0
    for c in raw_message[:raw_message.index("10=")]:
        checksum += ord(c)
    checksum = str(checksum % 256).zfill(3)
    return checksum
Though it leaves some things to be desired, that's our little quick-fix script complete! You can find the whole snippet here:
https://github.com/FSecureLABS/FixerUpper/blob/main/misc/QuickFIX.py
Testing our final MitM_Relay + Burp + Python Scripter Setup
OK, with our final script pasted into the Script tab's text editor, it instantly becomes active, and we can test it out by proxying some sweet sweet FIX messages.
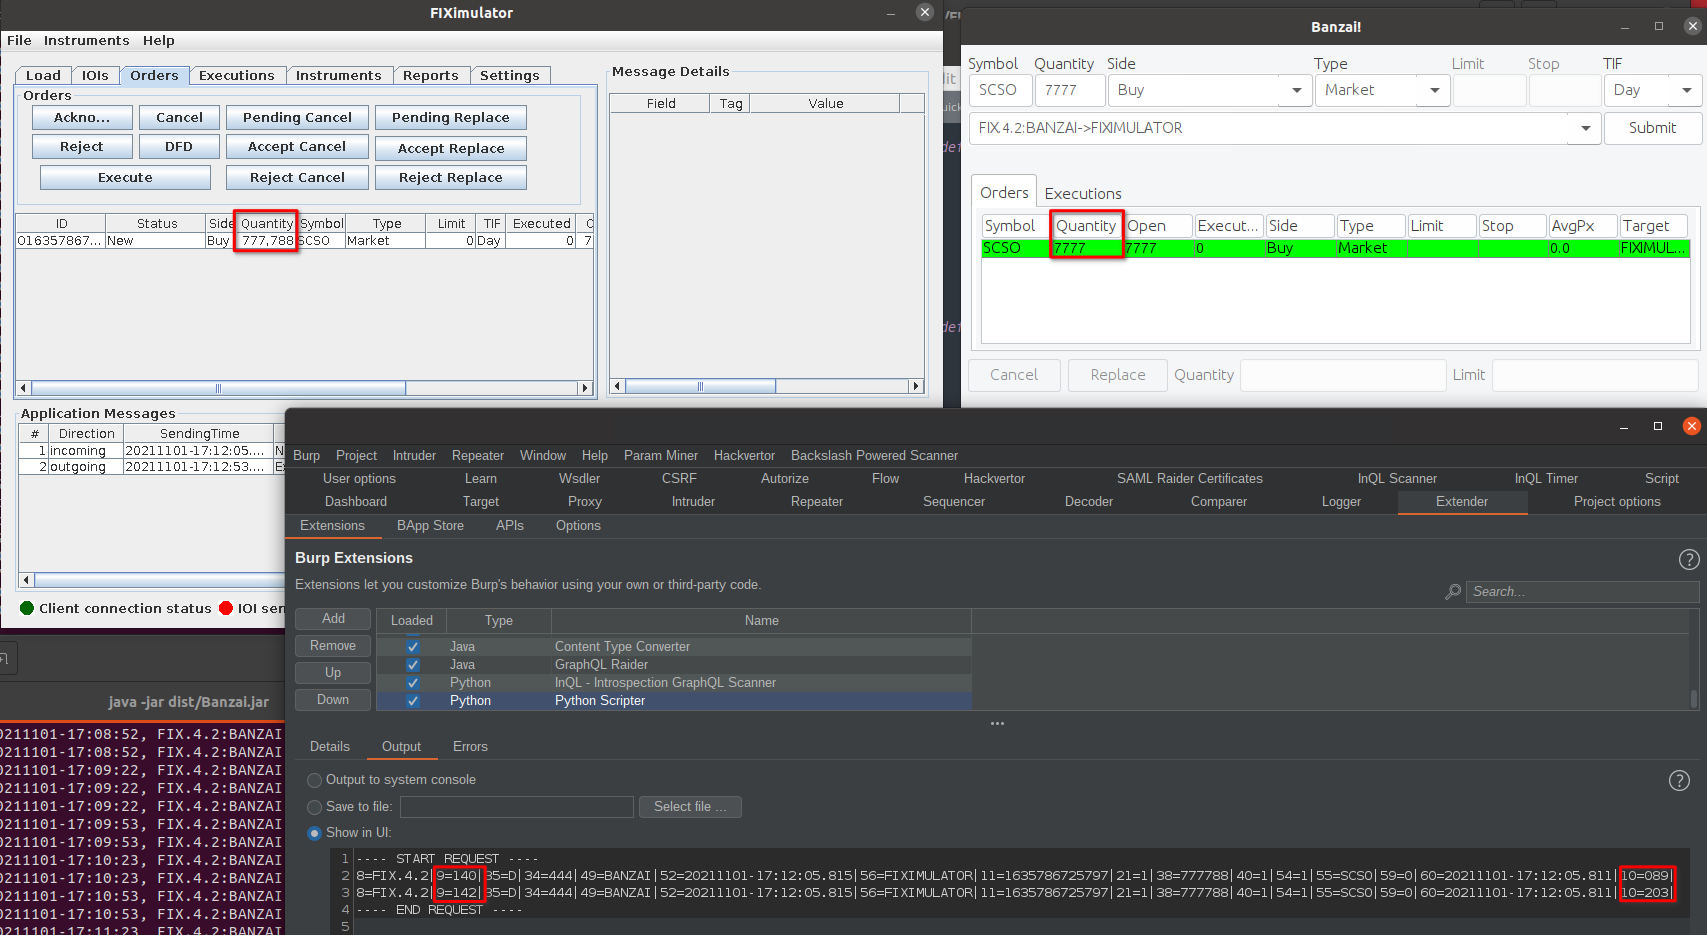
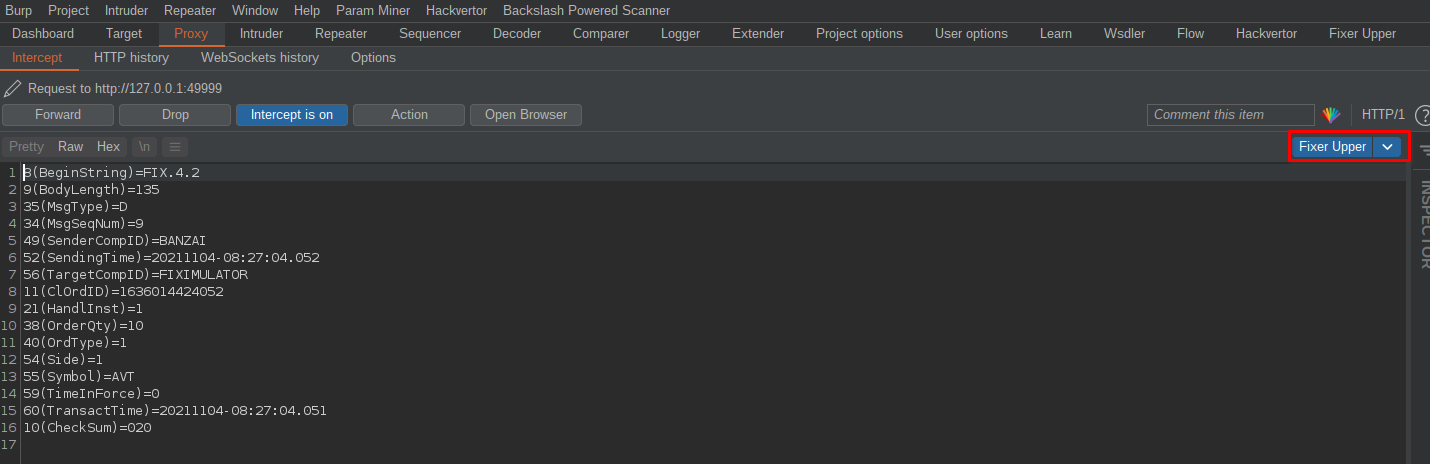
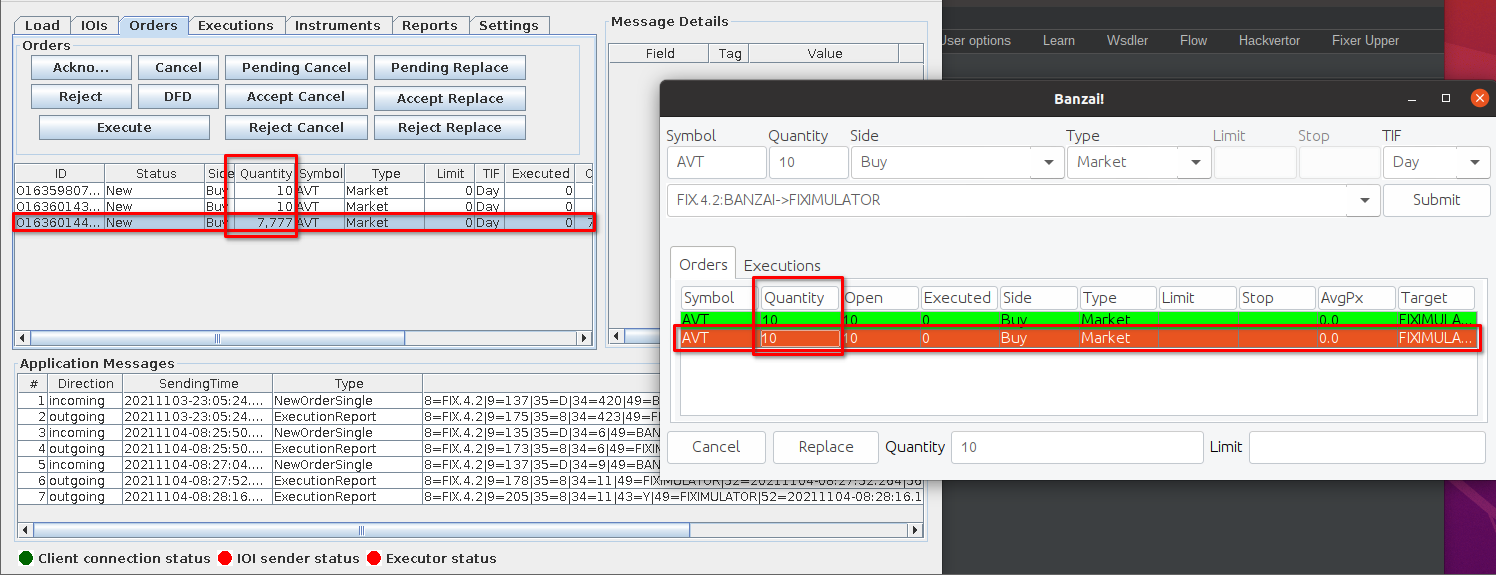
First I'll enable intercept and capture a FIX "ORDER SINGLE" message. Below you can see this message has an order quantity of 7777 (field 38) - I just used this as it was easy to spot. In this image we can also see that the order is showing in the client as 7777 - but nothing is showing on the server just yet (because... intercepted!)
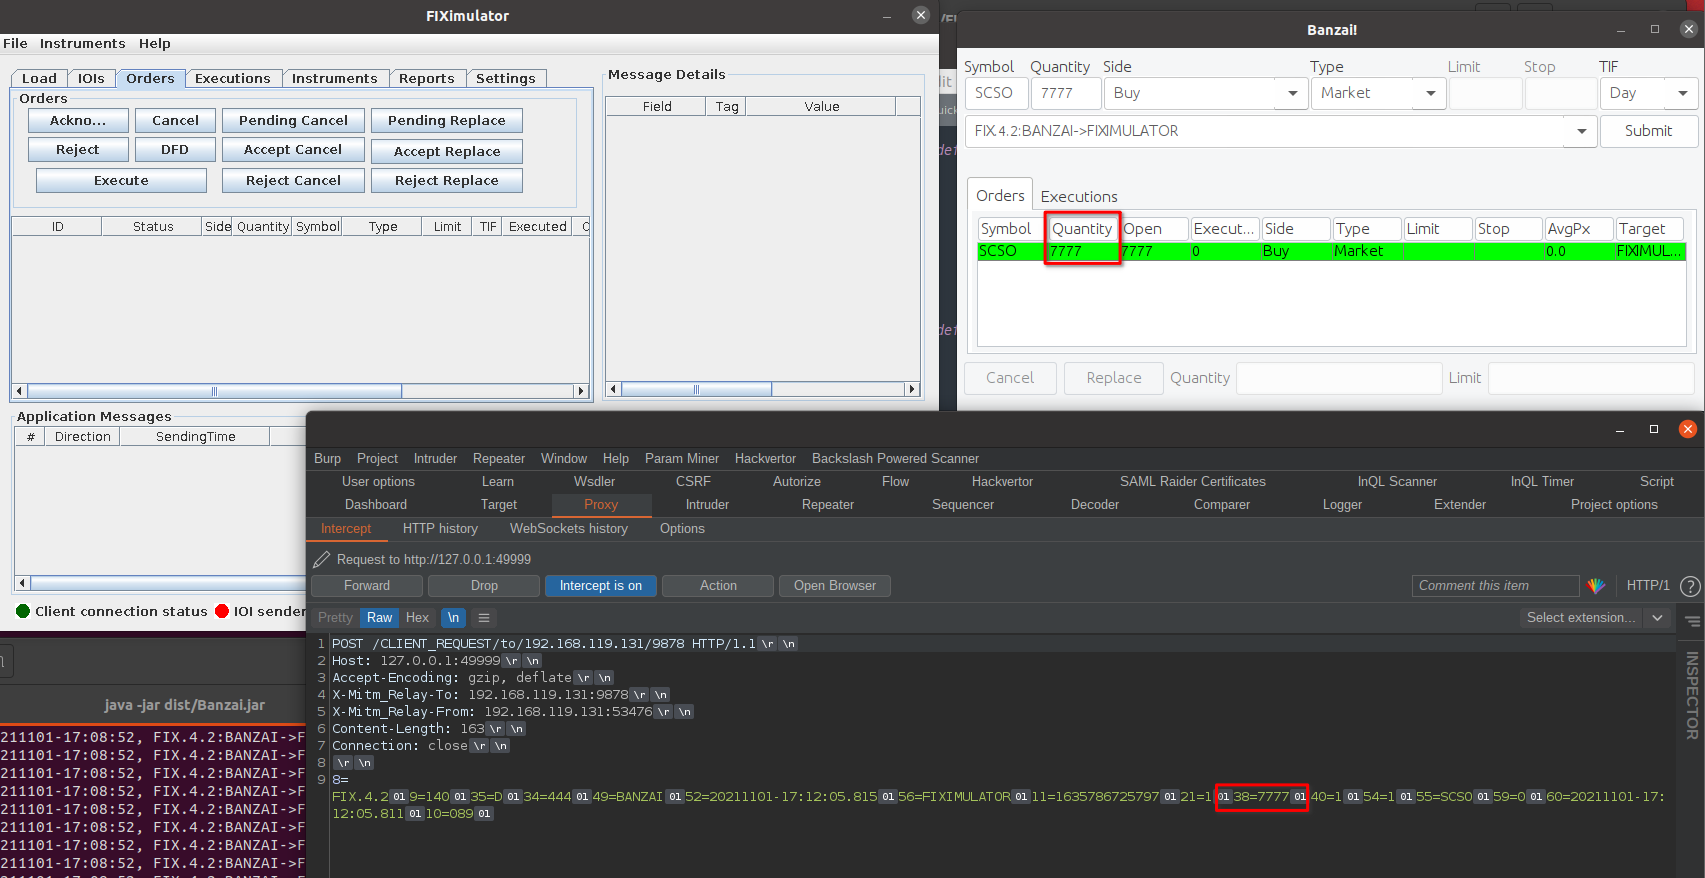
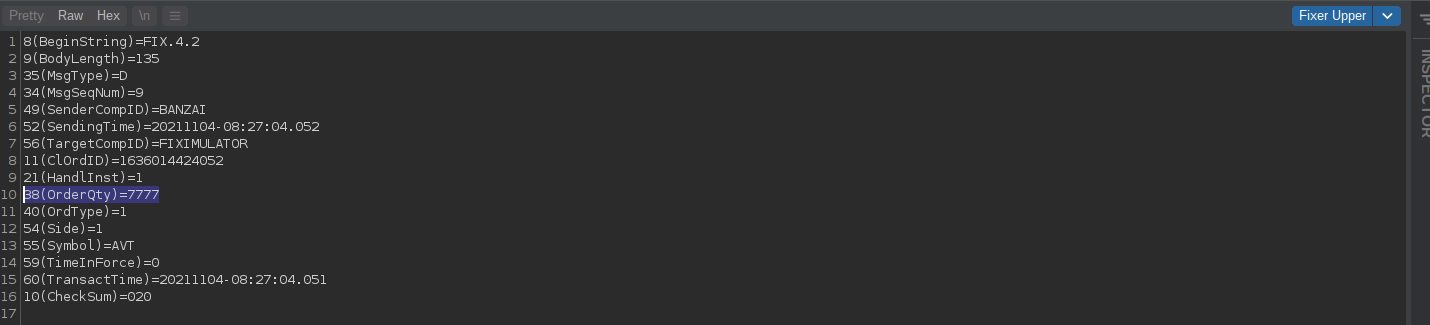
OK, next I'll updated this quantity from 7777 to 777788, to change both it's value and the message length - this will ensure all our functions are working as expected:
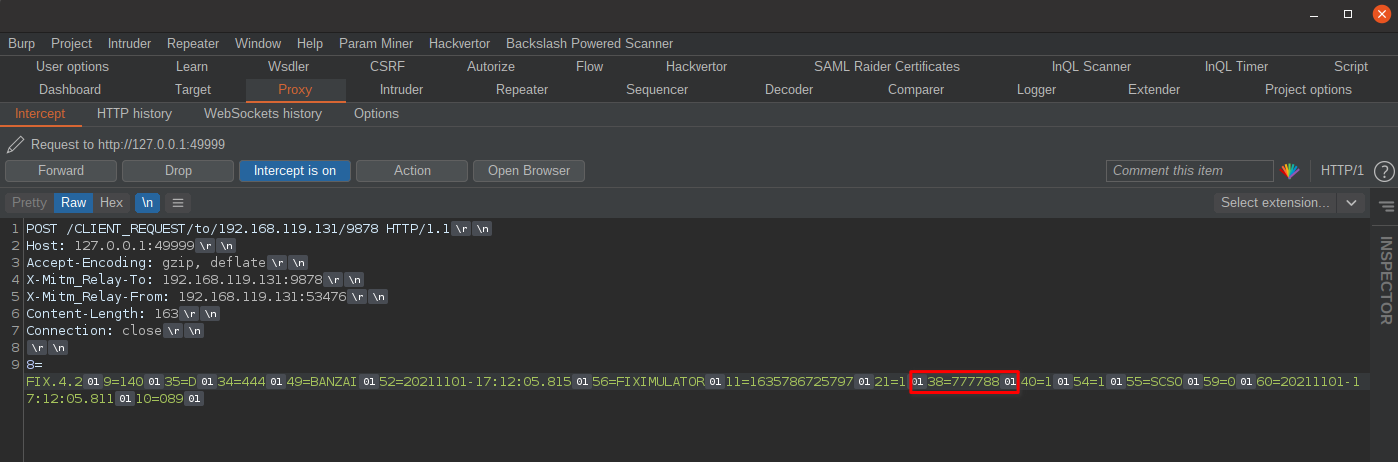
With the message edited, we can forward it on! And once we do this, we can see the order was processed successfully with the updated quantity value. This means our custom code worked and we can now intercept and modify the FIX TCP traffic!
If we open the Extender window and go to Python Scripter Output tab, we can see the script has logged the original message + update message values for context:
Nice!
But yeah... it's a bit of a fixer upper!
So yeah, this was handy and flexible, and shows a great way to quickly solve challenges you may face. However, that FIX message was really hard to read and edit. The fact I used 7777 because it was easy to see visually is a problem. We also needed to show control characters in burp to avoid breaking the format, and also... the code is not all that reliable.
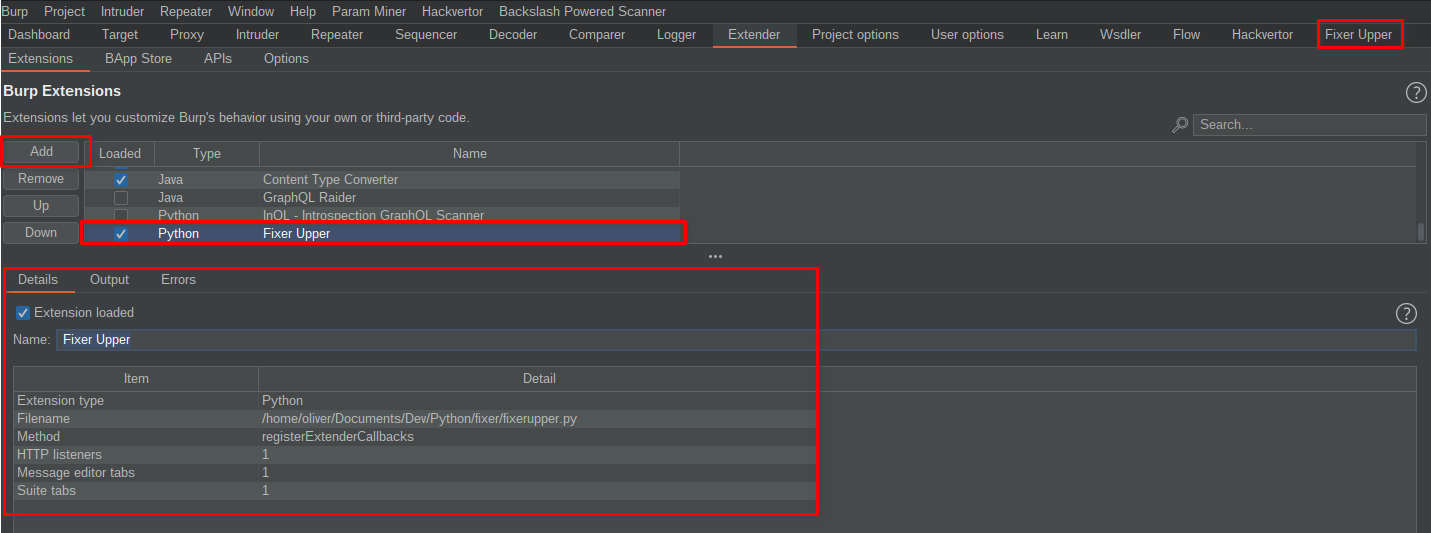
So a few hours of over engineering later, I'd created a more stable and reliable little burp Extension:
Welcome "Fixer Upper" to the world!
You can currently clone the extension from our Git (https://github.com/FSecureLABS/FixerUpper) and manually import Fixer Upper by loading the fixerupper.py file as seen below:
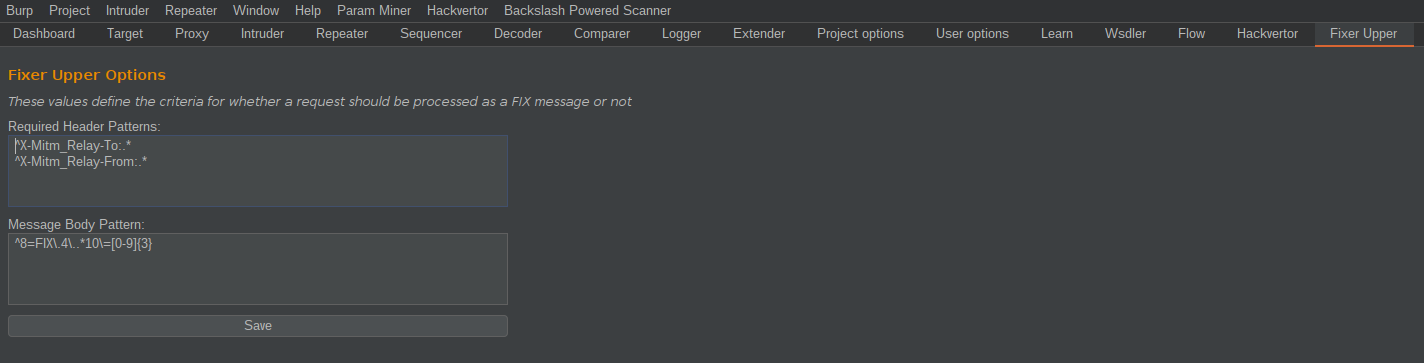
I'd also realized I probably don't want automated code processing every single HTTP request (which I had before). So I added a configuration panel where you can add a list of regular expressions for HTTP headers, and another for the request body. This lets the extension only process requests that match this criteria - FIX messages from MitM_Relay in the example below:
With the extension imported and configured; now when we intercept or view FIX messages, we can use the "Fixer Upper" tab to break it down, resolve the field names, and easily edit values:
If we use the extension to break down the request and modify it, it will subsequently re-structure it back into the correct message format and pass it to the server intact, with its new length field and checksum:
There we go. Now life is just that little bit easier!
Conclusion
Intercepting traffic from TCP-based clients is not always a pleasant experience, but hopefully this blog post and the Fixer Upper extension can make things a bit easier.
It's not perfect, as the name suggests. There are some limitations for sure. In that you need to relay the TCP traffic to Burp using MitM_Relay.py before you can actually use it, but hopefully the configuration feature will help make it be a bit more flexible to other circumstances. There are also some issues when considering repeater, as the FIX heartbeat messages increment the sequence number in the background, which is not updated in replayed request automatically.
If you think it’s lacking or could be improved, feel free to contribute to it and help keep it alive!
References
youtube.com - Anatomy of the FIX Protocol (Darwinex)
https://www.youtube.com/watch?v=wSgAwJyev2Y&list=PLv-cA-4O3y95np0YK9NrKqNKLsORaSjBc&index=2
knoldus.com - FIX Architecture and Message Structure
https://blog.knoldus.com/fix-protocol-architecture-and-message-structure/
fixsim.com - FIXSIM
https://www.fixsim.com/
github.com - fixer (SECFORCE)
https://github.com/SECFORCE/fixer
github.com - Fizzer (AonCyberLabs)
https://github.com/AonCyberLabs/Fizzer
giac.org - Exploiting Financial Information Exchange FIX Protocol
https://www.giac.org/paper/gcih/20359/exploiting-financial-information-exchange-fix-protocol/126181
fixtrading.org - Fix Security Whitepaper v1.9
https://www.fixtrading.org/packages/fix-security-white-paper-v1-9/
fiximulator.org - FIXimulator & Banzai
http://fiximulator.org/
github.com - MitM_Relay.py
https://github.com/jrmdev/mitm_relay
Burp Suite - Python Scripter
https://portswigger.net/bappstore/eb563ada801346e6bdb7a7d7c5c52583
b2bits.com - FIX BodyLength
https://btobits.com/fixopaedia/fixdic44/tag_9_BodyLength_.html
onixs.biz - FIX CheckSum Calculation
https://www.onixs.biz/fix-dictionary/4.2/app_b.html